
This is a recipe that I first saw on another blog (kevinandamanda.com) and knew I just HAD to try! The original recipe called for a lot more cheese and enchilada sauce than I knew my family would like… plus, there was no wine in the recipe. I just *had* to re-work it into something that would work for me and my wine-inspired blog. Thankfully, it was a huge hit and has already been made numerous times to great positive acclaim.
What I love most about this recipe is that it truly is incredibly easy. I’d always been a bit intimidated by enchiladas for some reason, but not any more when I use this recipe. Much of this meal was done by simply assembling the ingredients, but first, I had to make some rice.
I used James River Cellars Gewurztraminer wine but could have easily used another favorite wine (Chardonnel, Vidal Blanc, or even Chardonay) to make the rice for this dish. I used 1 cup of wine, 1 cup of water, and 1 cup of Arborio rice. I simmered the rice until the liquid was absorbed and the rice was fluffy. I did add some parsley, salt and pepper, but feel free to add whatever flavors you like in your rice. Just remember that the rice is a fairly tame part of this assembly line, so don’t go too crazy with the seasonings.
I also decided to use a pre-roasted chicken in this recipe. I pulled off both chicken breasts and diced the meat small enough to layer in the enchiladas.
Overall, your ingredients are as follows: tortillas, hummus, rice, chicken, cheese, and enchilada sauce. As with all my recipes, please feel free to personalize things to your family’s tastes. Red Pepper Hummus instead of a Garlic Hummus, Mexican cheese in place of Cheddar, Whole Wheat Tortillas as opposed to bulk purchased tortillas or even homemade tortillas. . . it’s all about making a meal that will make you and your family happy.
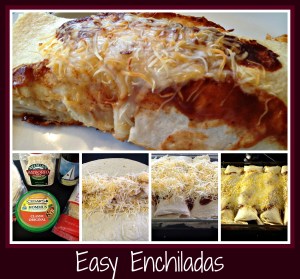
Assembling your enchiladas. . . here’s where the fun starts! Place the tortilla on a cutting board and begin the layering with hummus, a layer of rice (mine is fairly sticky and soft), some chicken, and a sprinkle of cheese. You can see an example in the second photo from the left… I throw on a fair amount of cheese, but do whatever will make you happy. I made all the enchiladas, laying them in the baking dish, then poured some enchilada sauce over top and finished by sprinkling on more cheese. Note: I loved the Cheesy Enchilada recipe that inspired this alteration but know that my guys would have balked if I had followed her recipe exactly. . . hence the need for an “Easy Enchilada” recipe of my own.
Once your enchiladas are assembled and ready, you can wait a bit to bake them if you must. I had a hard time not popping them directly into the oven (I was already hungry by this point) but I was “good” and waited until my darling hubby and son got home from work. Once they arrived, I popped the baking dish into a 350 degree oven for 30-40 minutes, until the cheese was melty, I could hear sizzling, and there was visible steam rising from the enchiladas. Seriously. . . I don’t usually use “exact times”, so use your best guess on cooking time, based on your own oven.
As you can see by the large photo of an enchilada, above, these things were really filling. I thought everyone would end up eating two enchiladas each, but we could barely make it through one. If you’re making this for a crowd, feel free to expect football players to eat two, but the average person will probably only make it through one. They are aa-maze-ing!
Hope you find this recipe to be as amazing as we did. . . and, as always, be sure to alter the ingredients to make your own “family favorite”!


