White Butterscotch Wine Bars

I was reading a blog this morning and saw a recipe I wanted to try. It’s one from Mix and Match Mama that she called Butterscotch Beer Bars. I didn’t have any beer open in the house, but I *did* have some Boordy Vineyards Rockfish, a lovely dry white wine that’s made with a blend of Pinot Gris, Albariño, and Seyval Blanc… would that work in this recipe? I decided it was worth trying and began pulling things together.
NOTE: These directions are originally written by Mix and Match Mama but I included my own adjustments and/or changes along the way. I’m sure I’ll be trying her original recipe with Samuel Adams’ Boston Lager soon!

My mise en place, ready to experiment with a recipe using wine

INGREDIENTS:

  • 1 cup butter
  • 3/4 cup butterscotch chips
  • 4 eggs
  • 2 cups sugar
  • 2 cups flour
  • pinch salt
  • 1/2 cup + 1 T dry white wine (save 1T for frosting)
  • 1 8oz package of softened cream cheese
  • 2 cups powdered sugar (I used 2 1/4 cups)

INSTRUCTIONS:

  • Preheat oven to 350*
  • Grease a 9×13 baking dish – I lined a 9×13 pan with nonstick foil instead, so I’d be able to more easily transfer the bars out of the pan for frosting later.
  • In a microwaveable bowl, melt butter and butterscotch chips together, stopping to stir every 30 seconds. Once melted, set aside to cool slightly.
  • In a mixing bowl, beat eggs with sugar. Once these are well-incorporated, beat in your melted butter/butterscotch mixture and beat well.
  • Add salt to the flour and slowly add into your batter, beating well.
  • Mix in your 1/2 cup wine (I put my mixer on low speed and drizzled it into the batter) just until it’s incorporated.
  • Pour mixture into your prepared baking dish and bake 25-35 minutes or until a toothpick inserted into the middle comes out clean. Note: Mine took closer to 35 minutes but the original recipe called for 25-30 min.
  • Remove pan from oven and allow to cool completely before frosting.
  • To make frosting, beat soften cream cheese with powdered sugar and 1T wine with an electric mixer. I needed to add the extra 1/4 cup of powdered sugar so it wasn’t too thin. Mix and Match Mama says you can substitute milk for the alcohol if you prefer.
  • Frost your bars, cut and serve. NOTE: I cut mine into smaller squares and was able to get 32 individual servings (or 16 double-piece servings).
  • Store these in the fridge or freezer.
Adding some Boordy Vineyards Rockfish to the frosting
A lovely little treat… with wine.

My thoughts? I really liked the taste of this bar. It’s dense enough to be called a bar, but lends itself closer to a cake than a cookie. I will need to try this recipe as it’s intended (with beer) but I thought this version was a fun way to use up some of the wine that I find in my fridge from time to time. The recipe didn’t take long to make and came together easily.

I would highly recommend using non-stick foil. It was very easy to remove from the pan, frost, and then place the entire recipe on a baking sheet to pop in the freezer. Once frozen, I will be able to transfer these treats into baggies for gifting later.

Enjoy!

Shrimp in Lemon Butter

Shrimp in Lemon Butter

This recipe is a favorite of my husband and one that I love to make during the week. It’s a simple meal to pull together and doesn’t take a lot of complicated ingredients.

Ingredients:
Raw Shrimp (I use Jumbo Shrimp)
3-4T Butter
2T Garlic Confit (or 3T crushed garlic cloves + 1T olive oil)
Juice of 1/2 lemon (reserve zest)
2T Parmesan
1/4 C White Wine (Use something you love to drink)
Splash of Half & Half
Pinch of sugar (if desired)
Salt, pepper, and parsley to taste
Brown Rice (or pasta)

Sauvignon Blanc by Boordy Vineyards

COOK YOUR SHRIMP:
Cook your shrimp, however you’d like. I shell my shrimp first, then bake shrimp on a piece of parchment on a baking sheet in a 400* oven until done.
NOTE: My husband likes his shrimp cooked longer than me, so I start cooking his shrimp in a 400* oven for about 15 minutes before adding mine to the baking sheet.

My husband’s shrimp on the bottom of the pic, mine on the top.

COOK YOUR SAUCE:
In a sauté pan, melt butter with garlic confit and lemon juice. Sprinkle with Parmesan and stir to combine. Add in the wine and half & half, then simmer until sauce thickens slightly, stirring frequently. Taste and add seasonings as desired.
NOTE: If sauce gets thick, add a little liquid (wine, water, stock, or pasta water) to thin.

Stirring to incorporate the butter into the sauce is key.

MAKE RICE (OR PASTA):
I use microwaveable brown rice. If you prefer to serve this meal on pasta, make your pasta so it’s ready to be plated when your shrimp are done.

ASSEMBLE DINNER:
You can either fold shrimp into the sauce (I do this with my husband’s shrimp) or place shrimp on rice and spoon sauce over top.

My husband’s shrimp, tossed with the sauce.
My shrimp, with sauce spooned over top.

ENJOY!

Chicken Divan Casserole

I have very fond memories of my mom making Chicken Divan casserole throughout my childhood. The recipe she used was based on one from Aunt Treva, my grandfather’s sister, and had lots of “cream of” soups included to make the sauce. It was always yummy, but I decided that I wanted to create a healthier version.

When searching for a similar recipe as the one from my childhood, I found a fabulous one created by Natasha Bull of http://www.saltandlavendar.com. Her original recipe can be found here: https://www.saltandlavender.com/chicken-divan/ but I needed to adjust the flavors to match what I was trying to recreate. If you’re looking for a cheesy, creamy chicken and broccoli casserole, look no further… this one is terrific.

For me, simply adding curry powder to the recipe above wasn’t quite what I wanted, so I played around with it until I created something that made sense for me. I also trimmed everything down to make an easy meal for two + 1 leftover serving. This recipe will make 3 servings in a 9×9 baking dish.

INGREDIENTS:

  • Broccoli florets – I used a small bag from the local store
  • Chicken Breast – I shredded two breasts from a rotisserie chicken but you can also use leftover chicken or even turkey
  • 2 T butter
  • 2 T flour
  • 3/4 c almond milk – you can use a mixture of almond milk and half & half if you prefer
  • 2 T whipped cream cheese
  • 1 tsp Dijon mustard
  • 1 tsp Worcestershire sauce
  • 1 tsp white wine – use what you have available/open but I also use this wine to thin the sauce before adding the cheese
  • 1 tsp curry powder
  • 1/4 tsp onion powder
  • 1/4 tsp garlic powder
  • 1 cup grated cheddar cheese – separate in half
  • 1/4 cup grated Parmesan
  • 10 Ritz crackers (approximate)

DIRECTIONS:

Preheat your oven to 375*F.

Prepare your broccoli for the casserole. After trimming down the broccoli into bite-size pieces, put all the florets in the bottom of the 9×9 baking dish. Lay a piece of paper towel over the broccoli and lightly dampen it with some white wine. Microwave the broccoli on HIGH for 2-3 minutes or until the broccoli is lightly cooked and still crisp. NOTE: if you’re using a metal dish, you can microwave the broccoli in the original bag and layer the cooked broccoli onto the bottom of the baking dish.

Layer your shredded chicken on top of the broccoli.

Make your sauce. Start by melting the butter in a sauce pan. Add the flour and whisk until combined and the mixture starts to bubble. Let the butter/flour mixture cook until it begins to get slightly toasty. Slowly add your milk and whisk to combine, then cook this mixture until it begins to thicken. Add the cream cheese (I like the whipped version b/c it’s light and combines fairly easily – if you use a block of cream cheese, I would decrease to 1T), whisking to combine. Add in your spices (mustard, Worcestershire, wine, curry powder, onion powder, garlic powder) and taste the sauce, adjusting as needed. Add salt and pepper if desired. NOTE: if sauce is too thick, add a splash of wine or almond milk. I have been known to add 1/4c-1/2 cup of wine to thin the sauce. Be aware that the sauce will thicken when you add the cheese. Remove the sauce from stove top and stir in 1/2 cup cheddar cheese.

Pour sauce over the chicken/broccoli mixture in your baking dish. Top with remaining cheddar cheese and Parmesan cheese then crush Ritz crackers over the entire casserole.

Bake casserole, uncovered, for 30-35 minutes. Cheese should be melted, crackers should be browned, and the sauce should be bubbling. Let casserole sit for 5 minutes before portioning out and serving.

Tuscan-style sauce

Oh, my goodness…. this sauce is so delicious! A friend recently mentioned a crock pot dinner that she’d made that sounded good, but I didn’t want to use my crock pot. I got the basics of the recipe from her, looked at a few other recipes, and went to “work”.

INGREDIENTS:

  • 2 TBSP butter
  • 1/3 cup half & half (fat-free is fine)
  • 2-3 forks of julienned sun dried tomatoes *I like to add a spoonful of the oil to this sauce as well
  • 2 handfuls of spinach
  • 1 TBSP Parmesan
  • 1 wedge Laughing Cow light cheese
  • 1-2 T white wine (I used Boordy Vineyards Vidal Blanc)
  • Salt and pepper to taste
  • Pasta water, as needed/if available, to thin or extend sauce

DIRECTIONS:

  • In a heavy sauce pan, simmer butter with half & half until butter melts.
  • Add sun dried tomato and fresh spinach, stir and allow spinach time to wilt.
  • Add Parmesan and Laughing Cow, stir to combine and allow the flavors to meld.
  • Add wine, salt & pepper, then taste sauce, adjusting flavors as needed. Add pasta water, if needed.

I typically spoon this sauce over baked chicken, pasta, and broccoli, as seen in the photo. I’ve also served this sauce over shrimp. It’s a delicious addition to enhance that plain chicken and vegetable dinner. It doesn’t take long to make this sauce and makes for a beautiful dinner plate!

Landscaper Muffins AKA “Thank You Muffins”

I call these “Thank You Muffins” because I make them to thank anyone who comes to my house – our landscapers, the mulch guys, the electrician, the plumber, the septic guys, and sometimes even our UPS guy! It’s my personal way of letting them all know how much I appreciate the work these people do to make my life easier… and doesn’t everyone like to know they are appreciated?

I’ve been sharing this recipe for years… and I don’t think I’ll be stopping anytime soon. I love having a recipe in my arsenal that uses a short list of ingredients, comes together quickly, and is (in my opinion) fool-proof… this recipe hits every one of those criteria!

Chocolate Thank You Muffins

INGREDIENTS:

  • 1 box cake mix – I used chocolate cake, but you can use any flavor or brand you like best. Sale brands are great to keep on hand for this recipe.
  • 1 can solid pack pumpkin – I typically buy 10 cans at a time, simply so I am always able to whip up a batch of muffins whenever needed
  • A small handful of Mini chocolate chips – off-brands are fine to use – they play a supporting role in this recipe.
  • A small amount of wine – I use red wine with chocolate, carrot cake, or spice cake muffins…. white wine with yellow cake, or anywhere I don’t want that pink hue to show. This is a great way to use up any “leftover wine”.

DIRECTIONS:

  • Preheat your oven to 375*F
  • Cover two large cookie trays with parchment paper.
  • Put your ingredients into a large mixing bowl and stir until thoroughly combined. If using a carrot cake recipe, feel free to let the mixture rest a little to allow the dehydrated carrots to plump a bit… it’s not necessary, but can help as you’re doling the mixture onto trays.
  • Scoop mixture onto cookie trays using a small cookie scoop. NOTE: I use the smallest cookie scoop from Pampered Chef, but will occasionally use the medium sized cookie scoop. The only difference will be in your cooking time and the number of muffin balls you can make. If I use the smallest scoop, I can make approximately 25 muffin balls/tray. Using the medium scoop only allows me to make approximately 18 muffin balls/tray.
  • Bake muffins in preheated 375* oven for 15-18 minutes (18-22 min for medium muffins).
  • Remove and allow to cool – I pull the muffins/parchment off the tray so the bottoms of the muffins don’t continue to cook.

Here are some photos of the process:

A “large” example of a “handful” of chips.
The dry red wine I used for these muffins: @BoordyVineyards South Mountain Red
Scooping the muffin mixture onto a prepared tray, using the small scoop
Two trays of Thank You muffins go into the oven

Another alternative is to make this recipe into full-sized muffins, using a muffin tin, or even baking it in a 9×13 baking pan and cutting into pieces. The recipe itself is incredibly adaptable, but your baking times will need to be adjusted. I love having bites of cake to share with people, so this is my personal preference.

I hope you find this recipe helpful. I have written it down a few different times and have made many different versions, all of which have been delicious. Feel free to message me here, or on my FromTheBottomOfAWineBottle Facebook page, if you have any questions!

Thank You Muffins

It’s been ages since I last posted a recipe or a food pic here. I’ve been sharing things on my Instagram account (@AliSportShots), but sitting down to formally type out something has taken a back seat. I’ve posted *sooo* many recipes here (over 175, by last count) and I like to be able to share something totally new, if possible…. however, I realized that I’ve been mentioning “Thank You Muffins” on multiple platforms and have never written this recipe for others to use, so I’m fixing that now.

Here’s my very favorite recipe… the one that I make at least once a week… the one I use anytime I need to express my appreciation for someone… the one that I’ve made SO many times throughout the past year that it’s become a “thing” in our house. This is my recipe for Thank You Muffins.

The ingredients list is fairly simple and incredibly flexible:

  • 1 box cake mix (any flavor)
  • 1 can solid pack pumpkin
  • Add-ins (chocolate chips, coconut, nuts, seeds, etc. – a palm-full)
  • Wine (just a few splashes, to thin out the batter a touch)

Directions:

  • Preheat your oven to 375*. Place a large piece of parchment paper (or use a silpat) on two large baking sheets
  • In a large bowl, empty the cake mix, add the pumpkin, include whatever add-ins you’d like, then splash in some wine. Mix thoroughly.
  • Using a small cookie scoop (I have all three sizes from Pampered Chef and prefer using the smallest for these muffins), place small scoops of batter on the prepared baking sheets. I’ve been able to get as many as 42 mini-muffins from a batch but it varies.
  • Bake at 375* for 12-14 minutes, until the muffins spring back if touched on the top. Remove and allow to cool on the paper (I lift the paper off the baking sheet so the bottoms of the muffins don’t continue to cook). NOTE: if you’re making these as full-size muffins, in a muffin tin, you’ll want to cook them at 400* for 15-17 minutes.
  • Once muffins are cool, you can freeze them for later use. I typically get two plates of muffins (or two weeks of muffins for my landscapers) from each batch.

I have used every flavor of cake mix for this recipe and tend to try and pair the flavor of the wine with the flavor of the cake mix. I’ve used chocolate cake mix with red wines, spice cake with red (or white) wines, yellow cake with white wine, carrot cake with rose’ (or most anything)… I’ve even used a sweet red (or a little sparkling wine) with a strawberry cake mix. Each one has come out well and has conveyed the right message…. “thank you”.

I must confess that the origin of this recipe is from about ten years ago, at a Weight Watchers meeting. It started as a two-ingredient sweet… cake mix and a can of pumpkin… no eggs, no oil, no complications… but I couldn’t leave it alone. I liked the idea of making full-size muffins from this recipe, which you can do easily, but I am a big fan of “bite-size” treats. After monkeying around with the recipe, I came up with the one you see above. My boys loved when I would make this recipe for their friends… especially since the main ingredient was solid-pack pumpkin… and I was happy to make it because I felt good about serving something relatively healthy to people.

Try this and see what you and your family think… I hope you enjoy it as much as me!

Mimi’s Peas

You’ve had the traditional “Green Bean Casserole“, right?  It’s the one on the back of the Campbell’s soup can…. the one that has been around forever… the one that everyone makes for holiday meals.  What would you think if I told you that we make this same casserole with PEAS instead of green beans?  THIS is a game-changer, people.  It’s absolutely amazing and is a staple on almost every holiday menu (or at least Thanksgiving, Christmas, and Easter) in our family.

mimispeas

Ingredients:

  • Frozen Peas (1- 1 1/2 16oz bags)
  • 1 can sliced water chestnuts, chopped
  • 1 can French’s Onion Rings (reserve 1/2-3/4 cup for topping)
  • 1 can Cream of Mushroom soup
  • 1/4 cup white wine (I like a dry or semi-dry wine)
  • 1 packet G. Washington Brown boullion *Trust me, this stuff is worth finding.  LOVE it and use it in so many ways!

Directions:

  1. Mix everything together, topping with the reserved Onion Rings.
  2. Bake in greased casserole dish at 375 degrees for 30-45 minutes, until bubbly.

This is our family’s “must have” recipe on any holiday table.  It also works well when mixing with turkey, stuffing, and gravy (and topped with mashed potatoes) to make a leftover turkey shepherd’s pie.

Give it a try sometime… you may find that you like this even better than the standard recipe!

White Apple Tart

This Thanksgiving, I’ll be making a few additions to my traditional menu.  We’ll be spending Thanksgiving Day with relatives (instead of just having our family of four) and I’ve been tasked with bringing the apple pies.  Since I get bored making multiples of the same recipe, I’ve decided to make a lovely apple tart as one of my offerings.  I had to try out the recipe before the big day, so here’s the recipe that I’ll be making for our Thanksgiving day meal with the cousins… my White Apple Tart.

I found a great recipe for “Sweet Pastry Dough” as well as one for a “Rustic Apple Tart” from Perfect Little Desserts by Nick Malgieri and David Joachim. This cookbook is absolutely mouthwatering and worth purchasing if you’re looking for a dessert cookbook.  Because I always use wine in my recipes, this is where I began when I made both the pastry dough and the tart itself.

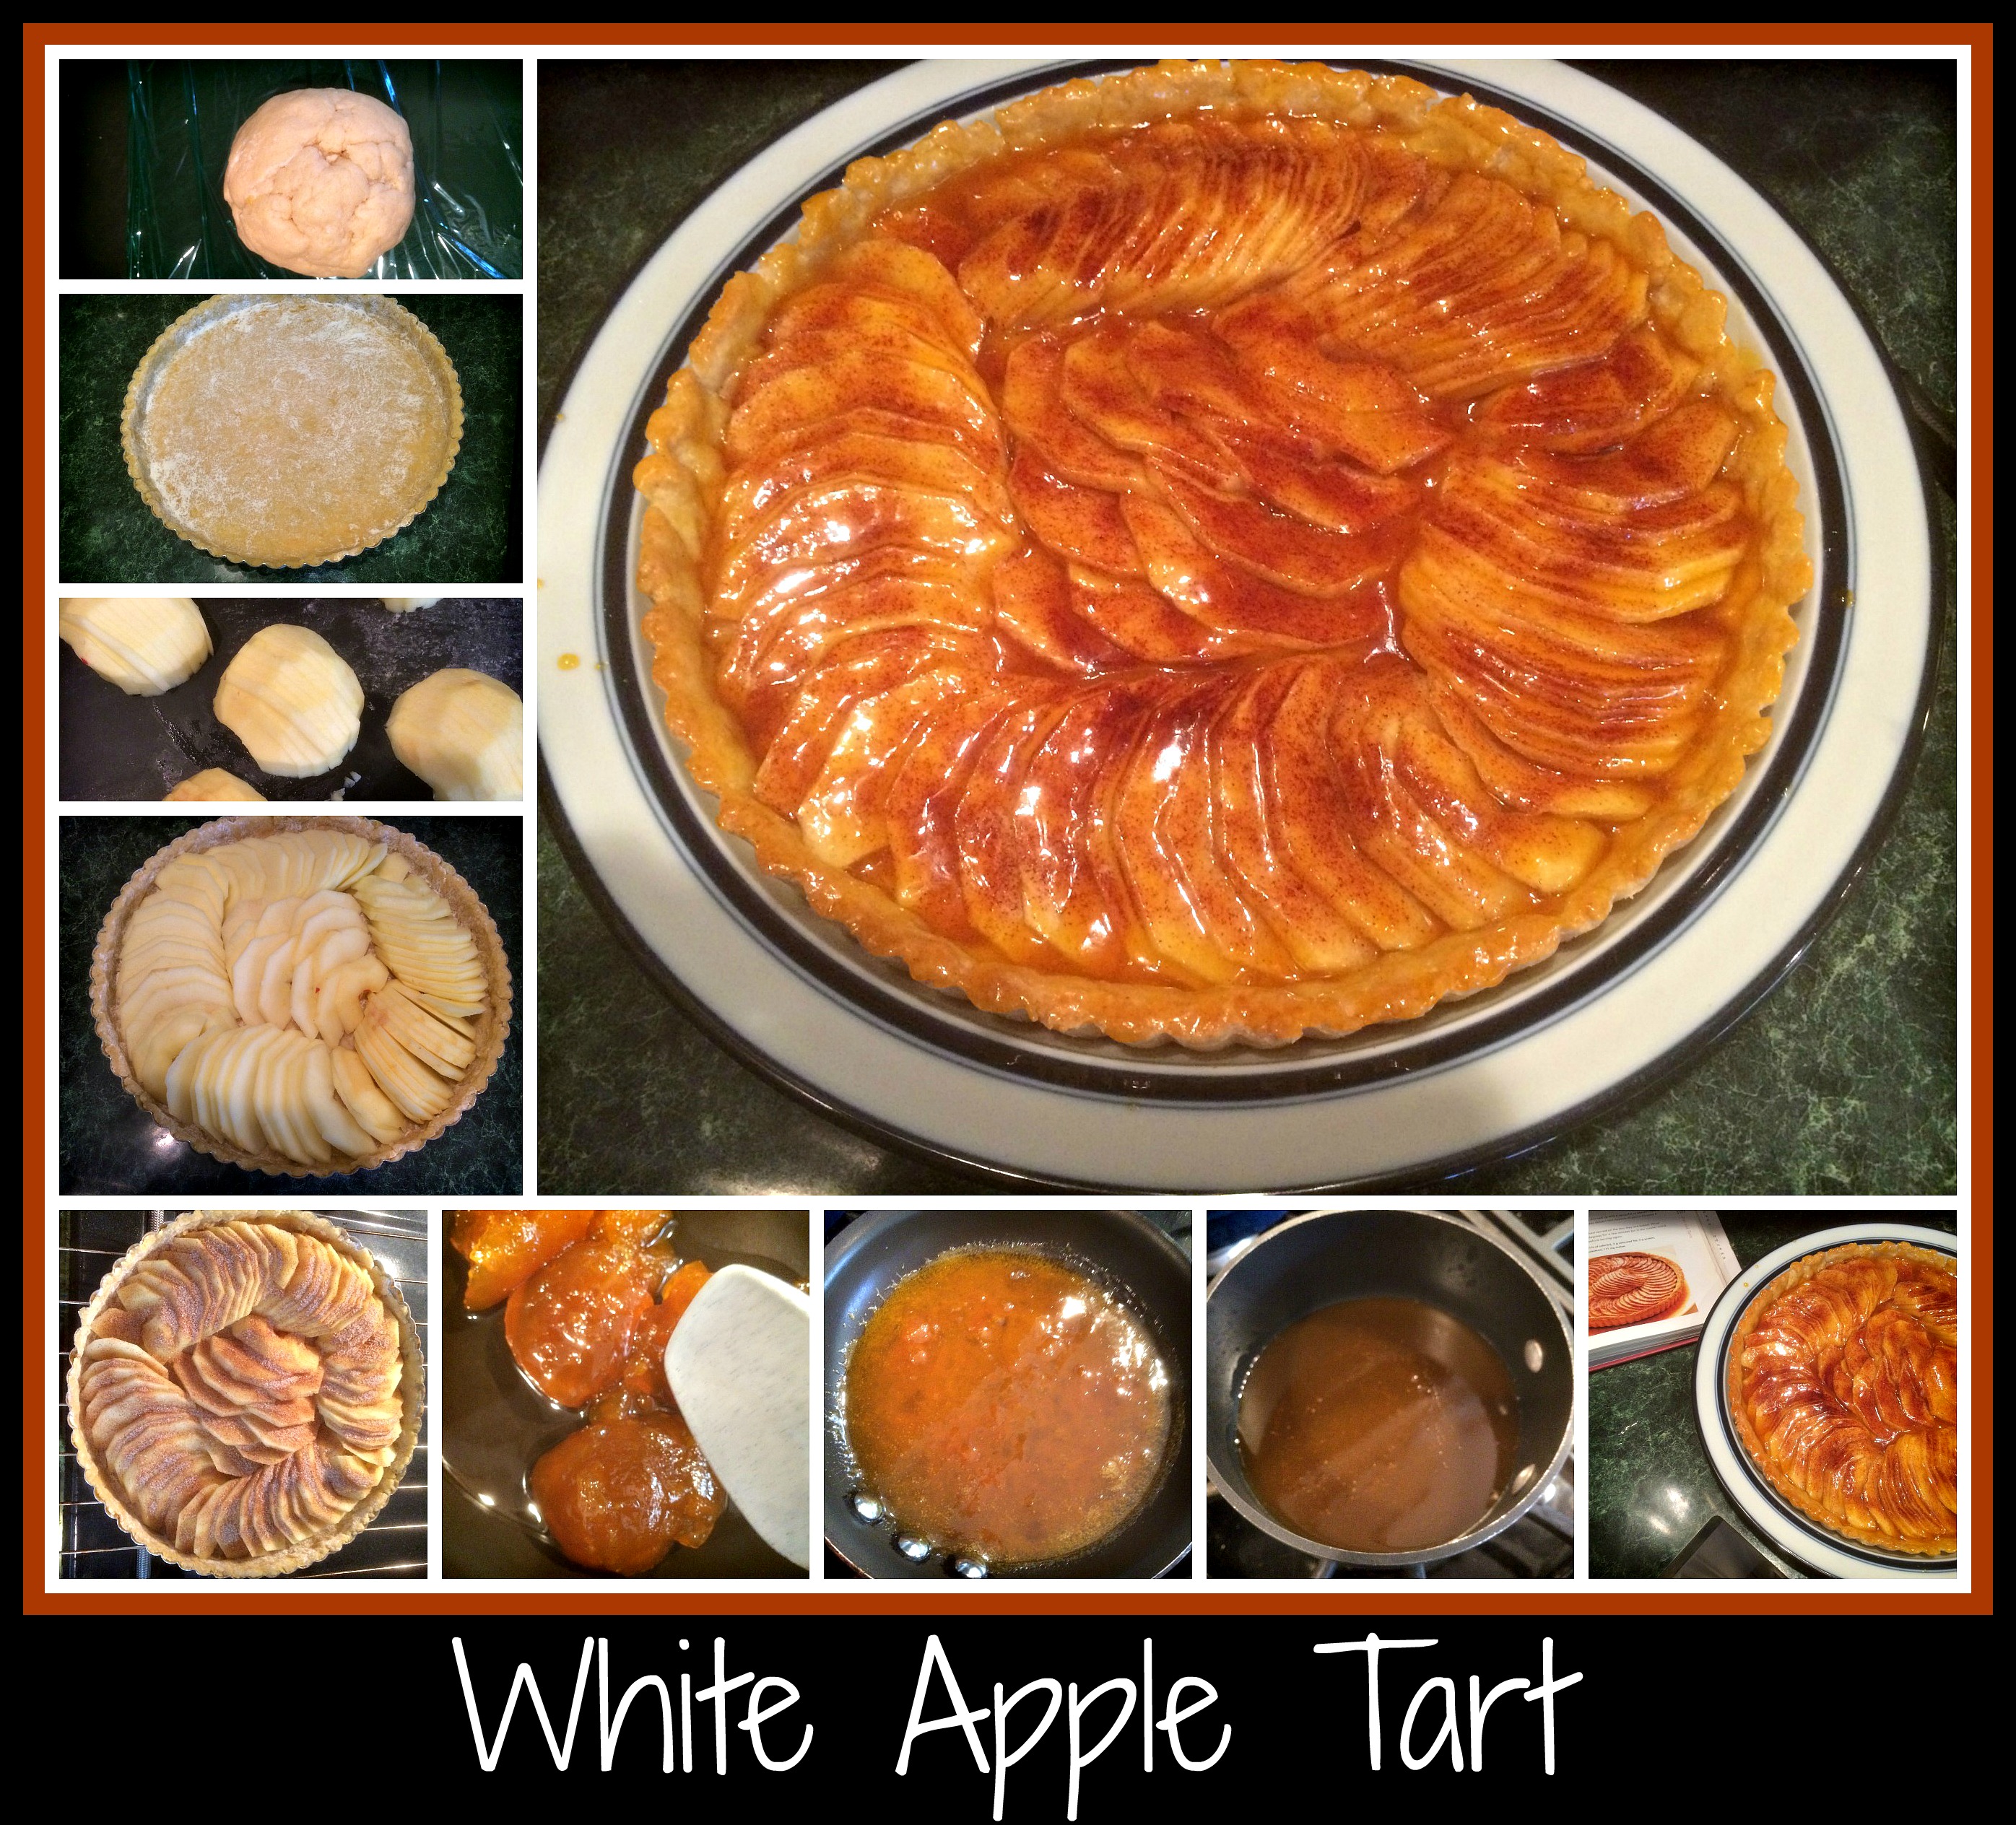
I started with the Pastry Dough.  I put 1 cup of flour, 3T sugar, 1/2 t baking powder, and 1/4 t salt into my food processor and I blended the dry ingredients.  I pulsed in 3T butter until the dough looked like wet sand.  I then added 1 egg and 1T cold Sauvignon Blanc (white wine) and ran the processor until the dough came together into a ball.  The dough was a bit wet, so I rolled it up in plastic wrap and popped it into the fridge for a few hours.  NOTE:  I intentionally made this in the morning so I could make the tart later in the afternoon… you can make this dough a few days ahead of time but the tart itself is best if made the day you want to serve it.  

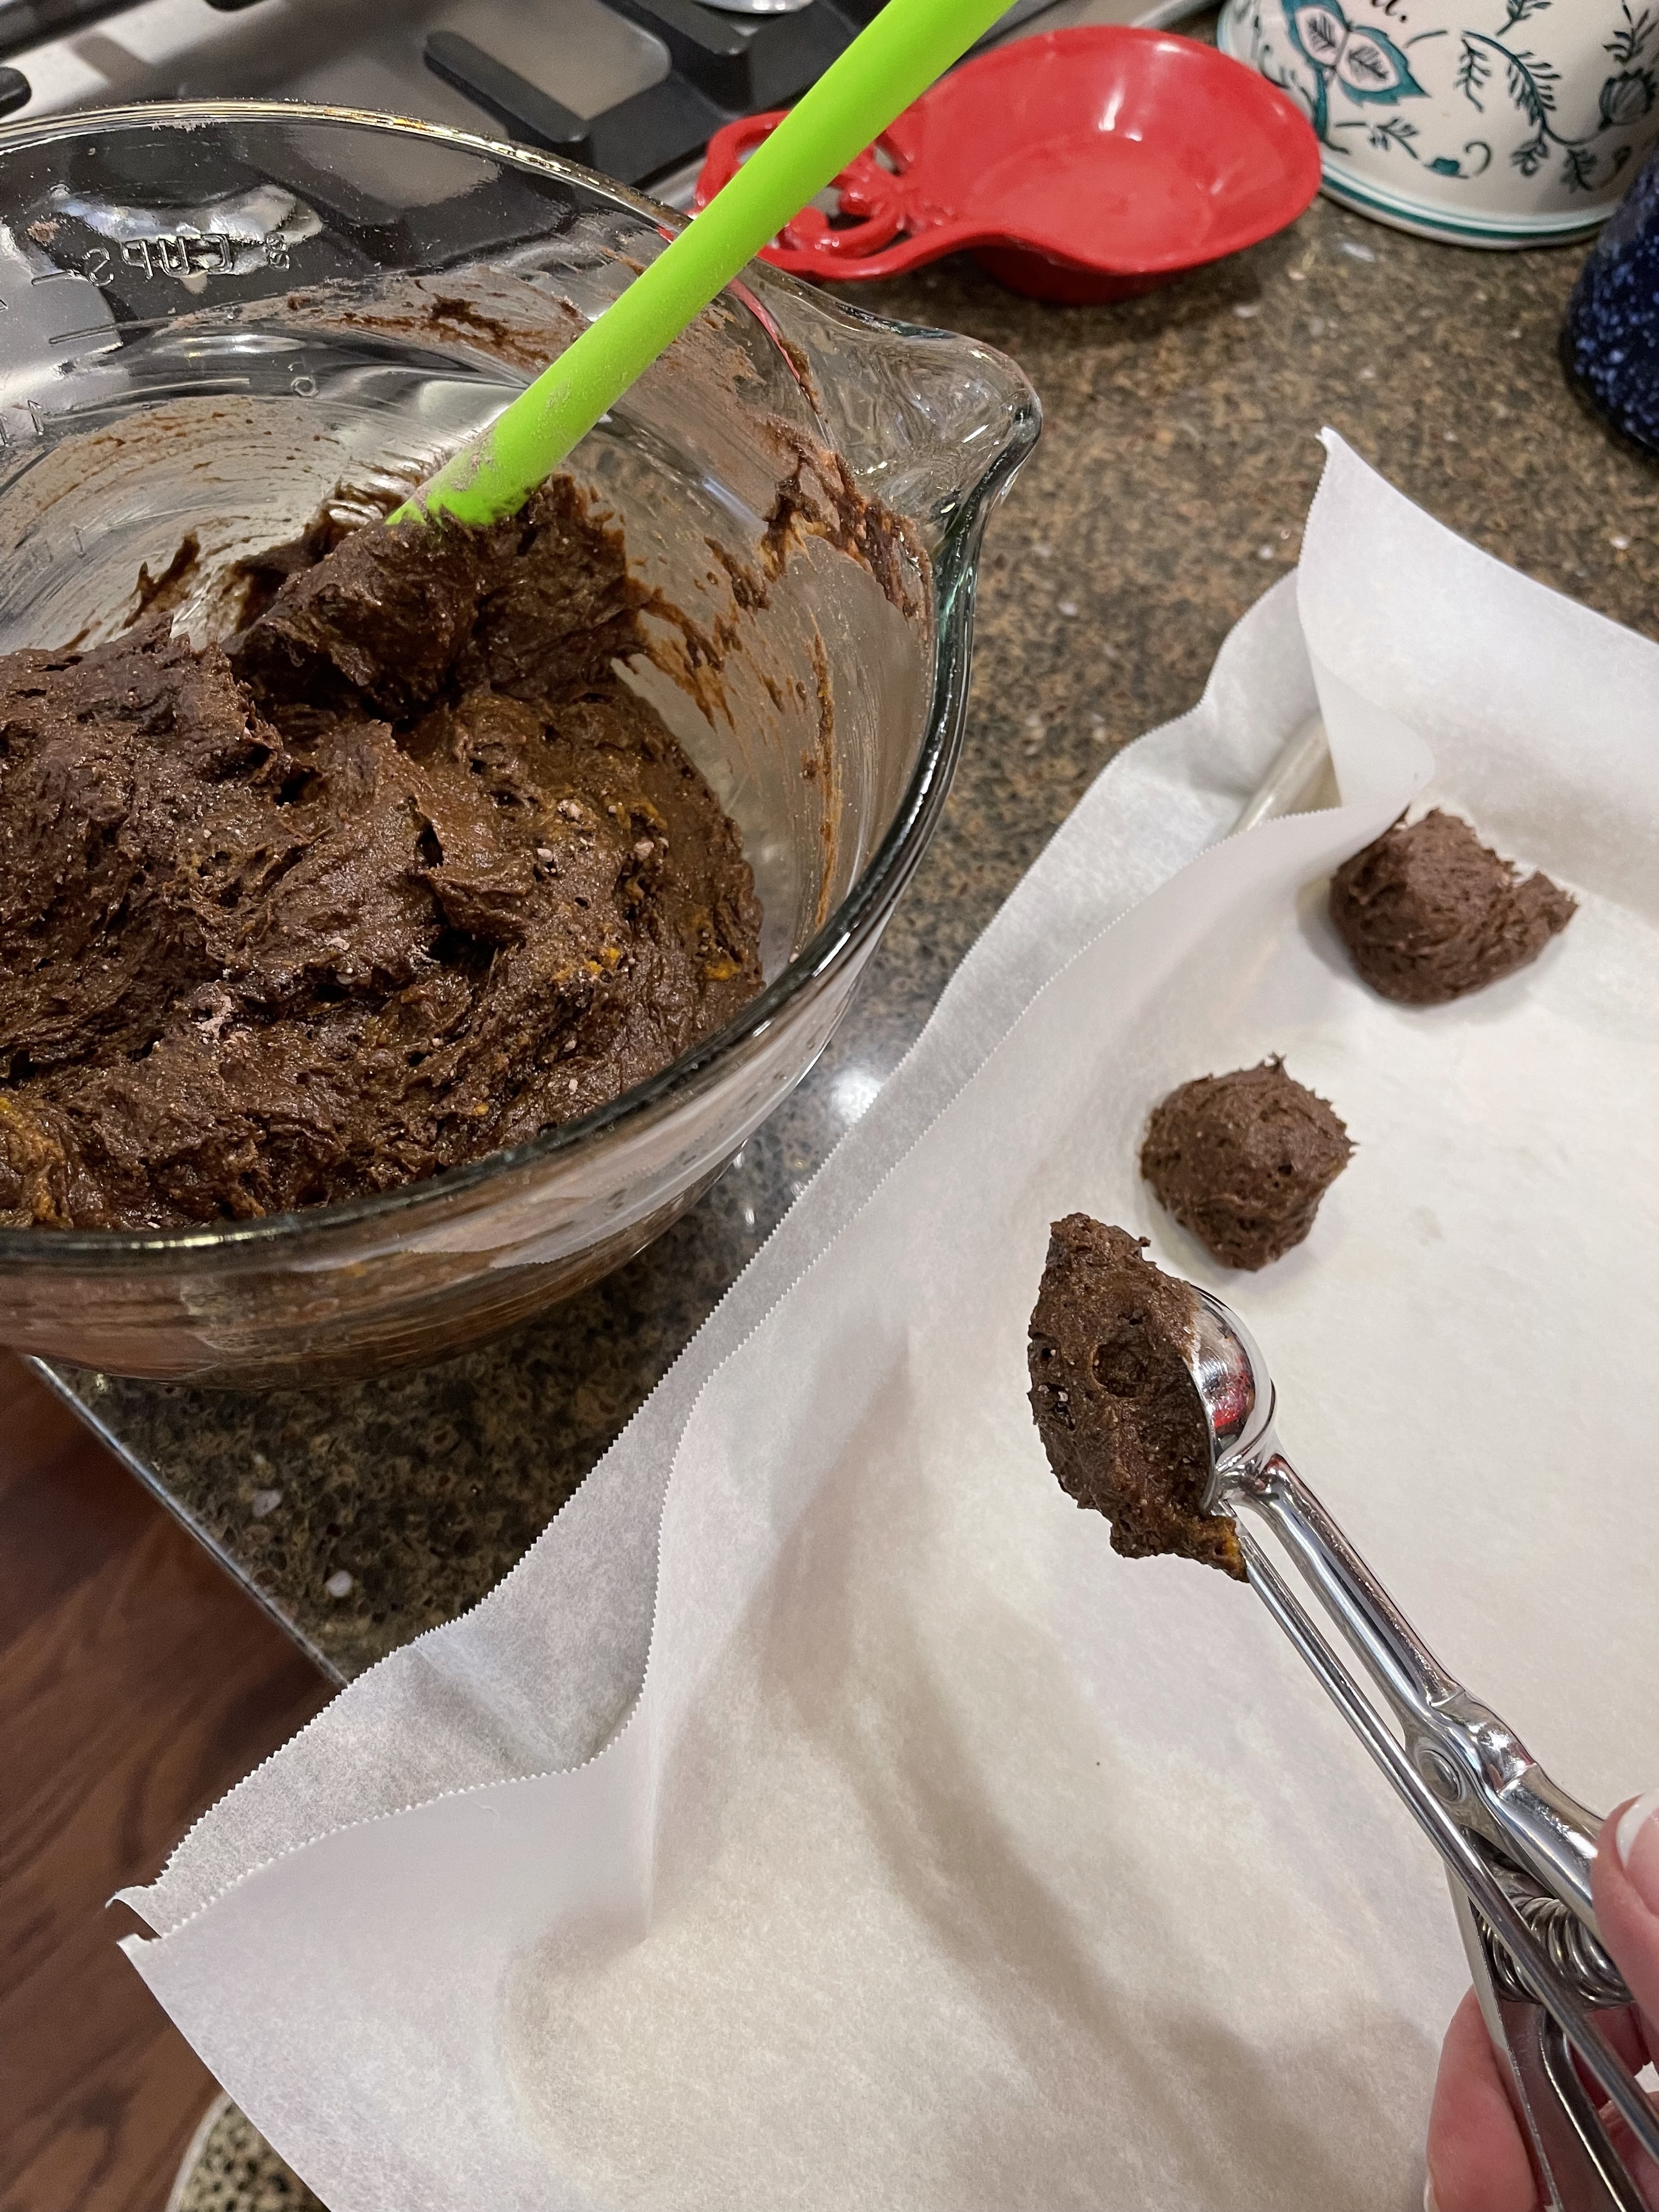
A few hours later, I was ready to make the tart.  I actually had never made a tart before, so I had to purchase a tart pan for this dish.  Thankfully, we had an amazing kitchen store nearby, so that task was easily handled.  I pulled the pastry dough out of the fridge and gave it time to get to room temperature, then preheated the oven to 350 degrees.  I rolled out the dough and then fit it into the pan, using a scraper to take off bits of the crust along the top of the tart pan.  The dough was soft enough that I really only had to push and move around the dough to fit it all into the pan.  It looked lovely. WhiteAppleTart

The next step was to prepare the apples for the tart.  I used 3 large Honeycrisp apples (feel free to use your own favorite type of apples). I cut them in half, removed the core and skin, then sliced each apple into thin slices, across the width from bottom to top. Since there were 3 apples, you’ll use five halves to go around the outside of the tart and then use one half to fill the space in the center.  I’ll try and do a cleaner job of this on my next attempt, but I thought it turned out nicely. I then sprinkled everything with a blend of 2T sugar and 1/2 t ground cinnamon.  Once everything was nicely coated with the cinnamon/sugar mixture, I put the tart on the bottom rack of the preheated oven and cook for 40-45 minutes.  Note:  I think the apples needed a little more cooking time, so I will probably increase cooking time to 55-60 minutes when I next make this tart.  Once the tart was nicely browned and the fruit was bubbly, I removed the tart to a wire rack to allow it to cool a bit before glazing the tart.

While the tart is baking, I needed to make the glaze.  I simmered 1/2 cup apricot preserves mixed with 2T white wine (I used a Sauvignon Blanc) until it boiled a bit and then strained the glaze into another pan so it was as liquid as possible.  Note: I used a small saute’ pan for the first step, then strained the mixture into a small sauce pan, since I only have one “small saucepan”.  Before glazing the tart, I warmed up the glaze until it was thickened.  I used a brush to dab the glaze all over the tart and make it all look glossy.

Extra Note:  When making this recipe in 2016, I used fig preserves instead of apricot (because that’s what I already had opened in the fridge) as well as a simple dry white wine and the tart was still just as fabulous and delicious.  

When I had to unmold the tart, the easiest way was to use a thick, flat object – like a large-wide can or a squat-sized canister – to allow the outside rim of the tart pan to drop away.  I then put the tart on a large platter… it made for a beautiful presentation.

I hope you’ll consider trying to make this tart sometime.  If you don’t want to use wine in this recipe, you can follow the original recipe and simply use water.  I thought the addition was fun and added a light edge to both the crust and the glaze. Whichever way you choose to make it, it’s worth the try.  I found it to be simple, yet spectacular.  Totally worth the price of an actual tart pan!

Sausage and Pepper Casserole

My neighbor had a health issue with her mom last night and I thought that the nicest thing I could do for her would be to make dinner and dessert for them tonight.  I know her mom loves sweets, so I had to make sure to have some sort of dessert included, so I made a platter of chocolate chip cookies, since I already had the dough in the fridge… the question was now “what do I make for dinner”?

I looked through my freezer and found a package of turkey kielbasa and a half package of bacon, so that became the base of my recipe.  Since I also had some green peppers and an onion in the crisper, I decided to make a turn on a “sausage and pepper sandwich” and add some linguine and a creamy cheese sauce to pull it all together.  Here’s how I went about making dinner. NOTE: Remember that I was making two dinners for two people each, so these could have easily been made into a single 9×11 casserole instead of two individual 9″ round casseroles.

I crisped up the half package of bacon and then removed the bacon to a plate, leaving the bacon drippings in the saute pan.  I diced one package of turkey kielbasa and crisped that up in the saute pan as well before removing that to a plate. I sliced one green pepper and half a large onion and sauteed these in the bacon grease until softened.  While cooking all these individual pieces, I cooked 3/4 package of linguine (broken in half) until just al dente, then drained the pasta, saving some of the water in case I needed it for the sauce that would top the entire casserole.Sausage&PepperCasserole

I then assembled the casseroles, placing a little of the bacon and half the kielbasa and half the vegetables on top before adding half the pasta.  Once this was done, I was able to turn my attention to the sauce.  I wanted something that was creamy and slightly cheesy but didn’t just want to throw cheese on top of the pasta and hope it melted correctly.

I started the sauce by simmering 2T butter and 2T flour together to make a roux.  I then added some white wine (using chardonnay was my choice this time… crisp and clean) and chicken stock to start a great tasting sauce.  To make the taste unique to this particular dish, I added half a can of cream of mushroom soup (leftover from Christmas dinner), some parmesan cheese and some cheddar cheese for creaminess and a few dashes of Worchestershire sauce for flavor.  Once the sauce tasted “right” (you HAVE to be willing to taste your sauces during the cooking phase so they balance out once they’re added to a dish), I poured half over each casserole and topped each with a sprinkling of leftover bacon.

I have no idea if my neighbors will enjoy this casserole, but I hope they feel the love that comes from wanting to do something nice for others in times of stress.  Karma is a tricky thing… but I believe that if you always reach out to others in a positive way and from a place of kindness and love, that same thing will come back to you tenfold.  I’m not expecting them to do anything in return…. I just know that they shouldn’t have to worry about feeding their family when they’re facing a difficult time.

May we all approach life in this manner… give when you can and your life will be made better for the effort.

Happy New Year Blessings to you all, my friends.  Wishing you health and happiness as 2015 begins!

White Cream Puffs

This recipe is one that has been used in my family for as long as I can remember.  As a child, my mom would make these cream puffs for her bridge club nights.  She’d make the cream puffs, cut off the tops and fill them with vanilla ice cream, then frost them with some chocolate before serving them to her honored guests.  Occasionally, we’d be given one of these treats before the ladies arrived and they always looked so incredibly elegant.  What a gift to find out, years later, that this was a simple recipe that I could share with my own guests… and now I get to share that gift with you!WhiteCreamPuffs

Ingredients:

  • 1 cups boiling water (I like to use 2/3 cup water and 1/3 cup white wine)
  • 1/2 cup butter (don’t skimp… butter is the only way to go here)
  • 1 cup flour
  • 1/2 tsp salt
  • 4 eggs

Directions:

  1. In a heavy saucepan, combine the water/wine with the butter and bring to a boil.  Once melted and fully boiling, add the flour/salt at once and stir, beating vigorously with a wooden spoon until the dough is smooth.
  2. Remove from heat and add eggs, one at a time, stirring well after each addition.  Drop by teaspoons onto 2 greased cookie sheets (or baking sheets lined with parchment), shaping dough to peak in center and round out on the bottom.  Place dough 2″ apart.
  3. Bake in preheated 375* oven for 10 minutes, reduce heat to 350*  and bake for an additional 25 minutes.  Cool and fill.  Freeze or use immediately.

These cream puffs make a lovely dessert – slice off the top of the puff, fill with softened ice cream and replace the top, then frost with a bit of chocolate.  My Red Fudge Sauce is fabulous with this dessert (as seen in the photo), but you can use whatever sauce you like best.

Another alternative would be to fill the puffs with a small amount of my Nutty Chicken Salad and serve for a fancy luncheon. You are only limited by your imagination when it comes to using these cream puffs!  Enjoy!