Blueberry Lemon Scones

I got to play in the kitchen today…. and chose to experiment with a scone recipe that uses my favorite @JiffyMixes baking mix. Jiffy mix has been made by the Chelsea Milling Company, a family-owned business started in 1901. Since we lived in Chelsea, MI for a number of years, I love to use this product for biscuits, scones, pancakes, or even fried chicken… it’s so versatile. Here’s a photo of the box – look for it in the baking aisle of your local grocery store.

INGREDIENTS:

  • 1 1/2 cups Jiffy Mix
  • 3 TBSP sugar
  • 1 1/4 tsp lemon zest (I use the zest of one lemon)
  • 1/2 heaping cup blueberries, if using frozen, don’t thaw (I use 1 handful of blueberries)
  • 1 egg
  • 3 TBSP liquid (I used a mixture of half almond milk, half @BoordyVineyards white wine)
  • 1/2 tsp vanilla extract

DIRECTIONS:

  • Preheat oven to 375* F
  • In a large bowl, blend Jiffy Mix, sugar, egg, liquids, and vanilla. Add zest and berries and mix thoroughly, but gently.
  • Lay a piece of parchment on cookie sheet and scoop out dough into small scones. I use a medium size cookie scoop and lightly press the dough down to flatten slightly. I like to lightly dust dough with sugar before baking
  • Bake in preheated oven for 10-15 minutes until edges begin to brown.
  • Let cool for at least 5 minutes before drizzling with glaze.

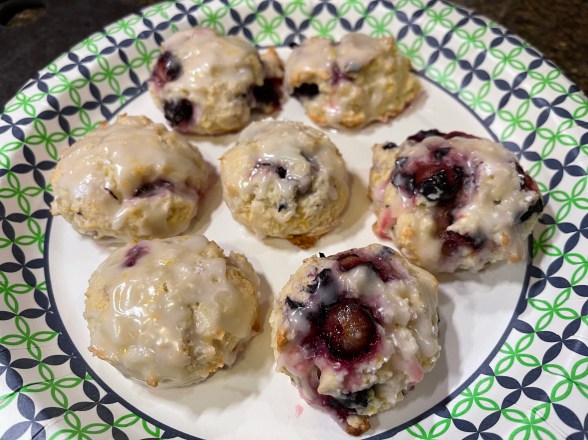
If you choose, you can drizzle the scones with a simple glaze made with the juice of one lemon and confectioner’s sugar. In this case, I also added a dash of salt and a splash of fat-free half and half. This is all personal preference, but I think it makes the scones look delicious!

I’ve made this recipe using a lot of different blends of add-ins such as dehydrated raspberries with cocoa nibs and orange zest with mini chocolate chips. The basic recipe isn’t difficult and doesn’t take a huge time commitment, which makes it a winner in my book.

I hope you’ll try this recipe and let me know what different combinations you’ve found to be delicious as well.

Advertisement

Recipe: Simple Wine Scones

I played with a recipe today… and ended up with the yummiest (and most simple) scones I’ve ever tasted.  A friend had posted this 3-ingredient scone recipe from TheMiniatureMoose.com on Facebook and I couldn’t help myself… I *had* to try it!  Of course, I just can’t make a plain scone, so I picked up some mini chocolate chips and decided to use some of the Chardonnay that I had in my fridge… it was a HIT!  I took most of the scones downstairs to the Leasing office and treated the ladies to an afternoon snack and they agreed with me.  Yummy & easy… wine & chocolate… two of my favorite combinations.

I started by preheating my oven to 425 degrees.  There were very specific (yet simple) directions in the original recipe, but my version ended up being totally tasty as well.  In a large bowl, I mixed 2 cups of self-rising flour with two Tablespoons of sugar and two palmsful of mini chocolate chips.  I then added 1 1/2 cups of canned coconut milk and stirred to combine.  NOTE: Canned coconut milk separates into two layers… a thin “milky” layer and a thick “greasy” layer.  You need to stir these two layers together to create the creamy coconut milk you want to use.  FYI… don’t poke the harder white layer on top too energetically or you’ll get spritzed with the milk that comes sporting up out of the can.  Trust me… I learned the hard (and messy) way on this one!  😉SimpleWineScones

My version differs at this point with most recipes for scones.  Everyone else will say to be gentle with your dough and to kneed the dough and do all sorts of lovely things to form your scones.  I was simply lazy and wanted to see if this recipe would still work, so  I stirred in some Chardonnay (a bright stainless-steel Chardonnay is great in this recipe, especially if you choose to add any citrus to the mixture) and made sure that everything was well-combined.  I then spooned the scone dough (it was definitely not something that could be cut into forms at this point) onto a pan sprayed with cooking spray and sprinkled the dough with sugar.  I knew I was going to want to cut the dough into pie-shaped wedges, so I tried to make slight indentations into the top of the dough so I’d know where to cut.  Much more than this wouldn’t have worked with this version of the recipe.

baked the scone dough at 425 degrees for 17-20 minutes until the top started to look lightly browned and didn’t look like it was going to be gooey when it cooled.  Ok, this isn’t a very “scientific” way to describe it, but it’s the most honest way I can explain it.  I shook the pan and nothing moved… then I pressed the top of the dough and it felt pretty solid.  I figured it was good to go at this point.

I removed the large cooked scone to a cutting board and allowed it to cool for a few minutes.  I then took a knife and cut the dough, following the pie-shaped wedge marks that I’d originally made.  They came out nicely puffed and light – not dense or dry at all.  I might just bake them in small rounds next time…. they would be lovely as a dessert, broken open and drizzled with fresh strawberries and whipped cream.

See… even a diversion from a tried-and-true recipe can turn into something totally different and fun!  Let me know if you come up with a new way to play with this recipe… and I’ll be sure to add other versions as I play with this recipe on my own!

Wishing a Happy Summer to you all!