White Butterscotch Wine Bars

I was reading a blog this morning and saw a recipe I wanted to try. It’s one from Mix and Match Mama that she called Butterscotch Beer Bars. I didn’t have any beer open in the house, but I *did* have some Boordy Vineyards Rockfish, a lovely dry white wine that’s made with a blend of Pinot Gris, Albariño, and Seyval Blanc… would that work in this recipe? I decided it was worth trying and began pulling things together.
NOTE: These directions are originally written by Mix and Match Mama but I included my own adjustments and/or changes along the way. I’m sure I’ll be trying her original recipe with Samuel Adams’ Boston Lager soon!

My mise en place, ready to experiment with a recipe using wine

INGREDIENTS:

  • 1 cup butter
  • 3/4 cup butterscotch chips
  • 4 eggs
  • 2 cups sugar
  • 2 cups flour
  • pinch salt
  • 1/2 cup + 1 T dry white wine (save 1T for frosting)
  • 1 8oz package of softened cream cheese
  • 2 cups powdered sugar (I used 2 1/4 cups)

INSTRUCTIONS:

  • Preheat oven to 350*
  • Grease a 9×13 baking dish – I lined a 9×13 pan with nonstick foil instead, so I’d be able to more easily transfer the bars out of the pan for frosting later.
  • In a microwaveable bowl, melt butter and butterscotch chips together, stopping to stir every 30 seconds. Once melted, set aside to cool slightly.
  • In a mixing bowl, beat eggs with sugar. Once these are well-incorporated, beat in your melted butter/butterscotch mixture and beat well.
  • Add salt to the flour and slowly add into your batter, beating well.
  • Mix in your 1/2 cup wine (I put my mixer on low speed and drizzled it into the batter) just until it’s incorporated.
  • Pour mixture into your prepared baking dish and bake 25-35 minutes or until a toothpick inserted into the middle comes out clean. Note: Mine took closer to 35 minutes but the original recipe called for 25-30 min.
  • Remove pan from oven and allow to cool completely before frosting.
  • To make frosting, beat soften cream cheese with powdered sugar and 1T wine with an electric mixer. I needed to add the extra 1/4 cup of powdered sugar so it wasn’t too thin. Mix and Match Mama says you can substitute milk for the alcohol if you prefer.
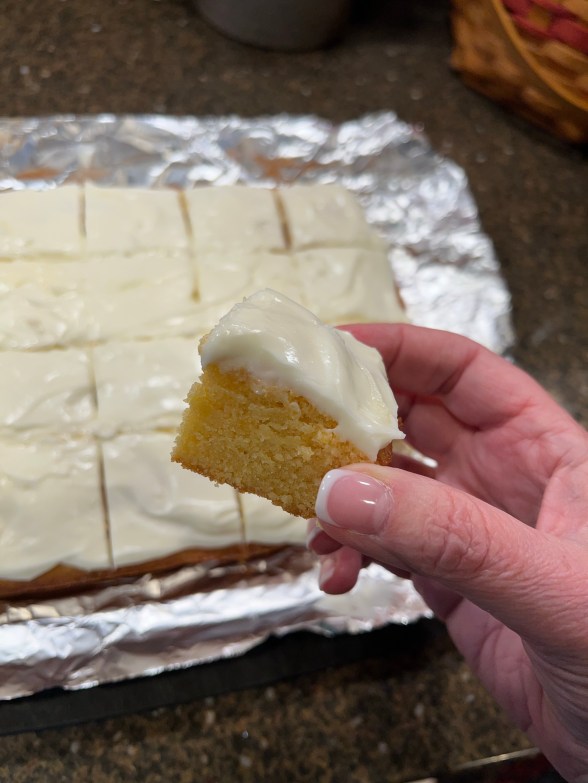
  • Frost your bars, cut and serve. NOTE: I cut mine into smaller squares and was able to get 32 individual servings (or 16 double-piece servings).
  • Store these in the fridge or freezer.
Adding some Boordy Vineyards Rockfish to the frosting
A lovely little treat… with wine.

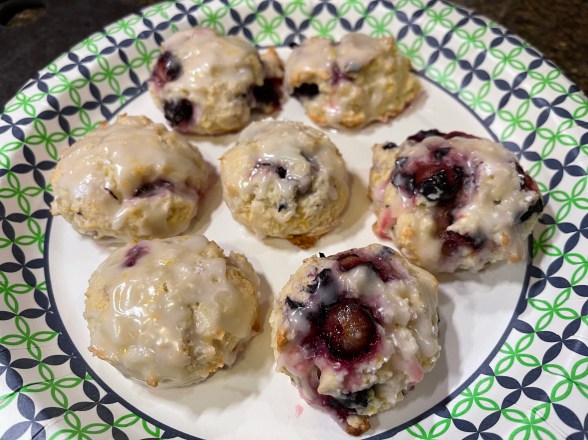
My thoughts? I really liked the taste of this bar. It’s dense enough to be called a bar, but lends itself closer to a cake than a cookie. I will need to try this recipe as it’s intended (with beer) but I thought this version was a fun way to use up some of the wine that I find in my fridge from time to time. The recipe didn’t take long to make and came together easily.

I would highly recommend using non-stick foil. It was very easy to remove from the pan, frost, and then place the entire recipe on a baking sheet to pop in the freezer. Once frozen, I will be able to transfer these treats into baggies for gifting later.

Enjoy!

Advertisement

Shrimp in Lemon Butter

Shrimp in Lemon Butter

This recipe is a favorite of my husband and one that I love to make during the week. It’s a simple meal to pull together and doesn’t take a lot of complicated ingredients.

Ingredients:
Raw Shrimp (I use Jumbo Shrimp)
3-4T Butter
2T Garlic Confit (or 3T crushed garlic cloves + 1T olive oil)
Juice of 1/2 lemon (reserve zest)
2T Parmesan
1/4 C White Wine (Use something you love to drink)
Splash of Half & Half
Pinch of sugar (if desired)
Salt, pepper, and parsley to taste
Brown Rice (or pasta)

Sauvignon Blanc by Boordy Vineyards

COOK YOUR SHRIMP:
Cook your shrimp, however you’d like. I shell my shrimp first, then bake shrimp on a piece of parchment on a baking sheet in a 400* oven until done.
NOTE: My husband likes his shrimp cooked longer than me, so I start cooking his shrimp in a 400* oven for about 15 minutes before adding mine to the baking sheet.

My husband’s shrimp on the bottom of the pic, mine on the top.

COOK YOUR SAUCE:
In a sauté pan, melt butter with garlic confit and lemon juice. Sprinkle with Parmesan and stir to combine. Add in the wine and half & half, then simmer until sauce thickens slightly, stirring frequently. Taste and add seasonings as desired.
NOTE: If sauce gets thick, add a little liquid (wine, water, stock, or pasta water) to thin.

Stirring to incorporate the butter into the sauce is key.

MAKE RICE (OR PASTA):
I use microwaveable brown rice. If you prefer to serve this meal on pasta, make your pasta so it’s ready to be plated when your shrimp are done.

ASSEMBLE DINNER:
You can either fold shrimp into the sauce (I do this with my husband’s shrimp) or place shrimp on rice and spoon sauce over top.

My husband’s shrimp, tossed with the sauce.
My shrimp, with sauce spooned over top.

ENJOY!

Easy Pulled Pork

Ingredients:

My favorite thing to make, when friends come to visit, is anything that will make my house smell amazing while it’s cooking. This recipe fits the bill perfectly!
NOTE: While I roasted this pork in the oven, you could easily make this into a crock pot recipe.

  • Boneless Pork Shoulder – Mine was just under 5 pounds
  • Dry onion soup mix
  • Red wine – I used Boordy Vineyards Cabernet
This is the pork I used for this recipe

Directions:

  • Remove netting from pork shoulder and toss in a gallon ziploc bag with dry onion soup mix and 1/2 cup red wine.
  • Marinate pork overnight.
Pork in marinade of onion soup mix and red wine
  • Remove pork from bag and sear on stovetop in cast iron pot.
  • Once all sides are browned, add another splash of red wine and cover.
  • Place pot in 300* oven to roast.
Pork, after 2 hours of roasting. This is my mother’s cast iron pot.
  • Roast, low and slow, until pork shreds easily.
  • Serve on homemade rolls for a delicious and easy dinner
Easy Pulled Pork, ready to eat!

I love to use my mom’s heavy cast iron pot. This is my favorite pot to use for low/slow cooking (pulled pork, pulled chicken, roasts of any sort) but I also love using it for soups and stews. While there are many options for a large pot, this specific one always reminds me of cooking with my mom.

This recipe is a great one to keep on hand for feeding a crowd. I’ll make it again in a few weeks when my son and his friends come for the weekend, but I’ll add a large pork butt roast so there’s enough food to go around. I like to make homemade kaiser rolls to complete the meal.

I hope you enjoy this recipe – let me know if you ever try it!

Chicken Divan Casserole

I have very fond memories of my mom making Chicken Divan casserole throughout my childhood. The recipe she used was based on one from Aunt Treva, my grandfather’s sister, and had lots of “cream of” soups included to make the sauce. It was always yummy, but I decided that I wanted to create a healthier version.

When searching for a similar recipe as the one from my childhood, I found a fabulous one created by Natasha Bull of http://www.saltandlavendar.com. Her original recipe can be found here: https://www.saltandlavender.com/chicken-divan/ but I needed to adjust the flavors to match what I was trying to recreate. If you’re looking for a cheesy, creamy chicken and broccoli casserole, look no further… this one is terrific.

For me, simply adding curry powder to the recipe above wasn’t quite what I wanted, so I played around with it until I created something that made sense for me. I also trimmed everything down to make an easy meal for two + 1 leftover serving. This recipe will make 3 servings in a 9×9 baking dish.

INGREDIENTS:

  • Broccoli florets – I used a small bag from the local store
  • Chicken Breast – I shredded two breasts from a rotisserie chicken but you can also use leftover chicken or even turkey
  • 2 T butter
  • 2 T flour
  • 3/4 c almond milk – you can use a mixture of almond milk and half & half if you prefer
  • 2 T whipped cream cheese
  • 1 tsp Dijon mustard
  • 1 tsp Worcestershire sauce
  • 1 tsp white wine – use what you have available/open but I also use this wine to thin the sauce before adding the cheese
  • 1 tsp curry powder
  • 1/4 tsp onion powder
  • 1/4 tsp garlic powder
  • 1 cup grated cheddar cheese – separate in half
  • 1/4 cup grated Parmesan
  • 10 Ritz crackers (approximate)

DIRECTIONS:

Preheat your oven to 375*F.

Prepare your broccoli for the casserole. After trimming down the broccoli into bite-size pieces, put all the florets in the bottom of the 9×9 baking dish. Lay a piece of paper towel over the broccoli and lightly dampen it with some white wine. Microwave the broccoli on HIGH for 2-3 minutes or until the broccoli is lightly cooked and still crisp. NOTE: if you’re using a metal dish, you can microwave the broccoli in the original bag and layer the cooked broccoli onto the bottom of the baking dish.

Layer your shredded chicken on top of the broccoli.

Make your sauce. Start by melting the butter in a sauce pan. Add the flour and whisk until combined and the mixture starts to bubble. Let the butter/flour mixture cook until it begins to get slightly toasty. Slowly add your milk and whisk to combine, then cook this mixture until it begins to thicken. Add the cream cheese (I like the whipped version b/c it’s light and combines fairly easily – if you use a block of cream cheese, I would decrease to 1T), whisking to combine. Add in your spices (mustard, Worcestershire, wine, curry powder, onion powder, garlic powder) and taste the sauce, adjusting as needed. Add salt and pepper if desired. NOTE: if sauce is too thick, add a splash of wine or almond milk. I have been known to add 1/4c-1/2 cup of wine to thin the sauce. Be aware that the sauce will thicken when you add the cheese. Remove the sauce from stove top and stir in 1/2 cup cheddar cheese.

Pour sauce over the chicken/broccoli mixture in your baking dish. Top with remaining cheddar cheese and Parmesan cheese then crush Ritz crackers over the entire casserole.

Bake casserole, uncovered, for 30-35 minutes. Cheese should be melted, crackers should be browned, and the sauce should be bubbling. Let casserole sit for 5 minutes before portioning out and serving.

Tuscan-style sauce

Oh, my goodness…. this sauce is so delicious! A friend recently mentioned a crock pot dinner that she’d made that sounded good, but I didn’t want to use my crock pot. I got the basics of the recipe from her, looked at a few other recipes, and went to “work”.

INGREDIENTS:

  • 2 TBSP butter
  • 1/3 cup half & half (fat-free is fine)
  • 2-3 forks of julienned sun dried tomatoes *I like to add a spoonful of the oil to this sauce as well
  • 2 handfuls of spinach
  • 1 TBSP Parmesan
  • 1 wedge Laughing Cow light cheese
  • 1-2 T white wine (I used Boordy Vineyards Vidal Blanc)
  • Salt and pepper to taste
  • Pasta water, as needed/if available, to thin or extend sauce

DIRECTIONS:

  • In a heavy sauce pan, simmer butter with half & half until butter melts.
  • Add sun dried tomato and fresh spinach, stir and allow spinach time to wilt.
  • Add Parmesan and Laughing Cow, stir to combine and allow the flavors to meld.
  • Add wine, salt & pepper, then taste sauce, adjusting flavors as needed. Add pasta water, if needed.

I typically spoon this sauce over baked chicken, pasta, and broccoli, as seen in the photo. I’ve also served this sauce over shrimp. It’s a delicious addition to enhance that plain chicken and vegetable dinner. It doesn’t take long to make this sauce and makes for a beautiful dinner plate!

Blueberry Lemon Scones

I got to play in the kitchen today…. and chose to experiment with a scone recipe that uses my favorite @JiffyMixes baking mix. Jiffy mix has been made by the Chelsea Milling Company, a family-owned business started in 1901. Since we lived in Chelsea, MI for a number of years, I love to use this product for biscuits, scones, pancakes, or even fried chicken… it’s so versatile. Here’s a photo of the box – look for it in the baking aisle of your local grocery store.

INGREDIENTS:

  • 1 1/2 cups Jiffy Mix
  • 3 TBSP sugar
  • 1 1/4 tsp lemon zest (I use the zest of one lemon)
  • 1/2 heaping cup blueberries, if using frozen, don’t thaw (I use 1 handful of blueberries)
  • 1 egg
  • 3 TBSP liquid (I used a mixture of half almond milk, half @BoordyVineyards white wine)
  • 1/2 tsp vanilla extract

DIRECTIONS:

  • Preheat oven to 375* F
  • In a large bowl, blend Jiffy Mix, sugar, egg, liquids, and vanilla. Add zest and berries and mix thoroughly, but gently.
  • Lay a piece of parchment on cookie sheet and scoop out dough into small scones. I use a medium size cookie scoop and lightly press the dough down to flatten slightly. I like to lightly dust dough with sugar before baking
  • Bake in preheated oven for 10-15 minutes until edges begin to brown.
  • Let cool for at least 5 minutes before drizzling with glaze.

If you choose, you can drizzle the scones with a simple glaze made with the juice of one lemon and confectioner’s sugar. In this case, I also added a dash of salt and a splash of fat-free half and half. This is all personal preference, but I think it makes the scones look delicious!

I’ve made this recipe using a lot of different blends of add-ins such as dehydrated raspberries with cocoa nibs and orange zest with mini chocolate chips. The basic recipe isn’t difficult and doesn’t take a huge time commitment, which makes it a winner in my book.

I hope you’ll try this recipe and let me know what different combinations you’ve found to be delicious as well.

White Veggie Cups

I’ve now made two or three different renditions of this recipe and it’s become one of my favorites. It’s a great way to use up any leftover vegetables in your fridge and is healthier than most of the things I can come up with to eat for a quick meal. Veggie cups (made with some white wine) are delicious, versatile, and even freeze-able!

Ingredients: 

  • A leafy green vegetable (I’ve used a bunch of Swiss Chard, Spinach, or even Kale), chopped fairly fine
  • Onion (I like to use 1/4-1/3 of a sweet onion), chopped fine
  • Leftover vegetables from the fridge, chopped.  I used a small yellow pepper in these photos, but I chopped up a tomato recently and it was equally delicious
  • Shredded Cheese (I sprinkled a small amount on each muffin cup – it totalled about 3/4 of a cup).  I have used Monterey Jack and Cheddar cheese – use your favorite
  • 2 cups of egg mixture (I used 1 1/2 cups of fat-free egg substitute, 1/4 cup egg whites, and 1/4 cup white wine
  • Seasonings (I like simple salt and pepper, but go wild and use what you like!)WhiteVeggieCups

DIrections:

  1. Chop all your veggies, put your egg mixture together, spray your muffin tin with cooking spray, and pre-heat your oven to 375 degrees.
  2. Into each muffin cup, place some chopped greens, chopped onion, chopped veggie (yellow pepper, tomato, whatever you’re using), and top each with a sprinkling of cheese.  Add seasonings.
  3. Ladle a bit of the egg mixture into each muffin cup, using the ladle to push the veggies and cheese into the egg mixture.  If you have extra egg mixture left over, add it to the cups so everything is as equal as possible but DO NOT overfill the cups.  They should be about 3/4 full since they will puff up as they cook.
  4. Cook the Veggie Cups at 375 degrees for 18-20 minutes until the egg is set.  Allow the veggie cups to cook slightly before removing them from the pan and serving.

This recipe is extremely versatile.  You can add bacon, sausage, or ham to the veggie cups if you’d like.  You can substitute vegetables as you prefer.  This is a great way to make a quick breakfast sandwich but simply toasting an english muffin and putting one veggie cup in the middle.  Play with this recipe and see if it doesn’t become one of your favorites as well.

Enjoy!

Recipe: Updated Chicken Prosciutto Roll

I know this is a re-do of a recipe that I posted in August, but honestly this  set of photos is much more informative than the first, so I decided to go ahead and add it… never hurts to show you more about a recipe than less, right?  I also adjusted this recipe a bit from the original, so please forgive my repetition… I want you to have as much info about recipes as I can provide, especially when I make something so tasty that doesn’t actually use a recipe.

I wanted to make a simple, yet elegant, dinner with James River Cellars’ Gewurztraminer wine.  Since we have found that the tastiest pairing of cheese-to-wine uses Bourcin cheese with this particular wine, my primary pairing was already set.  Sadly, though, my local grocery store was out of Bourcin Cheese, so I had to make due with a local goat cheese infused with garlic and herbs which turned out to be very tasty and worked just as well (in my humble opinion).

I started with three large chicken breasts from a sale package of chicken breasts.  Note: I don’t know what sort of giant chickens produced these breasts, but they were thick, meaty, and looked amazing.  I’m sure that they are genetically altered and I should have reached instead for the organic meat, but I was looking for value this time – I was able to get 5 breasts for the price of 2 organic breasts, so that made my decision for me yesterday.  I ran my knife through the meatiest part of the breast but didn’t cut all the way through, so I could open the breast like an envelope and make it as thin and wide as possible.  I used a mallet to pound the thicker spots down a bit so everything was even and got on with the recipe.

Making sure not to tear the meat, I separated a thin slice of prosciutto and laid it on top of the open chicken breast, then topped the breast with a thin line of garlic/herb goat cheese (here’s where I would have used the Bourcin Cheese, had I been able to find it at the store).  Once the layers were in place, I carefully rolled the chicken, beginning at the  side rather than from one of the ends, and then used a long skewer to secure the breast meat and keep all the toppings inside.  My goal was to make a long/thin roll as opposed to a short/fat roll so the meat would be able to cook thoroughly without being too overdone on the outside.  NewChickenPriscuittoRoll

When you are ready to cook dinner,  add a pat of butter and a bit of olive oil to the pan and then sear the rolls on all sides until they are browned and crispy.  I actually made the rolls earlier in the day and let them sit in the fridge until I was ready to cook, but you’re welcome to make them whenever it works for you.  I definitely would have done this earlier in the day if I were making it for company.  Once the meat is seared along all edges, I added the remaining cheese (maybe the last inch of the roll of goat cheese) and Gewurztraminer wine to create a bit of sauce in which the rolls could cook.  Note:  Since I knew the inside of the rolls weren’t anywhere near ready, my plan was to bake them in the oven until my husband came home for dinner.  I’m not sure exactly how long I baked them (remember… I USE THE FORCE TO COOK) but I had set the oven at 350 degrees and popped the saute pan in the oven until things “smelled done” and we were ready to eat.

To finish this dish, I used a bag of green beans and a bag of brown rice.  I microwaved the beans first and tossed them with a little butter and salt before serving.  I microwaved the brown rice afterward and divided that out among the dinner plates.  Removing the skewer at this point wasn’t easy, but I used a fork to keep things steady as I gently pulled the skewer out of each chicken roll.  The final touch was to spoon the cooking sauce over the chicken and rice.  It looked as pretty as it tasted!

Extra idea… if you are serving a small group of people, you could make four of these rolls and then slice them to serve onto individual plates instead of offering each person their own chicken roll.

This is one of my favorite recipes to share with people when I do a wine tasting at James River Cellars.  I do hope that you’ll consider trying this recipe and make it your own.  That’s the essence of cooking… creating something delicious to feed the ones that you love.

Enjoy!

The funny side of wine

There are always days in our lives that make you search for the obscure and the silly… those days when you need to have a place where you can escape the concerns and frustrations that are making you crazy and allow the comical to take over.  Yesterday was one of those days.

So to that end, I went looking for some fun (and funny) wine quotes to use at the winery where I work.   I found a grouping, posted together originally (as far as I can tell) by a website called iloveindia (http://lifestyle.iloveindia.com/lounge/funny-wine-quotes-2953.html) that I thought fit the bill… I hope you enjoy them as much as I did.

  • Wine is constant proof that God loves us and loves to see us happy. – Benjamin Franklin
  • What is the definition of a good wine? It should start and end with a smile. – William Sokolin
  • Wine is bottled poetry. – Robert Louis Stevenson
  • Wine gives a man nothing… it only puts in motion what had been locked up in frost. – Samuel Johnson
  • Wine gives courage and makes men more apt for passion. – Ovid
  • The vine bears three kinds of grapes: the first of pleasure, the second of intoxication, the third of disgust. – Diogenes
  • Wine is a turncoat; first a friend and then an enemy. – Henry Fielding
  • This is one of the disadvantages of wine; it makes a man mistake words for thoughts. – Samuel Johnson
  • Wine is a peep-hole on a man. – Alcaeus
  • Wine is a mocker, strong drink is raging: and whosoever is deceived thereby is not wise. – Bible quotes
  • Good wine is a good familiar creature if it be well used. – William Shakespeare
  • Wine makes every meal an occasion, every table more elegant, every day more civilized. – Andre Simon
  • A mind of the caliber of mine cannot derive its nutriment from cows. – George Bernard Shaw on wine
  • Sweetness belongs in the Mosel wine like the bubbles belong in the Champagne. – Nik Weiss
  • Appreciating old wine is like making love to a very old lady. It is possible. It can even be enjoyable. But it requires a bit of imagination. – Andre Tchelistcheff
  • Blind tastings are to wine what strip poker is to love. – Kermit Lynch
  • The discovery of a wine is of greater moment than the discovery of a constellation. The universe is too full of stars. – Benjamin Franklin
  • What is better than to sit at the end of the day and drink wine with friends, or substitutes for friends! – James Joyce
  • If God forbade drinking, would He have made wine so good! – Cardinal Richelieu
  • Wine improves with age. The older I get, the better I like it. – Anonymous
  • Where there is plenty of wine, sorrow and worry take wing. – Anonymous
  • I have enjoyed great health at a great age because everyday since I can remember I have consumed a bottle of wine except when I have not felt well. Then I have consumed two bottles. – Bishop of Seville
  • Compromises are for relationships, not wine. – Sir Robert Scott Caywood
  • Beer is made by men, wine by God! – Martin Luther
  • Men are like wine – some turn to vinegar, but the best improve with age. – Pope John XXIII
  • Life is too short to drink bad wine. – Anonymous
  • If food is the body of good living, wine is its soul. – Clifton Fadiman
  • I made wine out of raisins so I wouldn’t have to wait for it to age. – Steven Wright

Remember… wine doesn’t have to be part of every day in your life, but it can certainly make every day of your life a little sweeter, a little brighter, and a little lighter.   And with that, I’ll leave you with one of my favorite quotes, which I found on Pinterest.

Recipe: Chocolate Wine Cobbler

ChocolateWineCobblerI originally found this recipe on the side of my Facebook account. It looked yummy and was called “Chocolate Cobbler”. It showed up in my FB feed when I was looking for a new dessert and this just looked simple and tasty. For me, the plus came when the recipe called for “boiling water”… wait… water? What? Why use boiling water when I could substitute wine… and a new recipe was born. After trying this recipe a few times, I’ve finally been able to get a picture of this treat so you can see just how yummy it can be. Oh, and you’ll notice that there are exact measurements in this one because I didn’t use The Force…

INGREDIENTS:

2 sticks butter or margarine (I used margarine, because that’s what I had on hand)

BATTER:

1 1/4 cup sugar

1 1/2 c self-rising flour (or use 1 1/2 cup regular flour + 2 tsp baking powder + 3/4 tsp salt)

1 tsp vanilla

3/4 cup milk

CHOCOLATE LAYER:

1 cup sugar

6 Tbs cocoa powder

WINE LAYER:

2 cups boiling red wine – I used 2 cups of sweet red wine *Note: this tastes perfectly fine with boiling water instead if you so choose.

DIRECTIONS:

  1. Preheat oven to 350 degrees. In a high-sided 9×13 baking dish, melt the two sticks of butter in the oven
  2. Meanwhile, in a separate bowl mix together the ingredients for the batter layer. Once the butter is melted, pour the batter over the melted butter but DO NOT STIR.
  3. In a clean bowl, mix together the ingredients for the chocolate layer. Sprinkle on top of the batter but DO NOT STIR.
  4. Pour 2 cups of boiling wine gently on top of entire dessert (again… DO NOT STIR) and bake for 30-45 minutes. I bake mine until I can see a nice golden brown crust.
  5. Serve warm – this is great with ice cream.

I served this dessert at our company Christmas party and it was a huge hit. If you want to substitute boiling water for the wine, that’s completely fine. I would use anything that you like, but I’d suggest using a red wine that cooks well. I find that red Bordeaux varietals (Cabernet Franc, Cabernet Sauvignon, Merlot, Malbec, and Petit Verdot) cook nicely and maintain their integrity throughout the process.

Enjoy! I’ll be adding a little bit of vanilla ice cream to each serving tonight, but I can’t think of anything more comforting than wine paired with chocolate…