Summer Watermelon Salad

It’s summer!  The time of fresh fruit and lazy days… the time when you want to be able to go outside and enjoy your friends and family… the time for easy or starter recipes…  This is when I like to have a few recipes on hand that make my life a little easier, especially on those days when the temperature is high and my energy is not.  For those days, I give you the Summer Watermelon Salad!

PicMonkey Image

This recipe couldn’t be easier… four ingredients and easy to adjust for the number of people you’re feeding!  This is actually one of my favorite lunches… light and simple, it just screams “SUMMER” to me.

Ingredients:

  • Watermelon – cut into bite-size pieces.  Use as much or as little as you like, but this is your *main* ingredient.  I typically use about 3 cups.
  • Feta cheese – I like to use crumbled *light* feta, but you can use whatever type makes you happy.   I dump in some from the container – about 1/2 cup.
  • Basil – if I have fresh, I take a small handful and cut into a chiffonade (little ribbons).  If not, I take a generous pinch of dried.  I’ve done both and fresh is definitely better in this – it’s a wonderful flavor!
  • White wine – I use what I have in my fridge, about 1/8-1/4 cup total.  I’ve used dry (Chardonnay and Pinot Gris/Grigio) and I’ve used semi-sweet/off-dry (Vidal Blanc and Viogner)… use what you like!

Directions:

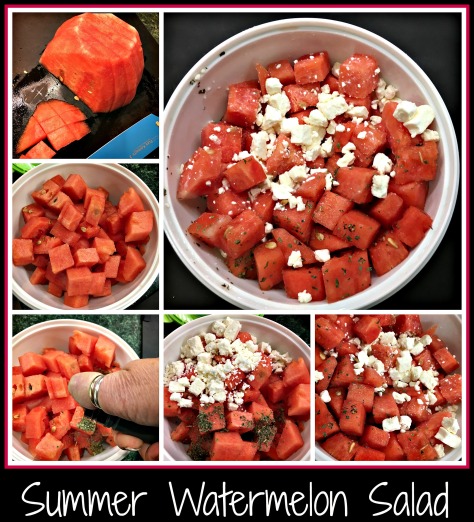
  • Cut watermelon into bite-sized pieces and place in a large bowl.  Sprinkle with feta cheese and basil.  Toss lightly and adjust amounts as needed.
  • Thumb 1/8-1/4 cup of white wine over the salad and allow time to marinate before serving.
  • I typically drain a bit of the liquid off before serving.  This ends up being a mixture of wine and watermelon juice that isn’t really necessary.
  • Enjoy!

This is a great example of how I use “The Force” when cooking… so many variations to make this salad and it’s always delicious.  Hope you’ll try it and come up with your own favorite way to make this salad!

Advertisement

White Summer Couscous Salad

It’s that time of the year again… summer is finally here and I have a fabulous salad to share with you!  I first had this dish in California, when we went to visit some dear friends in San Diego.  I watched our hostess whip up this delicious side dish and couldn’t help but be impressed with the clean taste, gorgeous colors, and wonderful blend of flavors.  While it’s not a dish that my husband would like (he doesn’t like the texture of couscous), I immediately knew it would become a personal favorite.  I hope you’ll consider trying it sometime soon and let me know how you like it!

WhiteSummerCouscousSalad

Ingredients:

  • 1 box Couscous
  • Garlic (I used about 1T crushed garlic)
  • Olive Oil (I think the directions call for a specific amount – I used about 2T)
  • 2 cups liquid (I like to use 1 cup bouillon and 1 cup dry white wine)
  • 1 small block feta, diced (or one small package of crumbled feta)
  • 1 package grape tomatoes, quartered
  • 2T fresh basil, sliced thin (more if desired)
  • 2T balsamic vinegar
  • salt/pepper to taste

Directions:

  1. In a microwave-safe bowl (I use a glass pyrex bowl), heat the garlic in olive oil for 30 seconds.  Add the 2 cups of liquid and heat for 4-5 minutes or until boiling. (see top right photo)
  2. Add entire box of couscous, cover with plastic wrap, and allow to sit until liquid is absorbed, about 5 minutes. (see top left photo)
  3. While the couscous is finishing, you can prep the grape tomatoes, feta, and basil (See lower left photo).  When all liquid is absorbed, fluff the warm couscous with a fork. Toss in the tomatoes, feta, and basil.  Season with balsamic vinegar, salt, and pepper.


Note:  I like to serve this salad chilled, but it’s just as delicious as soon as it’s made.  You can add bits of avocado and/or grilled chicken to make this into a filling lunch.  The original recipe called for whole tomatoes, diced, but I really like the texture and sweetness of cherry or grape tomatoes.  Feel free to use your own preference to create something uniquely your own!

Recipe: Red & White Stir Fry Salad

Here’s a recipe PLUS a bonus!  Each part of this recipe deserves it’s own post, but since they are connected, I decided to post them together.  It’s a recipe for “stir fry” AND a chicken salad recipe…in one recipe!RedNWhiteStirfrySalad

I was trying something new… I wanted to make a shrimp stir fry, but wondered how it might work if I tried to “bake” the ingredients for a stir fry.  To do this, I sliced a pound of de-shelled shrimp length-wise and used them to cover the bottom of a 9×9 pan.  I sprinkled a  package of slaw (the kind with shredded cauliflower and broccoli) over the shrimp and then made a sauce of hoisin sauce, red wine, garlic, ginger, and a little cornstarch (for thickening) to pour over the entire pan.  I covered the pan with foil and allowed it to bake at 350 degrees for 20-25 minutes.  A package of microwave brown rice finished off my first meal nicely (see top right-hand photo).  While the technique was unconventional, it was a great way to make a simple dinner without standing beside the stove top.

The second half of this recipe (the “Salad” portion) came about from my need to use up the half-cup of leftover stir fry.  I had a chicken breast in the fridge that also needed to be used, so I decided to try putting everything together to make a chicken-shrimp stir fry salad sandwich.  Weird, but it really was tasty.  I combined the following ingredients: leftover stir fry, one diced chicken breast, one diced stalk of celery, a small palmful of craisins, some mayo, white wine, salt and pepper.  I mixed everything until it was well combined, adding either mayo or white wine, depending on the desired texture, and then put the mixture on some toasted low-calorie bread to make a sandwich.  The threads of veggies from the stir-fry provided some interesting texture in the salad, but it was a great mix and the bits of leftover stir fry sauce added some zing to the flavor.  It was definitely a great way to use up leftovers in my fridge.

I hope this set of recipes gives you some ideas of ways to re-use foods in your own fridge.  Using red wine in the stir fry and white wine in the chicken salad was a fun inspiration as well… see what you can create when you go beyond the traditional and let your creative juices flow!

Leftover Recipe: Turkey Leftover Braid

This recipe was inspired by a lunch we had with our cousin Ann last month and I’ve been excited about trying it ever since.  I altered things somewhat (is that really a surprise to anyone who knows me??) but it turned out extremely well.

Here’s the basic recipe I used:TurkeyLeftoverBraid

  • 1/2 package shredded Monterey Jack cheese
  • 2 cups of leftover turkey, diced
  • 2 stalks of celery, with tops, diced fine
  • 1 large spoon of dijon mustard
  • 3 large spoons of mayo (I used 2 large spoons of nonfat plain Greek yogurt and 1 spoon of Miracle Whip Light)
  • 1/4 cup James River Cellars Chardonel (could have used Chardonnay but I had Chardonel available)
  • 1/2 package of craisins
  • 3 strips of cooked bacon, diced
  • salt and pepper to taste
  • 2 packages of crescent dough (sheets work best, but rolls work as well)
  1. Mix the turkey salad together and allow the flavors to meld for a bit – you can certainly make it and put it right into the braid, but the flavors intensify if you can let it sit in the fridge a little bit.
  2. On a large sheet pan covered in foil (or sprayed with cooking spray… I just don’t like the mess otherwise), lay out both packages of crescent dough side-to-side so you have a long rectangle of dough.  Smoosh any openings in the dough so everything is flat and uniform.
  3. Spread the turkey mixture evenly down the center of the rectangle of dough.
  4. Make slits along each side, doing your best to keep them at even intervals from each other on each side.
  5. NOTE: Here’s the “fancy” part.  Turn the pan so that the rectangle has a “top” and a “bottom.  Starting from one end, and working down to the other, you’re now going to make a “braid” to keep the salad inside.  Lift the left and right top strips, bring them to together, twist once, and lay them back down.  Continue with all remaining strips until it looks like a braided package in front of you.  Pinch the edges closed and tuck under each end.
  6. Bake braid in a preheated 375 degree oven for 30 minutes and then serve with or without a salad.  This meal should serve 4-5 people (or 3 very hungry people who forgot to eat lunch).

You could also add toasted almonds if you want more crunch but we find that the celery gives it just the right bite.  I’ve used this method for a few different meals (especially the Wine Taco Braid post on this blog) so feel free to incorporate any changes or flavors you want.  After all, who knows your family’s tastes better than you!  Have fun!

Recipe: Chambourcin Drizzle

I was trying to create something to add to a salad, when I came up with the idea of trying to use James River Cellars’ Chambourcin as the star ingredient… as luck would have it, a reduction of this sweet wine was just what I had in mind.

ChambourcinDrizzle

I started with 1 1/2 cups of James River Cellars’ Chambourcin wine.  Since our winemaker creates ours as a sweet wine, rather than a dry one, it seemed like the obvious choice to me.  I simmered the wine in a medium saute pan until much of the liquid had evaporated and the wine had thickened significantly.  I didn’t want to do a quick/hard boil on this, so it took about 40 minutes or so for this thickening to happen.

Once the wine was thick, I added 1/2T butter, 1t sugar, and 1T heavy cream to the mixture.  When the butter had melted and the sugar and cream had incorporated thoroughly, I poured the wine drizzle back to the glass measuring cup, where I was able to see that the mixture had reduced down to 1/4 cup of drizzle.   It was tart, yet had a bit of sweetness in the background that I thought would pair beautifully with some blue cheese and chicken in a salad.  Adding some crunch (some nuts, perhaps?) would have been nice touch, but I was more concerned with assembling a simple salad that would be filling and delicious.  The drizzle was relegated to the fridge until it was time to put my lunch together.

When lunchtime rolled around, I was more than ready to dig into this yummy salad.  NOTE: Since butter was used in creating the drizzle, you may want to allow the drizzle to warm ever so slightly so you don’t have any clumps in your drizzle.  Beating it lightly with a small whisk will accomplish the same task.  I sliced some romaine lettuce and used that as the base for my salad.  I thinly sliced a cooked chicken breast, use as much as you’d like and laid the slices in a pleasing array atop the lettuce.   NOTE: I used a breast that I had roasted the night before, but could have easily used pieces of a pre-roasted chicken from the local market. I crumbled some blue cheese over the chicken and lightly seasoned everything with 1T olive oil, salt, and pepper.  

Now was the time for my Chambourcin Drizzle to shine.  I used approximately 2 teaspoons of drizzle to “glaze” my salad, so there was plenty to use for a few servings.  Once I tossed the salad, the entire salad became slightly pink in color… it would have been wonderful with some crusty bread, but I loved all the flavors that combined to create something fun and tasty.

Hope you’ll try making something unique for your next luncheon.  A port wine would have been delicious in this recipe as well… maybe I’ll have to try that version next time.

Enjoy your taste tests… I know I do!


Recipe: Pinot Noir and Black Bean Salsa Dressing

I was trying to make my lunch early this morning when I stumbled onto something pretty tasty. I’m generally not a fan of packing my lunch, but it really is the simpler option when I’m working at the winery. Bringing in something to heat in the microwave might seem easier, but since my meal might be interrupted at any moment, I really do like to have something that won’t spoil. A salad or sandwich is fairly quick to throw together before I leave but this time it became inspired.

I decided to put together a salad for today’s lunch. I cut up a head of romaine lettuce, sprinkled some freshly frozen corn kernels around and then spooned in a small amount of taco meat from last night’s dinner. I had pulled out the last of a jar of Spicy Black Bean Salsa that I had left in the fridge, but I didn’t feel inspired to create a multi-ingredient dressing. Instead, I pulled out a bottle of Acrobat Pinot Noir that I had left in the fridge… and that’s when inspiration hit me. What would happen if I added wine to the salsa?

It was nothing short of wonderful. 1/4 jar of the salsa, combined with about the same amount of the red wine and a packet of equal, became a fabulous concoction that was thick, without being too thick… Spicy, but not too spicy… In the language of The Three Bears, I had unwittingly created a dressing that was “just right”.

I would love to say that it was the most amazing thing I’d ever made, but that would certainly be overstating things a bit. It made a unique and “oh, wow” sort of flavor that blended with my salad ingredients beautifully. The lunch that I had grudgingly packed that morning turned into a meal that made me happy….and any meal that can do that for a person is one worth sharing.

Feel free to share my blog with you friends… Maybe my sense of whimsy in using wine for cooking will inspire others to make something new from the mundane. It certainly has livened up many of the meals in our household.

Wishing you all a renewed sense of the unique and the strange…. it can be quite tasty!

20121016-211428.jpg

Recipe: Taco Meat

20120819-172531.jpg

Warning…. this is a recipe done entirely using The Force.

Sauté two pounds of ground turkey and a diced onion until browned. Add red wine (I used what I had of a California “Spaghetti Red” on hand but I would have used James River’s Rad Red if I’d had it open) and enough taco seasoning to cover. Once the liquid is absorbed, the taco meat is ready to use for whatever you want to use.

M and D like to make burritos with it (tortillas, meat, cheese, lettuce) and I like to use mine for a salad (lettuce, meat, cheese, and salsa). E probably would have made this into a massive wrapped burrito using the salsa cheese sauce we still have in the fridge along with rice and beans. It’s a great ingredient to have on hand to make a simple, easy dinner on a lazy Sunday night but it also works well as an ad hoc lunchtime ingredient.

Try it at your house sometime… You might be pleasantly surprised at the results!