Mimi’s Peas

You’ve had the traditional “Green Bean Casserole“, right?  It’s the one on the back of the Campbell’s soup can…. the one that has been around forever… the one that everyone makes for holiday meals.  What would you think if I told you that we make this same casserole with PEAS instead of green beans?  THIS is a game-changer, people.  It’s absolutely amazing and is a staple on almost every holiday menu (or at least Thanksgiving, Christmas, and Easter) in our family.

mimispeas

Ingredients:

  • Frozen Peas (1- 1 1/2 16oz bags)
  • 1 can sliced water chestnuts, chopped
  • 1 can French’s Onion Rings (reserve 1/2-3/4 cup for topping)
  • 1 can Cream of Mushroom soup
  • 1/4 cup white wine (I like a dry or semi-dry wine)
  • 1 packet G. Washington Brown boullion *Trust me, this stuff is worth finding.  LOVE it and use it in so many ways!

Directions:

  1. Mix everything together, topping with the reserved Onion Rings.
  2. Bake in greased casserole dish at 375 degrees for 30-45 minutes, until bubbly.

This is our family’s “must have” recipe on any holiday table.  It also works well when mixing with turkey, stuffing, and gravy (and topped with mashed potatoes) to make a leftover turkey shepherd’s pie.

Give it a try sometime… you may find that you like this even better than the standard recipe!

Advertisement

Glazed Salmon and Scalloped Potatoes

I have a confession to make… I’m usually lousy at cooking salmon.  Since I found two pieces on “mega-sale” at the store today, I thought I’d give it one more try to see if I could come up with something really yummy.  I have to say that this entire meal ended up being one of my favorites… and it was ridiculously easy!  This post isn’t just a recipe for dinner, it’s also got a great side dish (I serve these potatoes for Easter EVERY year) and a salad dressing.  If you’re looking for an easy and impressive dinner, this is it.  Yum!

GlazedSalmon_ScallopedPotatoes

Glazed Salmon

Ingredients for Salmon:

  • Salmon fillets
  • Salt/pepper
  • Coconut oil (or your favorite fat/oil)
  • Glaze
    • 2T jam (I used Loganberry jam)
    • 2t balsamic vinegar
    • 2t white wine (I used a lightly oaked chardonnay)

Salmon Directions:

Season the salmon fillets with salt and pepper.  In a hot saute’ pan, melt coconut oil and then sear the seasoned side of the salmon filets.

  • As the salmon sears in the hot oil, blend the glaze.  You’ll need to warm the jam for 10 seconds in the microwave.  You’re not trying to melt the jam… you just want it loose enough to blend with the vinegar and wine.  You’ll want to adjust the seasonings with a little salt and pepper…. make sure to taste the glaze before using it.
  • Once the one side of the salmon is nicely browned, turn the fillet over and pour the glaze over top. Since the salmon won’t be thoroughly cooked, I put the entire pan into the oven and allow the fish to roast until dinner is done.
  • NOTE:  I started the potatoes about 30-40 minutes before I began making the salmon, so the house already smelled amazing before I started on the fillets.

Scalloped Potatoes

Ingredients for Scalloped Potatoes (This recipe serves two/three.  You can add/subtract as needed to serve more people)

  • Three medium potatoes (I like to use Gold potatoes)
  • Half an onion
  • Flour (1/4-1/3 cup)
  • Salt/pepper
  • White wine
  • Shredded cheese (I used 1/2 bag of sharp cheddar)
  • Milk (I only have skim in the house, so that’s what I used)

Directions for Scalloped Potatoes

  • Slice potatoes thin (I use a mandolin, but that’s not necessary as long as the slices are all equally thin)
  • Slice onion in half (you only need 1/4 onion for each layer) and slice as thin as potatoes
  • Layer your dish:
    • Half potatoes
    • Half onions
    • Sprinkle with flour (this will ultimately thicken your cheese sauce, so don’t skimp)
    • Season lightly with salt and pepper
    • Thumb wine lightly over mixture
    • Top with a light layer of cheese
  • Repeat layer, ending with cheese
  • Bake in a preheated 375 degree oven for 45-50 minutes or until potatoes are fork-tender and the top is bubbling and browned.

This recipe showed me that, with a little ingenuity and imagination, I could create a fabulous, easy, “guest-worthy” meal that would satisfy all my expectations.  This is a starter recipe that will impress the pickiest visitor… try it and see what YOU think!

BONUS RECIPE:  I’d like to share my absolute favorite salad dressing recipe with you.  This recipe makes an impressive amount of dressing that is much lower in calorie than you’d ever imagine. I have NEVER actually measured the ingredients for this dressing, so you’ll have to forgive me for not including any.

Blend the following ingredients:

  • Balsamic Vinegar (a small puddle in the bottom of a salad bowl)
  • Mustard (I tend to use horseradish mustard or dijon mustard)
  • 1 envelope of sweetener (Equal or Splenda, depending on what’s in the house)
  • 1T of a prepared dressing (I typically use a creamy dressing of some sort)

Mix ingredients together and toss with thinly sliced romaine.  This is full of flavor and better than you’d expect!


White Summer Couscous Salad

It’s that time of the year again… summer is finally here and I have a fabulous salad to share with you!  I first had this dish in California, when we went to visit some dear friends in San Diego.  I watched our hostess whip up this delicious side dish and couldn’t help but be impressed with the clean taste, gorgeous colors, and wonderful blend of flavors.  While it’s not a dish that my husband would like (he doesn’t like the texture of couscous), I immediately knew it would become a personal favorite.  I hope you’ll consider trying it sometime soon and let me know how you like it!

WhiteSummerCouscousSalad

Ingredients:

  • 1 box Couscous
  • Garlic (I used about 1T crushed garlic)
  • Olive Oil (I think the directions call for a specific amount – I used about 2T)
  • 2 cups liquid (I like to use 1 cup bouillon and 1 cup dry white wine)
  • 1 small block feta, diced (or one small package of crumbled feta)
  • 1 package grape tomatoes, quartered
  • 2T fresh basil, sliced thin (more if desired)
  • 2T balsamic vinegar
  • salt/pepper to taste

Directions:

  1. In a microwave-safe bowl (I use a glass pyrex bowl), heat the garlic in olive oil for 30 seconds.  Add the 2 cups of liquid and heat for 4-5 minutes or until boiling. (see top right photo)
  2. Add entire box of couscous, cover with plastic wrap, and allow to sit until liquid is absorbed, about 5 minutes. (see top left photo)
  3. While the couscous is finishing, you can prep the grape tomatoes, feta, and basil (See lower left photo).  When all liquid is absorbed, fluff the warm couscous with a fork. Toss in the tomatoes, feta, and basil.  Season with balsamic vinegar, salt, and pepper.


Note:  I like to serve this salad chilled, but it’s just as delicious as soon as it’s made.  You can add bits of avocado and/or grilled chicken to make this into a filling lunch.  The original recipe called for whole tomatoes, diced, but I really like the texture and sweetness of cherry or grape tomatoes.  Feel free to use your own preference to create something uniquely your own!

Recipe: Twice Baked Wine Potatoes

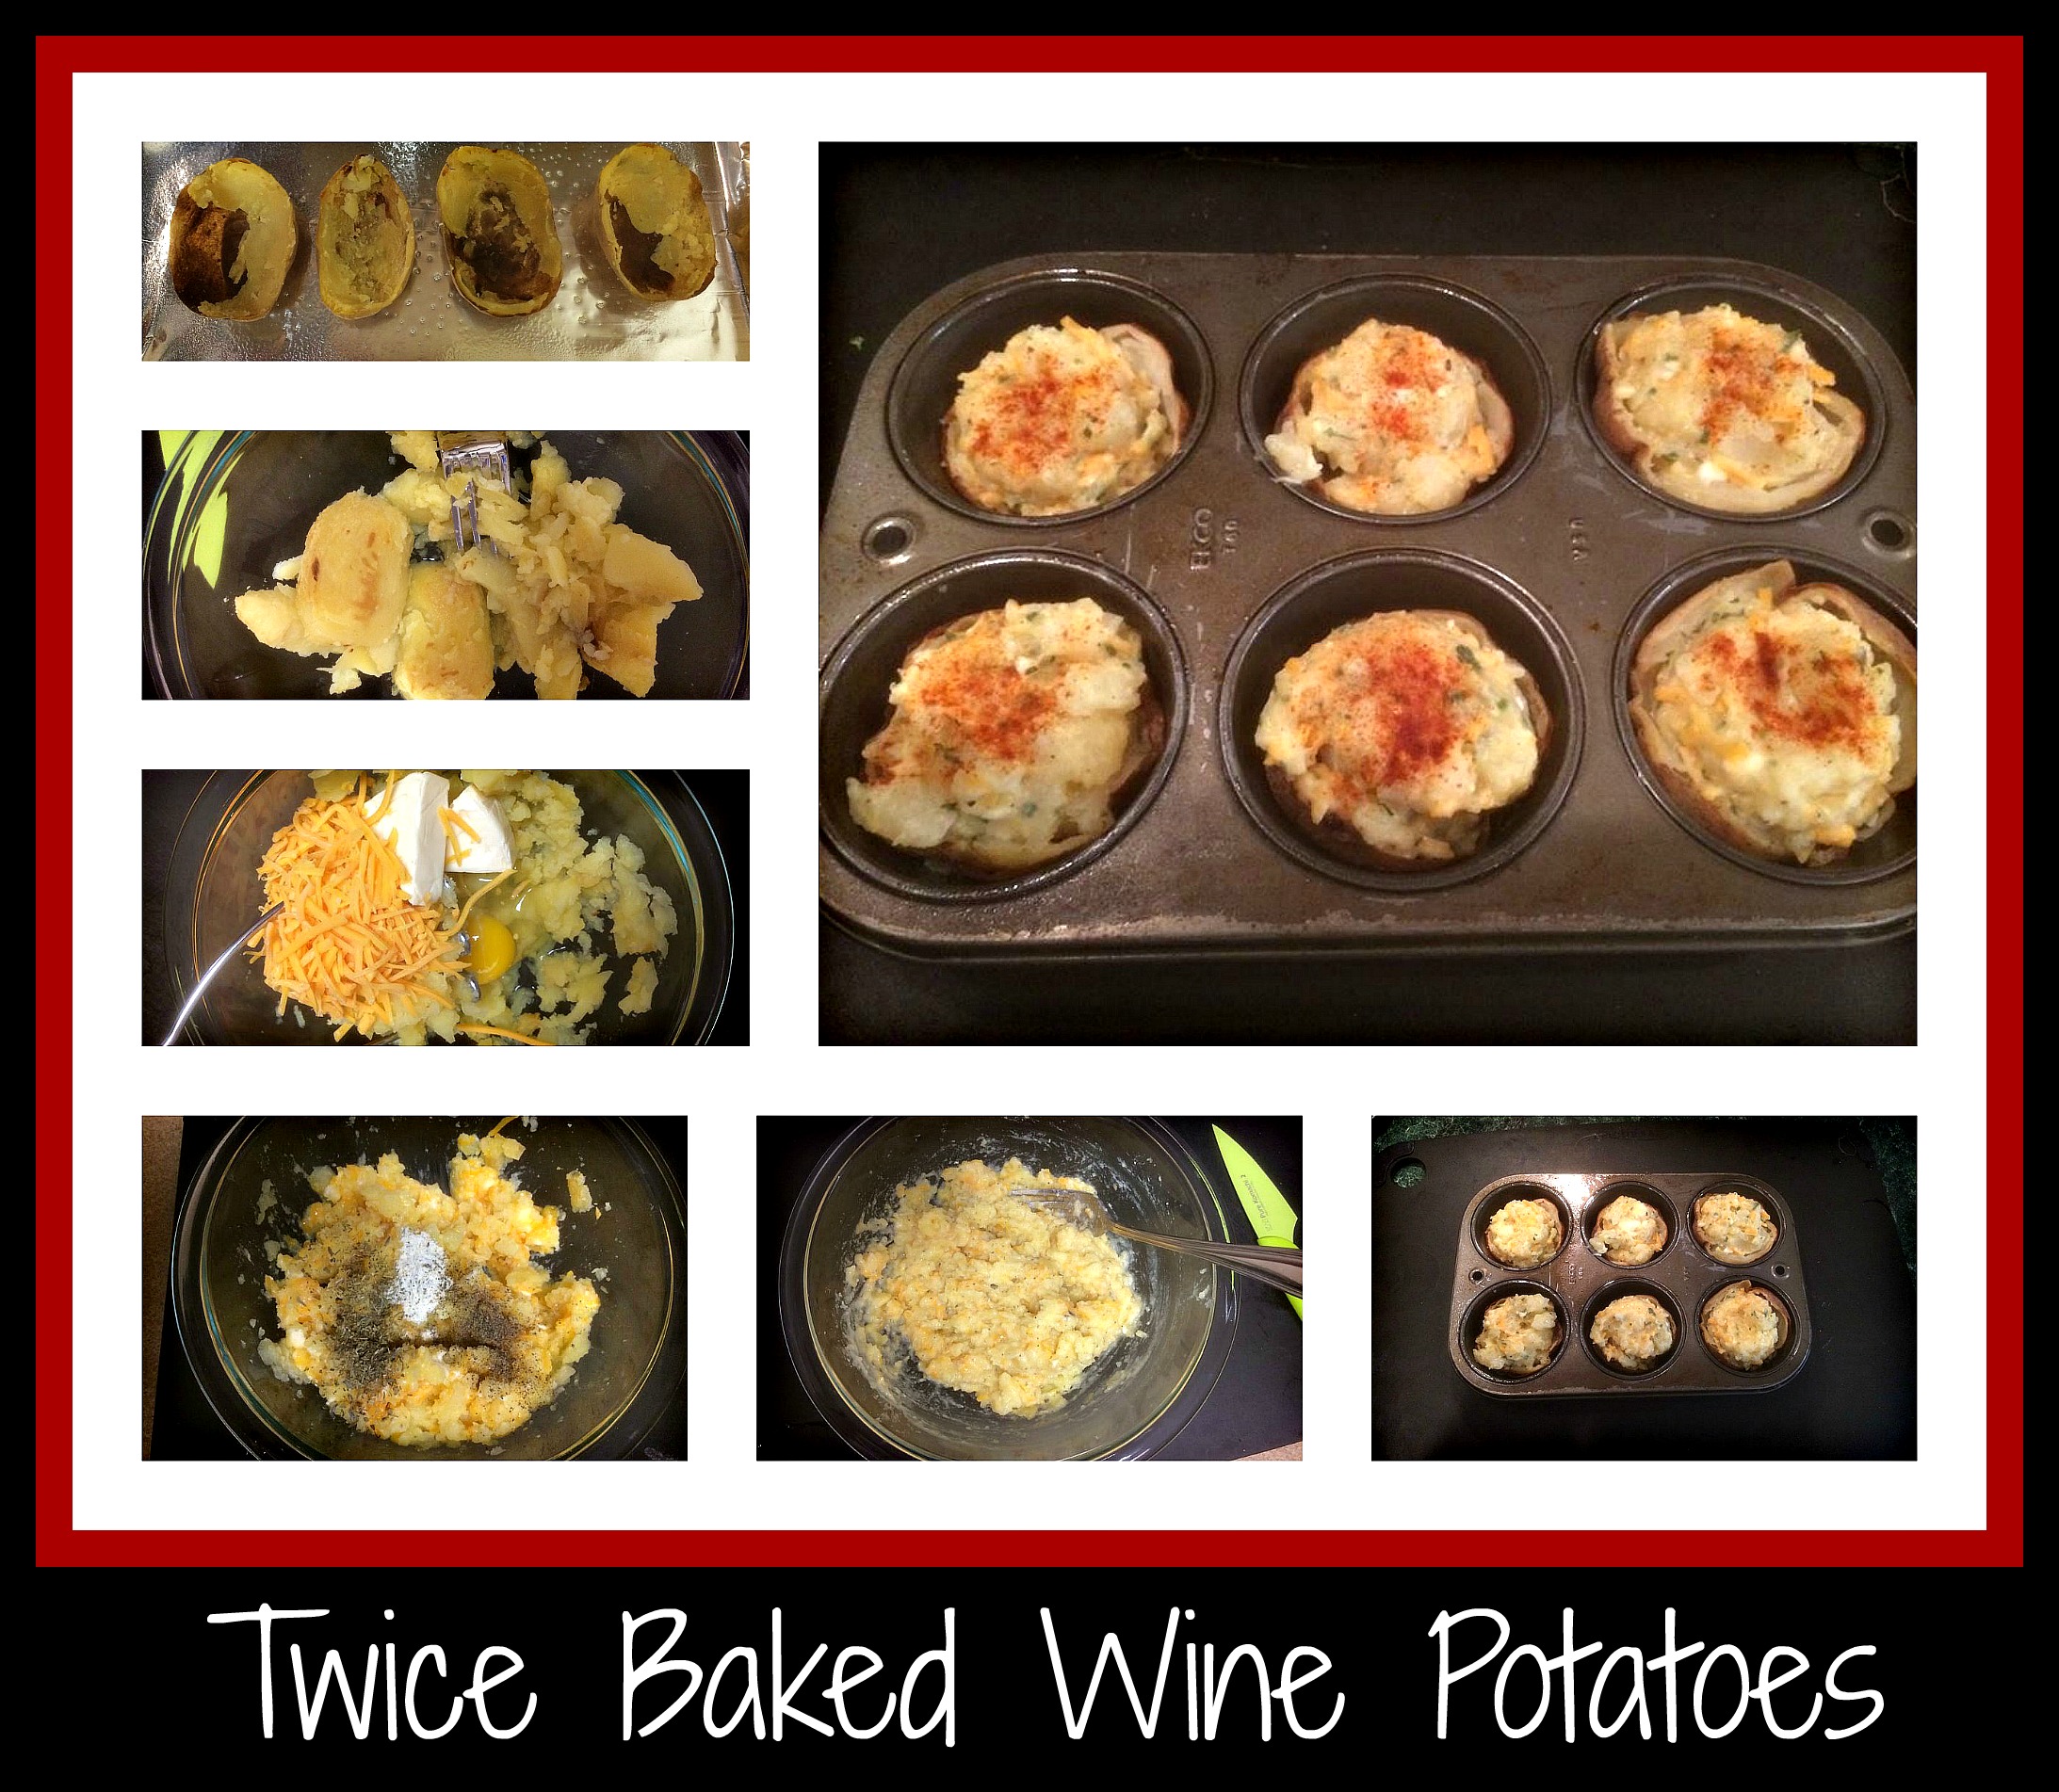
As promised, here is the recipe for my favorite Twice Baked Wine Potatoes.  I have been making these for quite awhile now.  I alter the recipe each time, depending on the flavor blend I want to have for the meal it might accompany, so it really does work for so many meals.  I’m sharing the basic idea, but please feel free to adjust and play with the recipe to suit your own family’s tastes and preferences.

I like to use Yukon Gold potatoes for this recipe.  NOTE:  the number of potatoes you bake depends on how many servings you want in the end, but for the two of us, I tend to bake three potatoes so I end up with six small twice-baked potatoes.  Feel free to bake your potatoes however you like, but I typically will cut a small slice in the side of the potato (this will end up being the start of my cut to slice each potato in half) and bake the potatoes at 350 degrees for 45-60 minutes.

Once the potatoes are cooked, I remove them from the oven (remember that they’re hot, so use oven mitts so you don’t burn your fingers) and slice them in half, lengthwise.  Using the oven mitts and a spoon, scoop out the cooked potato and collect it in a bowl large enough to mix any/all ingredients.  NOTE: If you want to use a mixer for this part, you can put all your potato innards into your mixing bowl… I just like the more rustic feel I get from using a hand masher, similar to one my mom used to use.TwiceBakedWinePotatoes

Once you’ve scooped out all the potato skins, your cooking fun begins!  For the recipe pictured here, I first added the following ingredients:  shredded cheese, one egg, a spoonful of margarine, some great tasting white wine,  and a wedge of Laughing Cow lite cheese.  Once I mashed these together, I needed to adjust the seasonings so I added a spoonful of Greek yogurt, salt, and some freshly ground pepper.  NOTE:  I have used a spoonful of Bourcin Cheese on occasion and this has also been a great addition.  The egg can be omitted, but I find that it adds a touch of richness to the final product that is otherwise lacking.  Feel free to use a Fat-Free Egg Substitute if you prefer, but using only the egg whites won’t produce the same texture – experiment with your favorite ingredients on this one.

Once the mashed potato mixture is to your liking (make sure to taste this part), I use a small cookie scoop to fill the potato skins so I know that I’m filling everything evenly.   You can simply line up the filled potato skins onto a baking sheet, but I have found that I really like to place the potato skins into a muffin tin and fill them inside so they don’t end up rolling off to the side and are easy to store until you’re ready to bake them.   I’m one of “those” people who thinks about dinner early in the day, so if I have the completed Twice Baked Potatoes sitting in my fridge for the day, it’s so much simpler to have them contained in a muffin tin.

NOTE:  This is a recipe that you could easily double and make over the weekend – freeze anything you don’t want to use right away and then you have a perfectly simple side dish available for any night of the week!  I’m a huge fan of “make-ahead” foods that can be stored in the freezer.

To bake these little darlings, just pop them into a preheated 375 degree oven for 30-40 minutes or until they’re cooked through and lightly browned on top.  I love the crispiness of the potato skin and think that it’s a wonderful complement to any meal.  I’ve served it with BBQ chicken, steak, lobster, shrimp, burgers… almost anything looks fancier when you put these out as your side dish!

Hope you’ll try this and see just how easy it is to make such a fun side dish… our family loves them and I’m sure yours will too!

Recipe: Red Mashed Potatoes

Yes, this is a strange way to use wine, but I was curious.  I had time on my hands, two potatoes, and some red wine… so what else was I to do, but to try out this recipe?RedMashedPotatoes

I started with two potatoes, a small amount of crushed garlic, about a cup of James River Cellars Hanover Red wine, and some herbs de provence.  I diced the potatoes into even cubes, added them along with the garlic and the herbs into a small saucepan, and then poured in the wine to almost cover the potatoes.  I cooked the potatoes in the wine until much of the wine had been absorbed.  NOTE: Next time, I think I’ll add a small amount of chicken stock along with the wine… the potatoes didn’t cook quite as much as I would have liked before the wine was absorbed.

Once the potatoes were ready, I mashed them until they were fairly smooth before adding a touch of margarine and some milk to turn this into a rather unique side dish.  NOTE: I wasn’t thrilled with the final purple color – next time, I think I’ll smash the potatoes and then just add a little butter, to allow the red and white colors to show through.  When the potatoes were totally mashed, they turned purple…. before that, they were really pretty.  I might even just toss the cooked potatoes with a small bit of olive oil and roast a touch so the colors don’t change.

Sometimes we all have “less than favorite” final results when trying out a recipe.  I wanted to post this so you know that we’re all in that same boat.  I have the occasional flop, just like everyone else… the idea is to learn from any mistakes and keep trying.

Enjoy the journey and keep cooking!

Recipe: Kale’d Squash with Chardonnay

Just wanted to add a follow up recipe to the Kale Pesto recipe that I posted yesterday.  I shared lots of ways to use kale pesto, but here’s a recipe that I used for breakfast this morning.  This recipe would make a great side dish and can certainly be altered as needed if you are following a diet plan that doesn’t allow for wine or other ingredients.

Kale'd Squash

I had already roasted and cooled some spaghetti squash, so I started with this ingredient as my focus.  In a saute pan, I heated a small amount of olive oil, some crushed garlic, and a large spoonful of Kale Pesto.  Once this was sizzling, I added  2 cups of spaghetti squash, along with a nice amount of James River Cellars Chardonnay, and tossed all the ingredients together, cooking them until everything was toasty and fragrant.  

As I completed this recipe, I added some salt and pepper to taste and topped with a small amount of grated asiago cheese.  Since the alcohol in the wine had cooked out and I still had the back-taste of chardonnay in my food, this was a really tasty breakfast, but would have made an equally yummy lunch or even a full meal (if I added some protein).

 Isn’t that a great way to kick off a new day?  Enjoy!

Recipe: Chardonnay Broccoli Buds

Hey, James River Cellars’ Wine Club Members!  Are you looking for an interesting recipe that uses the Stainless-Steel Chardonnay that you got at tonight’s release party?  You’re in luck… I’ve got just the thing… Chardonnay Broccoli Buds.  It’s a recipe that can be either an appetizer or side dish (cold OR roasted).  YUM!

ChardonnayBroccoliBuds

I first had this recipe as a child, during Sunday picnics at summer camp with relatives and friends.  I had never had broccoli as a cold appetizer before and it was delicious… crisp, tangy, and flavorful.  I have made this recipe many times throughout my adulthood but it always seemed a bit too oily, so I decided to remake it.

Since I used an actual recipe to start, it’s only fair that I give you the new recipe as one with specific ingredients (but please realize that I’ll always alter things slightly when I remake a recipe, so even these are guidelines).

Start by mixing 1/2 cup cider vinegar, 1/2 cup oil (I used canola oil), 1/2 cup James River Cellars’ Chardonnay, 1/2 Tablespoon sugar, 1/2 Tablespoon dried dill, 1/3 Tablespoon accent, 3/4 teaspoon salt, 1/2 teaspoon fresh ground pepper, and 1/2 teaspoon garlic salt together in a large resealable bowl or resealable plastic bag.  Add 1 1/2 to 2 bags fresh broccoli florets and toss well.  Allow broccoli to marinate for 24-48 hours, re-tossing in the dressing occasionally.  Once the vinaigrette has thoroughly flavored the broccoli, they can be served cold (drained of any access vinaigrette) as seen in the left photo OR drained and roasted in a 350 degree oven for 12-15 minutes as seen in the right photo.

I hope you and your family enjoy this side dish/appetizer as much as I always do… it reminds me of the magical summers I spent in PA as a child and it makes me happy.  I hope it becomes a recipe that makes you happy as well!

Enjoy… from my childhood and family to yours!

Recipe: Mango Risotto

OK, I know this sounds really weird, but this side dish was the perfect accompaniment to dinner recently.  As you can see by the photo, I was making tilapia (not using the recipe for Ali’s Rock Star Tilapia… just wanted to saute’ the fillets with some paprika) and I decided to make a side dish that would utilize the mangos that I picked up at Sam’s Club recently.

MangoRisotto

My younger son is a huge fan of the mango fruit, so I decided to attempt a spicy/sweet risotto that would include this yummy ingredient.  I peeled and chopped two mangos and popped them into a saucepan with 1 cup of white wine (I used Potomac Point Viognier this time… could just as easily have used James River Cellars’ Chardonel or Vidal Blanc) and 1 cup of water.  I brought the liquid to a low simmer and cooked the fruit until I could mash it easily with a potato masher.

I added 3/4 cup arborio rice and seasoned with a little chicken consomme powdersalt & pepper  before allowing the rice to cook and soak up all the yummy flavors.  Simmering the rice took about a half hour, but I was watching to see if I needed to add any more liquid.  Note:  the liquid absorbed faster than I expected, so I added a touch of James River Cellars’ Hanover White Wine, to stay with the sweet/spicy theme.

Once the liquid was absorbed and the rice was tender, I added a handful of parmesan cheese and a heavy dash of paprika to taste.  This side dish ended up having a tasty blend of mango and spice that paired really well with the sautee’d fish.

Nothing like having something go over well when you’re totally winging it, right?  I was definitely a fan and will work this dish into the “meal rotation” going forward…  YUM!