Snickers Bites

Welcome to anyone who is new to my wine blog… especially to those who have found your way here through @coffee_and_crayons_blog. I wanted to get this recipe posted somewhere so I had a way to share it with others. While it doesn’t incorporate wine, it’s one that I make often and is one of my favorite whole food snacks. This is my smaller “snack-size” spin on one that is posted on Brittany’s @EatingBirdFood . Note: my ingredients list is vague for a reason. If you want to use 3 dates and make 12 bites, you’ll need less ingredients than if you use 7 dates and make 28 bites. I don’t typically measure this recipe and like to “use the force”, as my husband so says. My Snickers Bites don’t look incredibly swoon-worthy, but they’re delicious! See Photo #1 below.

Ingredients:
Medjool dates
Whole dry-roasted almonds (or pecans)
Peanut butter (the drippy kind where peanuts are the only ingredient)
Chocolate Chips (I either use semi-sweet or dark chocolate)
Coconut oil

Directions:
1. Line a cookie tray with a piece of parchment paper. Slice your dates into fourths and lay on the prepared tray, leaving enough room in case things get “messy”.
2. Press a single nut on each quarter piece of date. See Photo #2
3. Spoon a small amount of peanut butter on each date. Pop in the freezer to allow the peanut butter to harden. Try not to get excess peanut butter on the parchment, since it will be discarded if it’s not *on* the bite. Once hardened, I flip the bites over before adding the chocolate. This is completely unnecessary, but I think it’s pretty. See Photo #3
4. Warm up the chips with a small amount of coconut oil until smooth. I use a silicone measuring cup and microwave in 30 second increments until the chips and oil have melted together.
5. Spoon (or drizzle) a small amount of the chocolate mixture on top of each date… this is where it can get really messy and where you’ll be glad of a little space between each bite. Once all the bites are covered to your liking in chocolate, pop the tray back into the freezer to harden. See Photo #4
6. Once your snickers bites are hard enough, you can remove them from the tray and store them in a ziplock bag in your freezer. See Photo #5 below.

Photo #1 – completed Snickers Bite

Photo # 2 – dates are quartered and a single almond is pressed into each

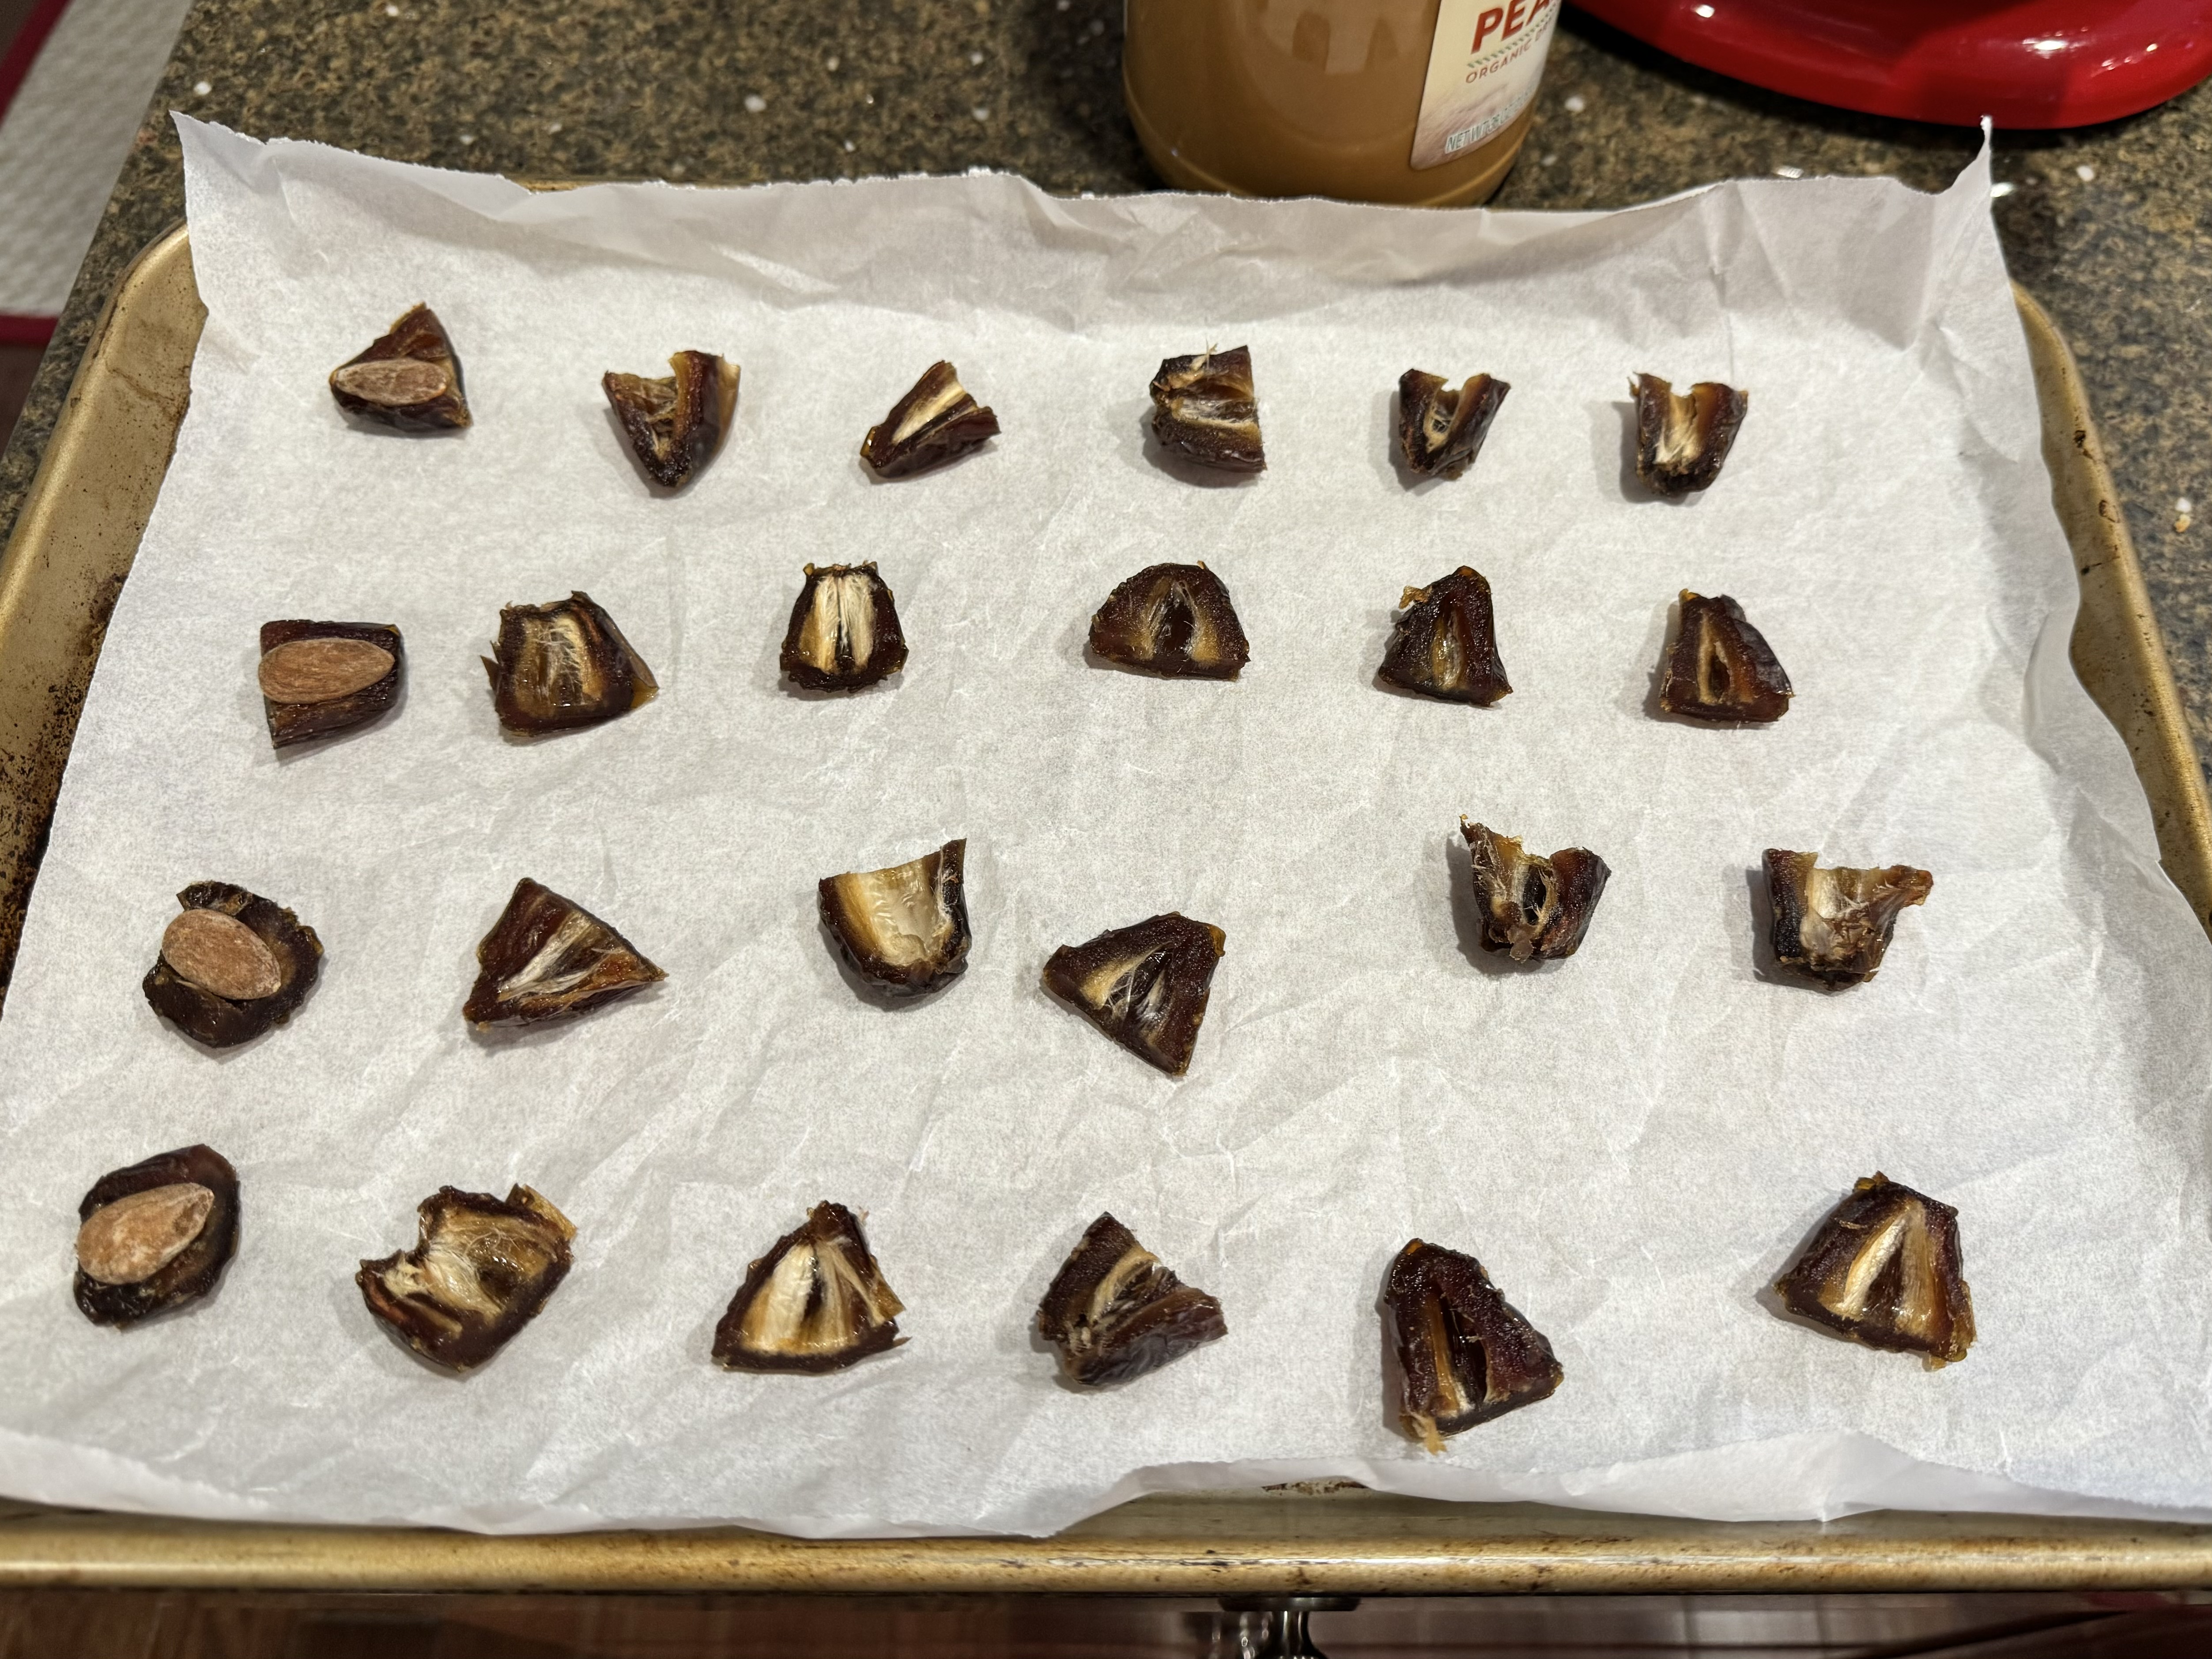
Photo #3 – Photo of bites, first with peanut butter and then with the bites flipped over, ready for the chocolate layer

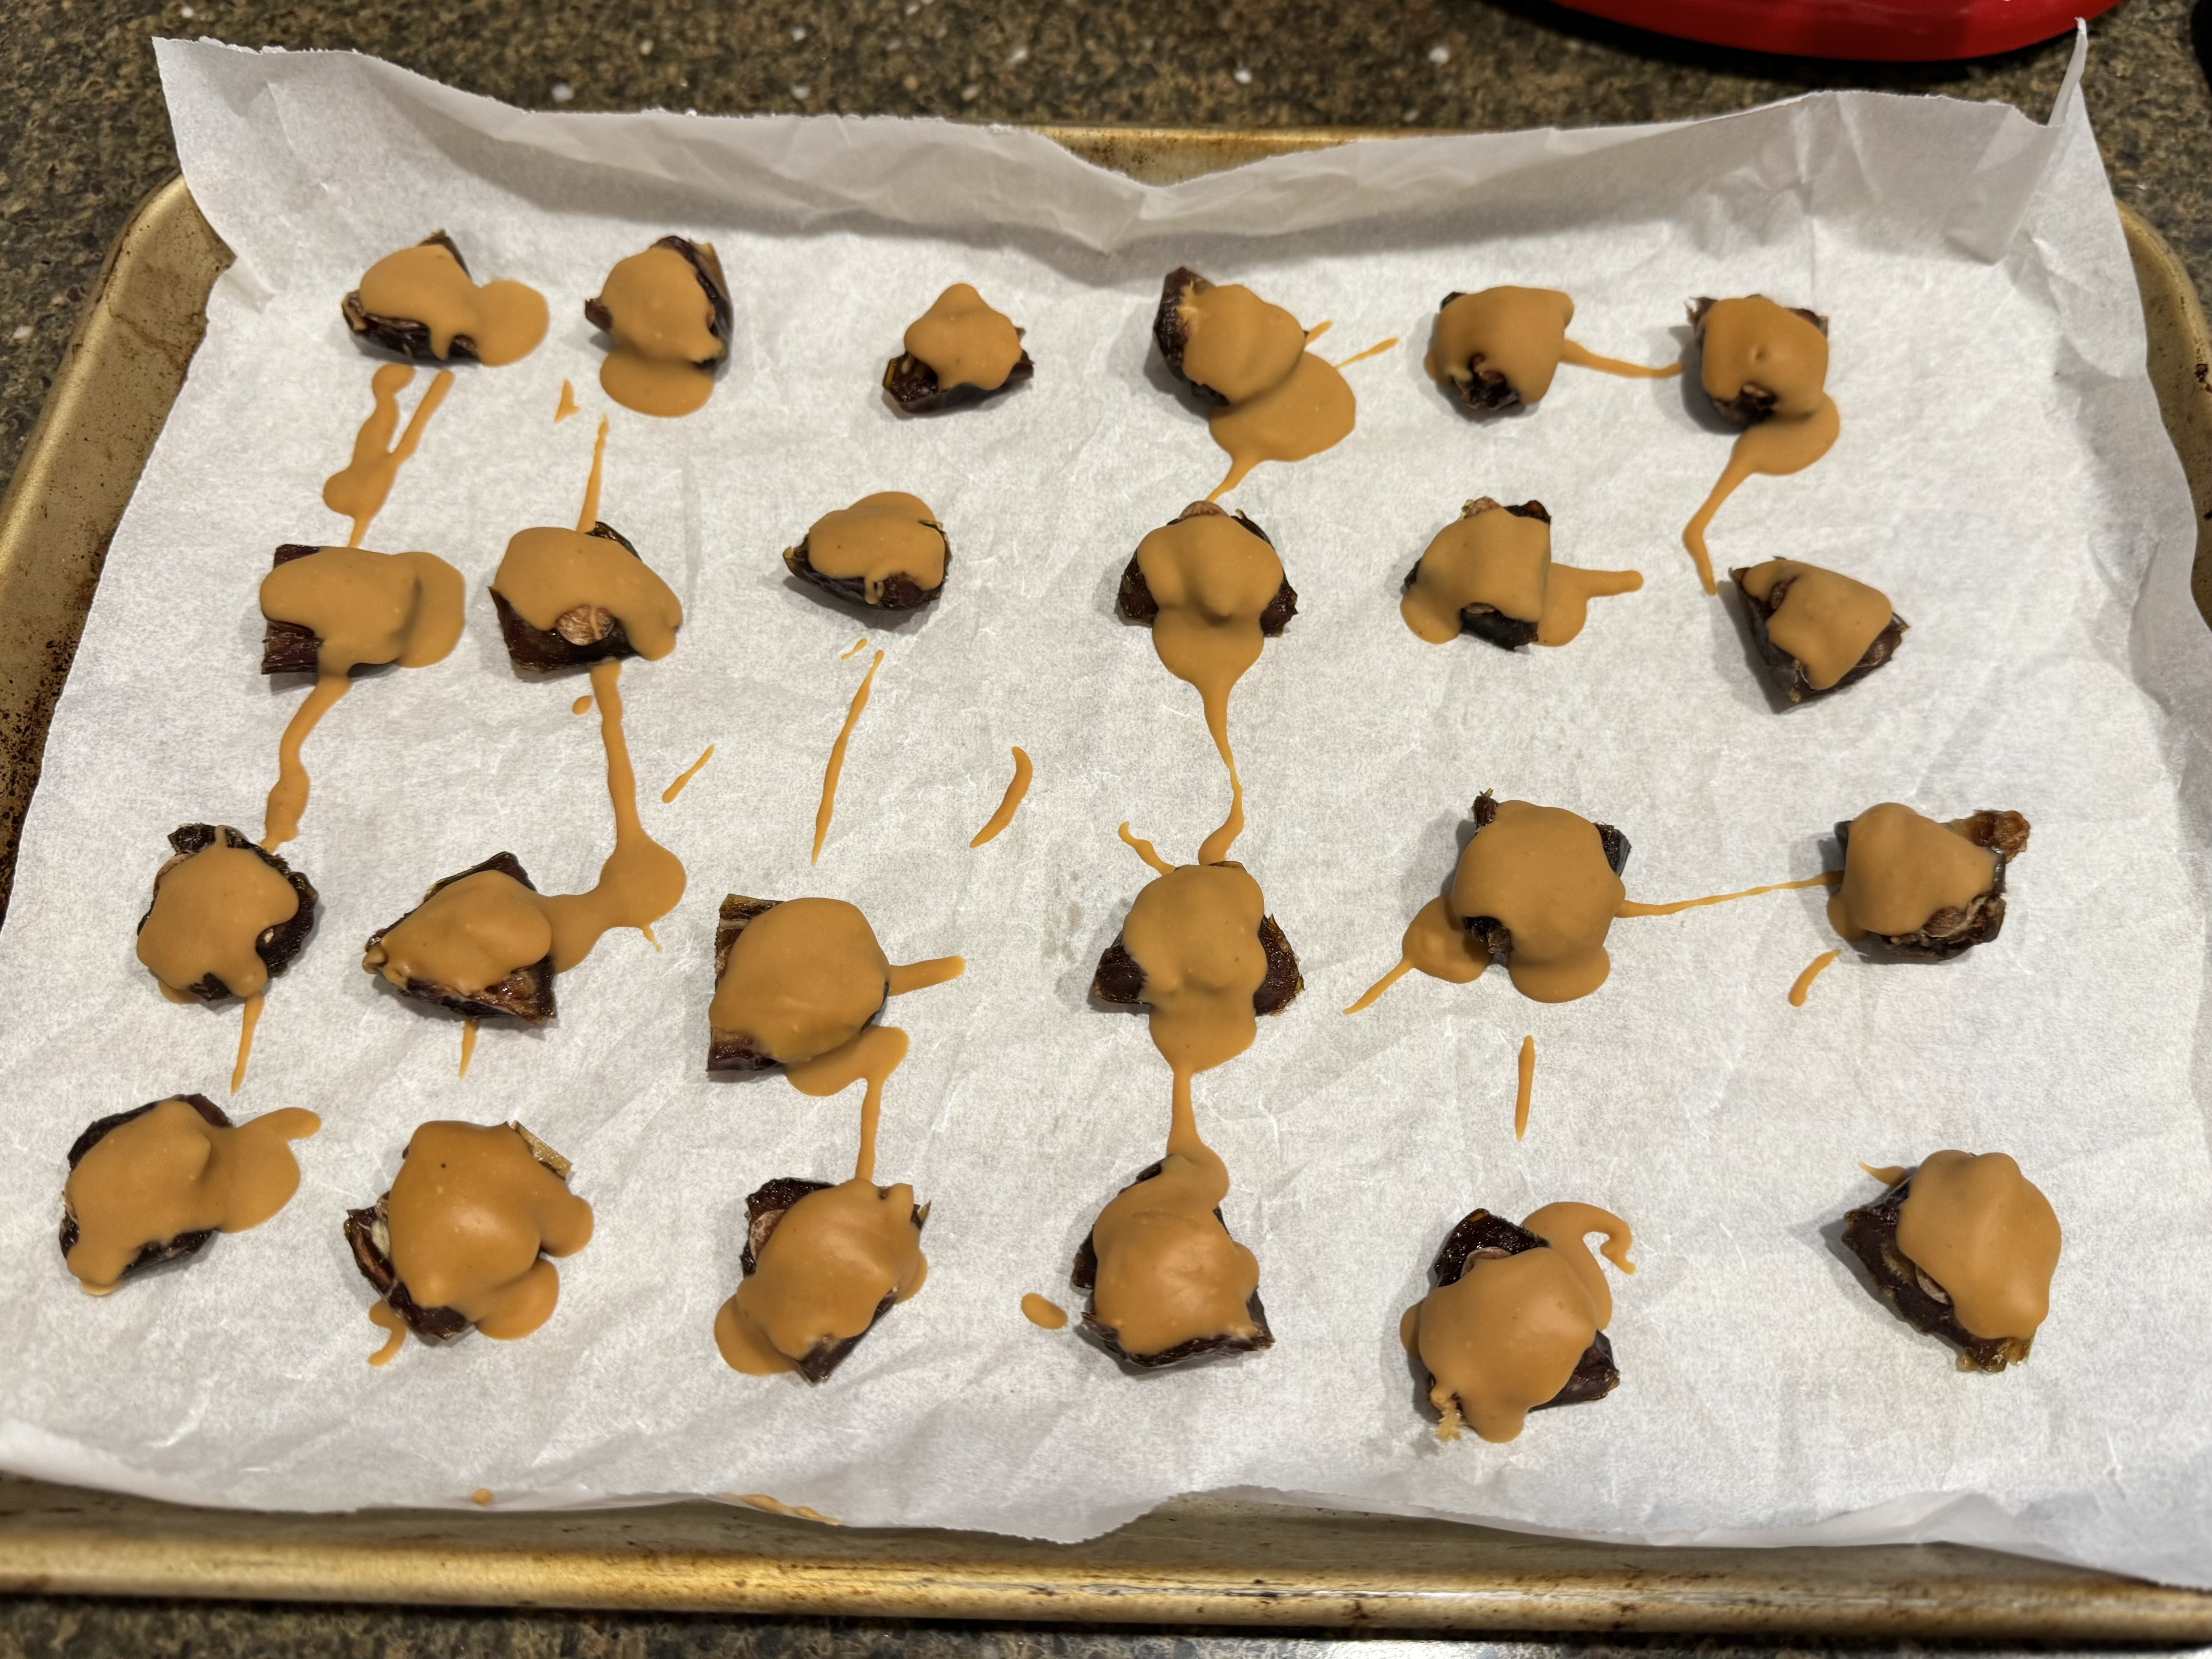
Photo #4 – chocolate layer with a bit of drizzle – now they head back to the freezer

Photo #5 – completed Snickers Bites, nicely hardened and ready to eat.

I hope you enjoy this recipe. It’s one that I make every week or so and one that doesn’t seem to require a lot of thought or planning, provided I keep all the main ingredients on hand. You can certainly adjust this recipe to fit your own preferences – I’ve used dry-roasted pecans instead of almonds (just as delicious) but highly recommend using the larger Medjool dates rather than the smaller “pitted dates” you might find in large bags at a store like BJ’s.

Landscaper Muffins AKA “Thank You Muffins”

I call these “Thank You Muffins” because I make them to thank anyone who comes to my house – our landscapers, the mulch guys, the electrician, the plumber, the septic guys, and sometimes even our UPS guy! It’s my personal way of letting them all know how much I appreciate the work these people do to make my life easier… and doesn’t everyone like to know they are appreciated?

I’ve been sharing this recipe for years… and I don’t think I’ll be stopping anytime soon. I love having a recipe in my arsenal that uses a short list of ingredients, comes together quickly, and is (in my opinion) fool-proof… this recipe hits every one of those criteria!

Chocolate Thank You Muffins

INGREDIENTS:

  • 1 box cake mix – I used chocolate cake, but you can use any flavor or brand you like best. Sale brands are great to keep on hand for this recipe.
  • 1 can solid pack pumpkin – I typically buy 10 cans at a time, simply so I am always able to whip up a batch of muffins whenever needed
  • A small handful of Mini chocolate chips – off-brands are fine to use – they play a supporting role in this recipe.
  • A small amount of wine – I use red wine with chocolate, carrot cake, or spice cake muffins…. white wine with yellow cake, or anywhere I don’t want that pink hue to show. This is a great way to use up any “leftover wine”.

DIRECTIONS:

  • Preheat your oven to 375*F
  • Cover two large cookie trays with parchment paper.
  • Put your ingredients into a large mixing bowl and stir until thoroughly combined. If using a carrot cake recipe, feel free to let the mixture rest a little to allow the dehydrated carrots to plump a bit… it’s not necessary, but can help as you’re doling the mixture onto trays.
  • Scoop mixture onto cookie trays using a small cookie scoop. NOTE: I use the smallest cookie scoop from Pampered Chef, but will occasionally use the medium sized cookie scoop. The only difference will be in your cooking time and the number of muffin balls you can make. If I use the smallest scoop, I can make approximately 25 muffin balls/tray. Using the medium scoop only allows me to make approximately 18 muffin balls/tray.
  • Bake muffins in preheated 375* oven for 15-18 minutes (18-22 min for medium muffins).
  • Remove and allow to cool – I pull the muffins/parchment off the tray so the bottoms of the muffins don’t continue to cook.

Here are some photos of the process:

A “large” example of a “handful” of chips.
The dry red wine I used for these muffins: @BoordyVineyards South Mountain Red
Scooping the muffin mixture onto a prepared tray, using the small scoop
Two trays of Thank You muffins go into the oven

Another alternative is to make this recipe into full-sized muffins, using a muffin tin, or even baking it in a 9×13 baking pan and cutting into pieces. The recipe itself is incredibly adaptable, but your baking times will need to be adjusted. I love having bites of cake to share with people, so this is my personal preference.

I hope you find this recipe helpful. I have written it down a few different times and have made many different versions, all of which have been delicious. Feel free to message me here, or on my FromTheBottomOfAWineBottle Facebook page, if you have any questions!

Fudgy Brownie Muffins

If you ever have the need for a delicious and simple muffin recipe, this is one to keep on hand.  I have been making (and playing with) this recipe for years and it is one of my absolute favorites.  This version seems a little more sophisticated, but it’s truly one that I make to give to anyone, especially when I have people doing work on my house.

We’re getting a new HVAC system installed in our home today.  We’re not exactly thrilled with the timing, but the original system was installed in 1998, so we knew we were due. Since I knew the workers would be here for much of the day, I thought I would make some muffins to show my appreciation for all the work they’re doing.  I made this recipe in mini-muffin tins so they would be “pop-able”… nothing worse than having to worry about muffin wrappers or holding food between bites if you’re working hard.  I just love the ease of this treat!

fudgybrowniemuffinsNote:  If you saw my post about “chocolate jury gems”, this is a version of the same recipe.

Ingredients:

  • One box chocolate brownie mix (I like to use dark chocolate mix)
  • One can solid pack pumpkin (NOT pumpkin pie mix)
  • 1/3 cup mini chocolate chips
  • 1 teaspoon cinnamon
  • 1 teaspoon dark chili powder
  • 1/4 cup (2 Tablespoons) red wine.  I used a pinot noir, but any dry red wine works well

Directions:

  • Preheat oven to 400 degrees.
  • Empty brownie mix into a large bowl and add remaining ingredients.
  • Blend everything together thoroughly until it resembles the photo in the lower left corner of the collage above.
  • Using a small cookie scoop, divide batter into mini muffin tins that have been sprayed with cooking spray.  Note:  this recipe will make about 40 mini-muffins, so you’ll go through two sets of mini muffin pans twice
  • Bake in pre-heated oven for 18 minutes, remove promptly and allow to cool while you scoop the remaining batter into the muffin tins for the second round of cooking.
  • These muffins are delicious warm, room temp, or cool.  They are fabulous for kids (the pumpkin packs a great punch of fiber) and have been a favorite in my family for years.

Starter Recipe: Chocolate Fudge “Jury Gems”

As a Starter Recipe, I try to make things easy and simple so that anyone just learning to cook can make the recipe.  This snack food fits the bill, in my opinion.  I was put on a jury recently and wanted to make something to share with my fellow jurors on our final day… this was the food I brought to keep us focused as we concluded our duty.

Ingredients:ChocolateFudgeJuryGems (1)

  • 1 box chocolate fudge brownie mix (or your favorite box mix)
  • 1 can solid pack pumpkin (not pumpkin pie mix)
  • Mini chocolate chips (I used about 1/4 cup)
  • Red wine (I used a Pinot Noir, but you could use any dry red wine or even substitute espresso if you prefer)

Directions:

  1. Preheat your oven to 400 degrees and spray your cupcake tins with cooking spray.  I used two small cupcake pans (12 small cupcakes in each) and one mini cupcake pan (also with 12 mini cupcakes).
  2. Empty the brownie mix, pumpkin, and chocolate chips into a large mixing bowl.  Pour in a small bit of wine/liquid (start with 1/4 cup) and mix all ingredients together until well incorporated.  If the batter seems too thick, add a bit more wine/liquid.  I like this batter to be fairly thick, but not so thick that the batter could stand alone, like a cookie dough.
  3. Using a cookie scoop, ladle out the dough into the cupcake tins.  I used a medium scoop for the small cupcake tins and a small scoop for the mini cupcake tin.
  4. Sprinkle with decorations, if desired (I used gold sugar) and put the tins into the oven.  I baked the mini cupcakes for 15 minutes and the small cupcakes for 3 minutes longer (18 minutes total).  Use a toothpick to test when making sure the fudge-cupcakes are cooked thoroughly.

These fudge-y cupcakes will get very sticky if served the following day, so be sure to allow them to dry a bit so they don’t actually stick to the fingers of your guests.  I got lots of positive comments on these snacks from my fellow jurors and that solidified the name for me… Jury Gems.  We had three days together and I hope that everyone feels they did their best according to the law, as required.

If you have a chance to make this recipe for your friends, feel free to alter the name a bit… these are delicious, healthy, and surprisingly filling.  Enjoy!

Recipe: Another twist on brownies

Every once in a while, I get a craving for brownies.  Today, my craving was for a simple recipe for brownies that wouldn’t take much in the way of time or effort… the Army/Navy game was starting at 3PM and I just didn’t want to get too invested in the “how” of making brownies.  Enter the Shake and Pour Brownies Mix container (as shown in the picture).702733_10151373537062953_589848861_n

This interesting item that I found in the baking aisle of the grocery store instructed me to simply “add 1/2 cup water and shake” to be able to make brownies… how much simpler could that be?  My next thought was how the  brownies would taste if I substituted red wine in place of water… I mean, why use water if I can use wine, right?

I brought the package home and added a shy 1/2 cup of James River Cellars Rad Red wine.  Once I poured the mixture into my 9×9 pan, I added a small amount of wine into the container to finish getting all the remaining traces of brownie mix and poured that into the pan as well.  I gently mixed everything together (since it was already in the baking pan) and popped it into the oven.  In true “Using The Force” style, I sprinkled the end of a bag of Bits o’ Brickle onto the top after the first 10 minutes of cooking time.  If you wanted to add chocolate chips or candy bits, this would work equally well.

I baked them a little too long (in my opinion) but otherwise I think they turned out nicely.   This would be an easy thing to keep on hand for those last minute times when you need to send a baked good along with someone, whether they’re going to work or headed back to school.

Try your own version of these easy brownies… maybe use espresso or coffee in place of the water?  Who knows… you might come up with the perfect new dessert for your family!  Use The Force… it can be so much fun and oh, so tasty!

Recipe: Doctored Chocolate Chip Cookies

Yup… you’re reading it correctly… I make Doctored Chocolate Chip Cookies.  Oh, and I doctor them with WINE.  Don’t believe it?  Try this recipe and let me know what you think after trying this yourself.   They’re amazing.

I’ve mentioned before that I cook using The Force, right?  This recipe I created started with the basic Nestle Tollhouse Chocolate Chip Cookie recipe that is wonderfully simple but fun to alter.  I’ve been making this recipe for decades now and am going to share this recipe with you.  I will warn you that I tend to tweak this recipe from time to time, so feel free to add your own special touch to create your own version.

It started innocently enough… at our second duty station (USNA), M had just been assigned as the O-Rep (Officer Representative) for the Varsity men’s soccer team.  M came up with the great idea of making a large bag of cookies for each of the guys on the team for their birthday.  I’d make up a batch of homemade cookies, put them into a gallon freezer bag, and he’d drop them off at Main Office for the boys to pick up.  So many times, parents weren’t able to get treats to their kids in time for a birthday, so this was our way of stepping in to make the boys feel special.

I started making cookie dough whenever I had time and then would freeze balls of dough so I could bake cookies anytime there was a birthday.  As I got better at cooking, my freezer became an inconvenient place to store balls of frozen cookie dough and I ended up making cookie dough and keeping it in the fridge, scooping out dough as needed.  With two boys and their friends always around our house, a batch (or even a double batch) didn’t sit around for long…. and it still doesn’t.

I also found that I have a definite preference in using Butter flavored Crisco instead of butter or margarine… as the cookies bake, they don’t seem to flatten as quickly as those made with butter/margarine and the chocolate chips seem to stay softer for a longer time.  I think they rock… maybe it’s worth a try if you’re feeling so inclined.  Note:  On the Crisco package, there is specific information on “how to substitute Crisco shortening for butter or margarine in your favorite recipes”… says to add 2Tablespoons of water to 1 cup of Crisco to mimic 1 cup of Butter or Margarine.  This is why I started adding liquid to my cookie recipe.

Doctored Chocolate Chip Cookies

4 1/2 c flour

2 t baking soda

2 t salt

2 c butter-flavored Crisco

1 c white sugar

2 c brown sugar

4 eggs (room temperature)

2 t chili powder

2 t cinnamon

1/2 t ground ginger

1 t almond extract

2 t vanilla extract

1 t espresso powder

1/4 c red wine (I like a dry red or Meritage)

1 1/2 cup EACH semi-sweet, mini, and bittersweet chocolate chips (4 1/2 cups overall)

In a small bowl, mix the flour, soda, and salt together and set aside.  In a small measuring cup,  blend together eggs, spices, extracts, espresso powder, and wine.  In large mixer bowl, whip together the Crisco and sugars until light.  Slowly add in the egg mixture and beat until well incorporated.  Gradually add flour mixture and blend until dough is mixed thoroughly.   Gently blend in all three types of chocolate chips.  If preferred, put all cookie dough into an airtight container and allow to sit in the fridge until you want to bake a tray of cookies.

When cooking, drop by teaspoon (or small cookie scoop) onto a baking sheet.  Bake at 375 degrees for 10-12 minutes.  In my oven, I bake for 11 minutes and then remove and allow baked cookies to set for a few minutes before removing them to a wire rack to cook completely.
Oh, and I believe that I also added 2 teaspoons of blood orange balsamic vinegar to this most recent batch… it added a nice touch of acid against the heavy sweetness of chocolate and sugar.   I’ll be incorporating this into my recipe as long as I can continue to find that special vinegar… it’s totally worth the search!

These are amazing chocolate chip cookies… I hope you’ll consider trying this recipe out for yourself.  Maybe you’ll come up with a favorite ingredient to add that creates your own special chocolate chip cookies.  Have fun out there!

Recipe: Chocolate Wine Cobbler

ChocolateWineCobblerI originally found this recipe on the side of my Facebook account. It looked yummy and was called “Chocolate Cobbler”. It showed up in my FB feed when I was looking for a new dessert and this just looked simple and tasty. For me, the plus came when the recipe called for “boiling water”… wait… water? What? Why use boiling water when I could substitute wine… and a new recipe was born. After trying this recipe a few times, I’ve finally been able to get a picture of this treat so you can see just how yummy it can be. Oh, and you’ll notice that there are exact measurements in this one because I didn’t use The Force…

INGREDIENTS:

2 sticks butter or margarine (I used margarine, because that’s what I had on hand)

BATTER:

1 1/4 cup sugar

1 1/2 c self-rising flour (or use 1 1/2 cup regular flour + 2 tsp baking powder + 3/4 tsp salt)

1 tsp vanilla

3/4 cup milk

CHOCOLATE LAYER:

1 cup sugar

6 Tbs cocoa powder

WINE LAYER:

2 cups boiling red wine – I used 2 cups of sweet red wine *Note: this tastes perfectly fine with boiling water instead if you so choose.

DIRECTIONS:

  1. Preheat oven to 350 degrees. In a high-sided 9×13 baking dish, melt the two sticks of butter in the oven
  2. Meanwhile, in a separate bowl mix together the ingredients for the batter layer. Once the butter is melted, pour the batter over the melted butter but DO NOT STIR.
  3. In a clean bowl, mix together the ingredients for the chocolate layer. Sprinkle on top of the batter but DO NOT STIR.
  4. Pour 2 cups of boiling wine gently on top of entire dessert (again… DO NOT STIR) and bake for 30-45 minutes. I bake mine until I can see a nice golden brown crust.
  5. Serve warm – this is great with ice cream.

I served this dessert at our company Christmas party and it was a huge hit. If you want to substitute boiling water for the wine, that’s completely fine. I would use anything that you like, but I’d suggest using a red wine that cooks well. I find that red Bordeaux varietals (Cabernet Franc, Cabernet Sauvignon, Merlot, Malbec, and Petit Verdot) cook nicely and maintain their integrity throughout the process.

Enjoy! I’ll be adding a little bit of vanilla ice cream to each serving tonight, but I can’t think of anything more comforting than wine paired with chocolate…