Landscaper Muffins AKA “Thank You Muffins”

I call these “Thank You Muffins” because I make them to thank anyone who comes to my house – our landscapers, the mulch guys, the electrician, the plumber, the septic guys, and sometimes even our UPS guy! It’s my personal way of letting them all know how much I appreciate the work these people do to make my life easier… and doesn’t everyone like to know they are appreciated?

I’ve been sharing this recipe for years… and I don’t think I’ll be stopping anytime soon. I love having a recipe in my arsenal that uses a short list of ingredients, comes together quickly, and is (in my opinion) fool-proof… this recipe hits every one of those criteria!

Chocolate Thank You Muffins

INGREDIENTS:

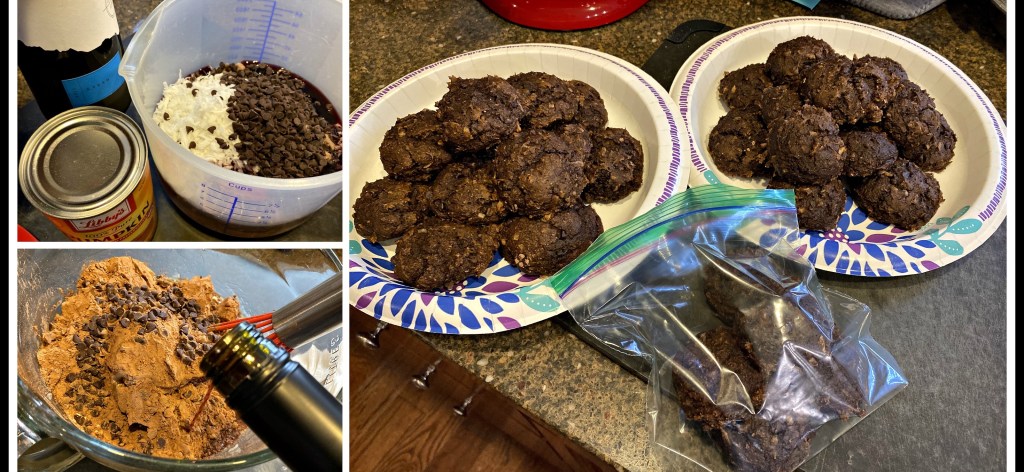
  • 1 box cake mix – I used chocolate cake, but you can use any flavor or brand you like best. Sale brands are great to keep on hand for this recipe.
  • 1 can solid pack pumpkin – I typically buy 10 cans at a time, simply so I am always able to whip up a batch of muffins whenever needed
  • A small handful of Mini chocolate chips – off-brands are fine to use – they play a supporting role in this recipe.
  • A small amount of wine – I use red wine with chocolate, carrot cake, or spice cake muffins…. white wine with yellow cake, or anywhere I don’t want that pink hue to show. This is a great way to use up any “leftover wine”.

DIRECTIONS:

  • Preheat your oven to 375*F
  • Cover two large cookie trays with parchment paper.
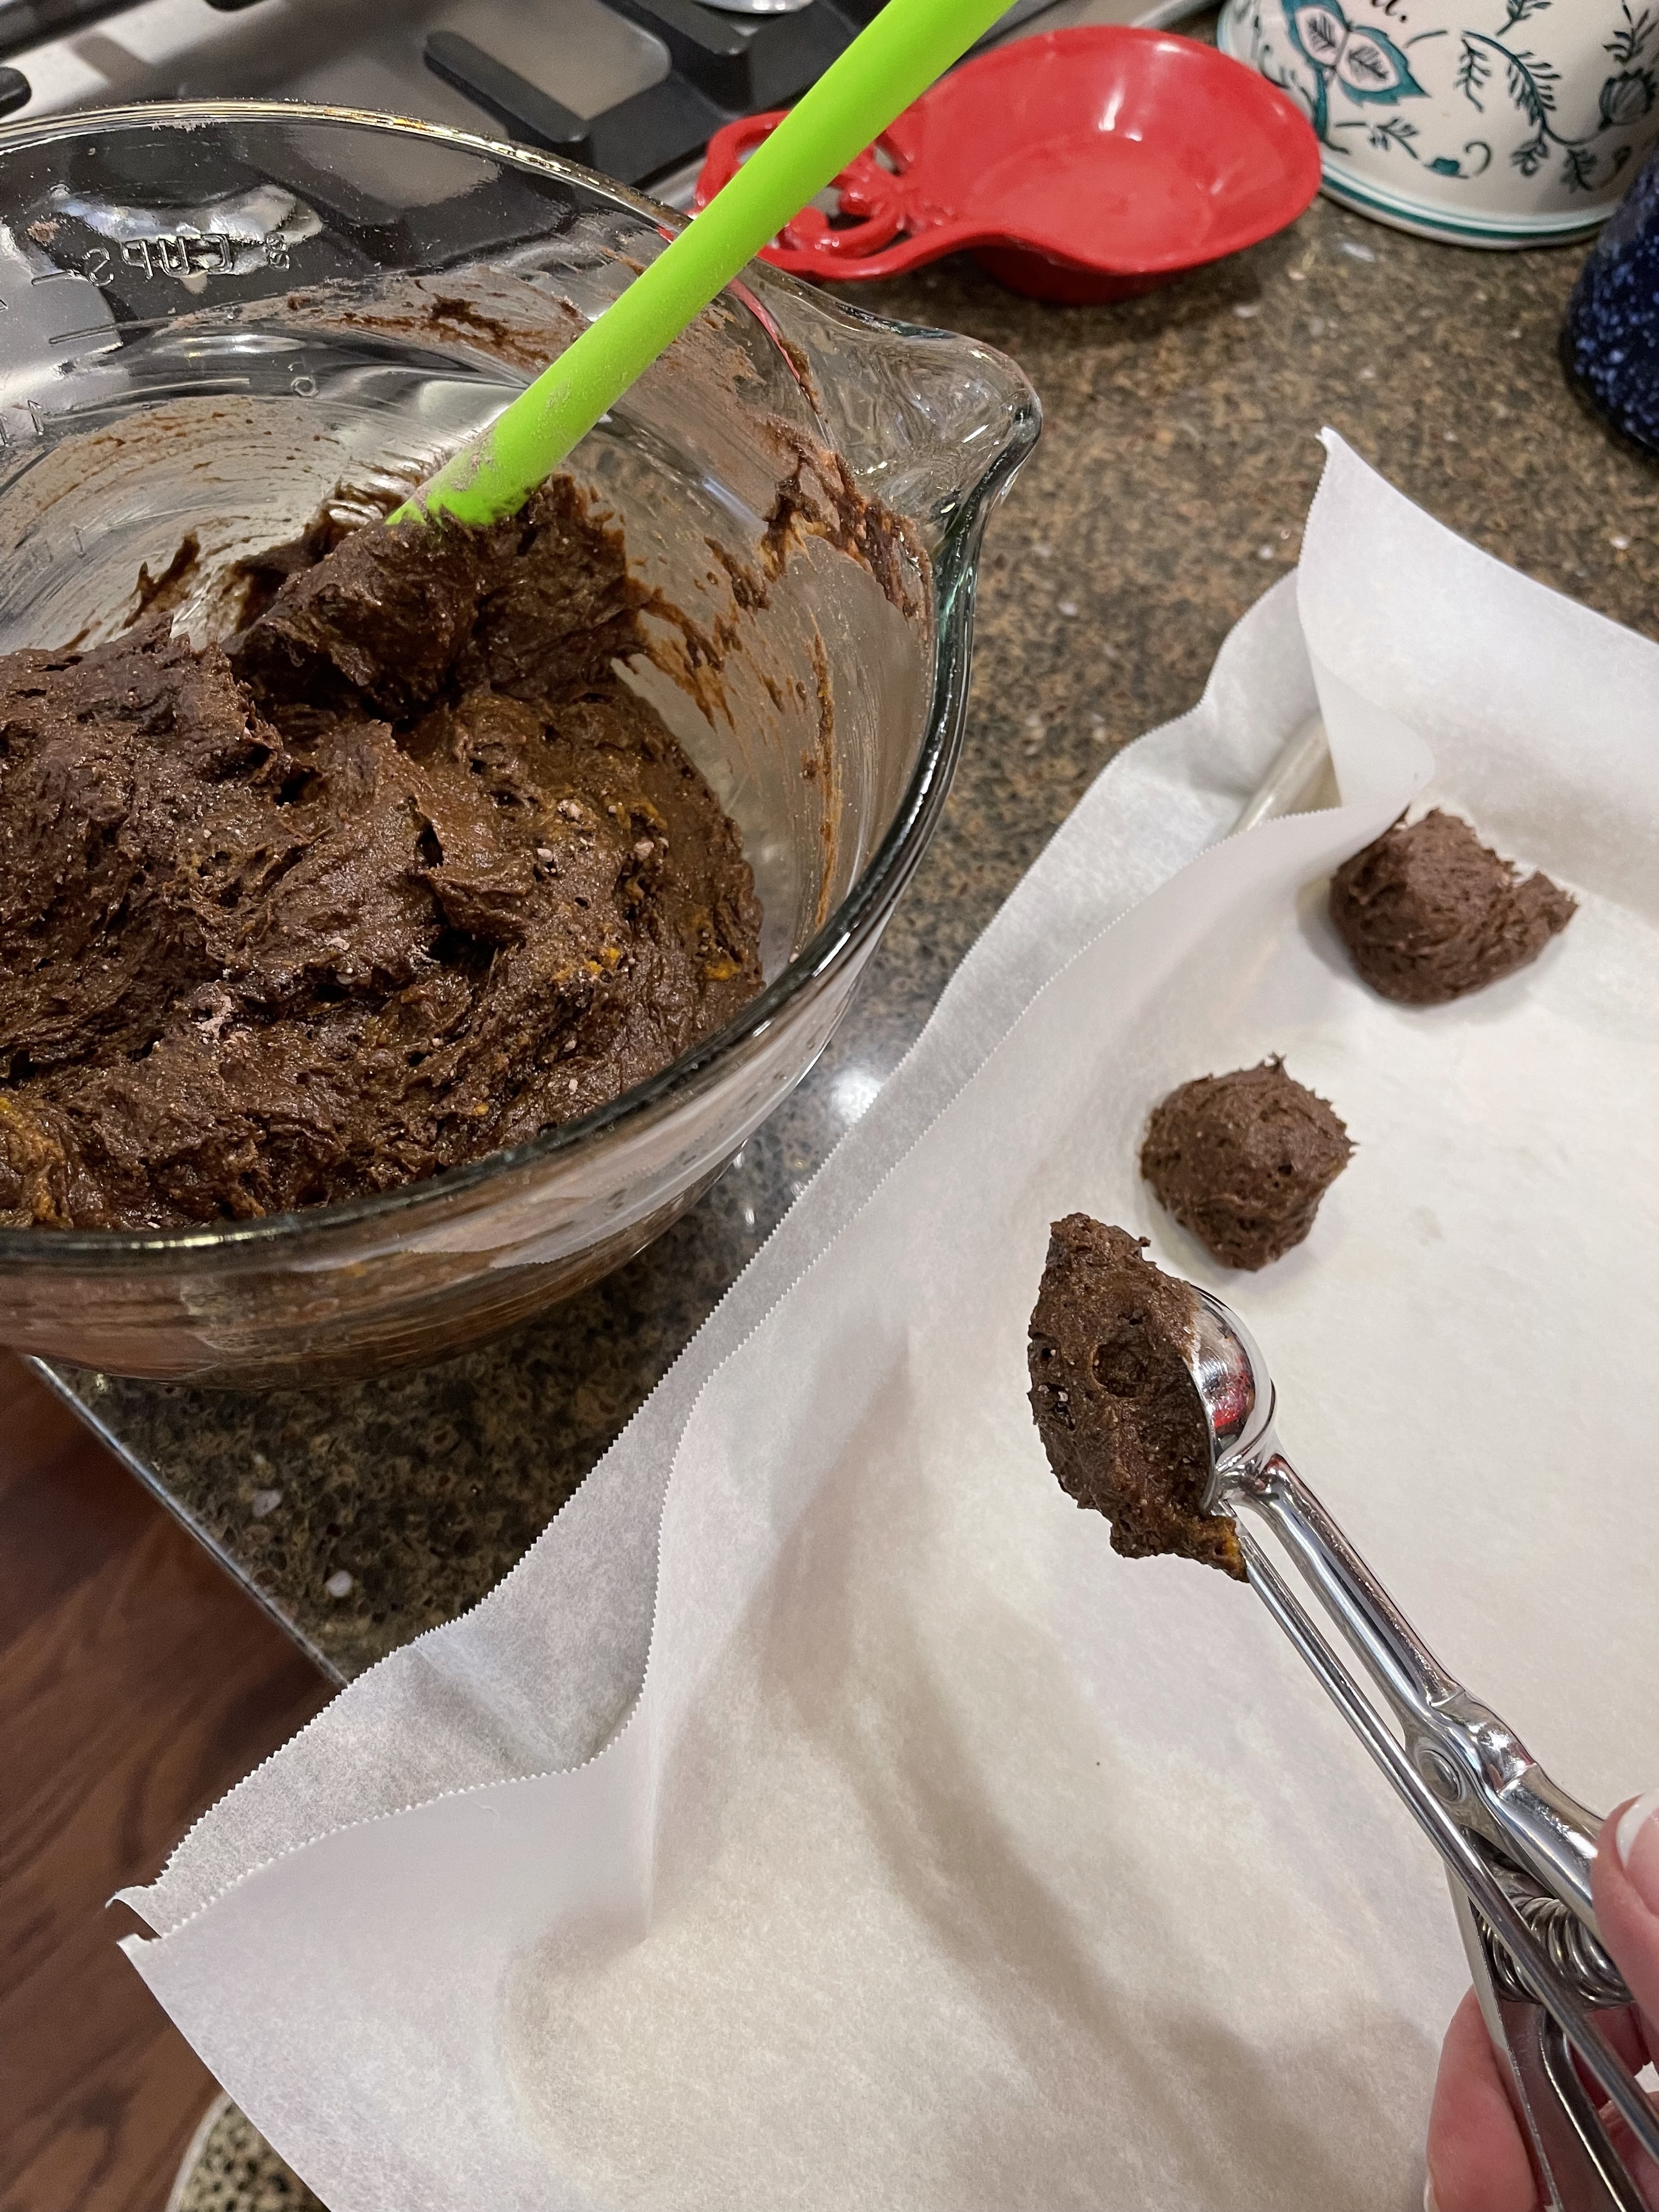
  • Put your ingredients into a large mixing bowl and stir until thoroughly combined. If using a carrot cake recipe, feel free to let the mixture rest a little to allow the dehydrated carrots to plump a bit… it’s not necessary, but can help as you’re doling the mixture onto trays.
  • Scoop mixture onto cookie trays using a small cookie scoop. NOTE: I use the smallest cookie scoop from Pampered Chef, but will occasionally use the medium sized cookie scoop. The only difference will be in your cooking time and the number of muffin balls you can make. If I use the smallest scoop, I can make approximately 25 muffin balls/tray. Using the medium scoop only allows me to make approximately 18 muffin balls/tray.
  • Bake muffins in preheated 375* oven for 15-18 minutes (18-22 min for medium muffins).
  • Remove and allow to cool – I pull the muffins/parchment off the tray so the bottoms of the muffins don’t continue to cook.

Here are some photos of the process:

A “large” example of a “handful” of chips.
The dry red wine I used for these muffins: @BoordyVineyards South Mountain Red
Scooping the muffin mixture onto a prepared tray, using the small scoop
Two trays of Thank You muffins go into the oven

Another alternative is to make this recipe into full-sized muffins, using a muffin tin, or even baking it in a 9×13 baking pan and cutting into pieces. The recipe itself is incredibly adaptable, but your baking times will need to be adjusted. I love having bites of cake to share with people, so this is my personal preference.

I hope you find this recipe helpful. I have written it down a few different times and have made many different versions, all of which have been delicious. Feel free to message me here, or on my FromTheBottomOfAWineBottle Facebook page, if you have any questions!

Advertisement

Thank You Muffins

It’s been ages since I last posted a recipe or a food pic here. I’ve been sharing things on my Instagram account (@AliSportShots), but sitting down to formally type out something has taken a back seat. I’ve posted *sooo* many recipes here (over 175, by last count) and I like to be able to share something totally new, if possible…. however, I realized that I’ve been mentioning “Thank You Muffins” on multiple platforms and have never written this recipe for others to use, so I’m fixing that now.

Here’s my very favorite recipe… the one that I make at least once a week… the one I use anytime I need to express my appreciation for someone… the one that I’ve made SO many times throughout the past year that it’s become a “thing” in our house. This is my recipe for Thank You Muffins.

The ingredients list is fairly simple and incredibly flexible:

  • 1 box cake mix (any flavor)
  • 1 can solid pack pumpkin
  • Add-ins (chocolate chips, coconut, nuts, seeds, etc. – a palm-full)
  • Wine (just a few splashes, to thin out the batter a touch)

Directions:

  • Preheat your oven to 375*. Place a large piece of parchment paper (or use a silpat) on two large baking sheets
  • In a large bowl, empty the cake mix, add the pumpkin, include whatever add-ins you’d like, then splash in some wine. Mix thoroughly.
  • Using a small cookie scoop (I have all three sizes from Pampered Chef and prefer using the smallest for these muffins), place small scoops of batter on the prepared baking sheets. I’ve been able to get as many as 42 mini-muffins from a batch but it varies.
  • Bake at 375* for 12-14 minutes, until the muffins spring back if touched on the top. Remove and allow to cool on the paper (I lift the paper off the baking sheet so the bottoms of the muffins don’t continue to cook). NOTE: if you’re making these as full-size muffins, in a muffin tin, you’ll want to cook them at 400* for 15-17 minutes.
  • Once muffins are cool, you can freeze them for later use. I typically get two plates of muffins (or two weeks of muffins for my landscapers) from each batch.

I have used every flavor of cake mix for this recipe and tend to try and pair the flavor of the wine with the flavor of the cake mix. I’ve used chocolate cake mix with red wines, spice cake with red (or white) wines, yellow cake with white wine, carrot cake with rose’ (or most anything)… I’ve even used a sweet red (or a little sparkling wine) with a strawberry cake mix. Each one has come out well and has conveyed the right message…. “thank you”.

I must confess that the origin of this recipe is from about ten years ago, at a Weight Watchers meeting. It started as a two-ingredient sweet… cake mix and a can of pumpkin… no eggs, no oil, no complications… but I couldn’t leave it alone. I liked the idea of making full-size muffins from this recipe, which you can do easily, but I am a big fan of “bite-size” treats. After monkeying around with the recipe, I came up with the one you see above. My boys loved when I would make this recipe for their friends… especially since the main ingredient was solid-pack pumpkin… and I was happy to make it because I felt good about serving something relatively healthy to people.

Try this and see what you and your family think… I hope you enjoy it as much as me!

Fudgy Brownie Muffins

If you ever have the need for a delicious and simple muffin recipe, this is one to keep on hand.  I have been making (and playing with) this recipe for years and it is one of my absolute favorites.  This version seems a little more sophisticated, but it’s truly one that I make to give to anyone, especially when I have people doing work on my house.

We’re getting a new HVAC system installed in our home today.  We’re not exactly thrilled with the timing, but the original system was installed in 1998, so we knew we were due. Since I knew the workers would be here for much of the day, I thought I would make some muffins to show my appreciation for all the work they’re doing.  I made this recipe in mini-muffin tins so they would be “pop-able”… nothing worse than having to worry about muffin wrappers or holding food between bites if you’re working hard.  I just love the ease of this treat!

fudgybrowniemuffinsNote:  If you saw my post about “chocolate jury gems”, this is a version of the same recipe.

Ingredients:

  • One box chocolate brownie mix (I like to use dark chocolate mix)
  • One can solid pack pumpkin (NOT pumpkin pie mix)
  • 1/3 cup mini chocolate chips
  • 1 teaspoon cinnamon
  • 1 teaspoon dark chili powder
  • 1/4 cup (2 Tablespoons) red wine.  I used a pinot noir, but any dry red wine works well

Directions:

  • Preheat oven to 400 degrees.
  • Empty brownie mix into a large bowl and add remaining ingredients.
  • Blend everything together thoroughly until it resembles the photo in the lower left corner of the collage above.
  • Using a small cookie scoop, divide batter into mini muffin tins that have been sprayed with cooking spray.  Note:  this recipe will make about 40 mini-muffins, so you’ll go through two sets of mini muffin pans twice
  • Bake in pre-heated oven for 18 minutes, remove promptly and allow to cool while you scoop the remaining batter into the muffin tins for the second round of cooking.
  • These muffins are delicious warm, room temp, or cool.  They are fabulous for kids (the pumpkin packs a great punch of fiber) and have been a favorite in my family for years.

Starter Recipe: Chocolate Fudge “Jury Gems”

As a Starter Recipe, I try to make things easy and simple so that anyone just learning to cook can make the recipe.  This snack food fits the bill, in my opinion.  I was put on a jury recently and wanted to make something to share with my fellow jurors on our final day… this was the food I brought to keep us focused as we concluded our duty.

Ingredients:ChocolateFudgeJuryGems (1)

  • 1 box chocolate fudge brownie mix (or your favorite box mix)
  • 1 can solid pack pumpkin (not pumpkin pie mix)
  • Mini chocolate chips (I used about 1/4 cup)
  • Red wine (I used a Pinot Noir, but you could use any dry red wine or even substitute espresso if you prefer)

Directions:

  1. Preheat your oven to 400 degrees and spray your cupcake tins with cooking spray.  I used two small cupcake pans (12 small cupcakes in each) and one mini cupcake pan (also with 12 mini cupcakes).
  2. Empty the brownie mix, pumpkin, and chocolate chips into a large mixing bowl.  Pour in a small bit of wine/liquid (start with 1/4 cup) and mix all ingredients together until well incorporated.  If the batter seems too thick, add a bit more wine/liquid.  I like this batter to be fairly thick, but not so thick that the batter could stand alone, like a cookie dough.
  3. Using a cookie scoop, ladle out the dough into the cupcake tins.  I used a medium scoop for the small cupcake tins and a small scoop for the mini cupcake tin.
  4. Sprinkle with decorations, if desired (I used gold sugar) and put the tins into the oven.  I baked the mini cupcakes for 15 minutes and the small cupcakes for 3 minutes longer (18 minutes total).  Use a toothpick to test when making sure the fudge-cupcakes are cooked thoroughly.

These fudge-y cupcakes will get very sticky if served the following day, so be sure to allow them to dry a bit so they don’t actually stick to the fingers of your guests.  I got lots of positive comments on these snacks from my fellow jurors and that solidified the name for me… Jury Gems.  We had three days together and I hope that everyone feels they did their best according to the law, as required.

If you have a chance to make this recipe for your friends, feel free to alter the name a bit… these are delicious, healthy, and surprisingly filling.  Enjoy!

Recipe: No-Bake Pumpkin Pie

This recipe is one that my husband loves and it comes to me, courtesy of my wonderful Mother-in-Law.  I have played with this recipe a bit, but try and make it as close to the original as possible, since it’s my husband’s favorite.  Everyone should have a favorite food that doesn’t get “edited” or “upgraded”, so this is the one recipe that I don’t change.  HOWEVER, if you are interested in making a few edits, this is a simple change you can make to include wine in your dessert.  NOTE: Lest my husband reads this post and worries that this year’s pie has wine… it doesn’t.  It *has* in the past, but it doesn’t this year.  NoBakePumpkinPie

Mom’s No-Bake Pumpkin Pie:

  • 14 oz can sweetened condensed milk (I use the Fat-free version)
  • 1 egg, slightly beaten
  • 1 teaspoon ground ginger
  • 1/2 teaspoon nutmeg
  • 1/2 teaspoon salt
  • 1 envelope Knox brand geletin
  • 2 Tablespoons water **Here’s your substitution opportunity
  • 16 oz can solid pack pumpkin (NOT pumpkin pie mix)
  • 1 graham cracker pie crust
  1. Blend the sweetened condensed milk, egg, ginger, nutmeg, and salt together.
  2. In a 2-quart saucepan, sprinkle gelatin over water and let stand one minute.  Stir over low heat until gelatin dissolves.
  3. Blend in milk mixture
  4. Stir over how heat until thickened, about 7-9 minutes.  Blend in pumpkin and mix well to incorporate.
  5. Pour into pie shell and chill for several hours.
  6. Cut and serve with Cool Whip.

NOTE:  I substituted James River Cellars Reserve Chardonnay for the water last year.  The only major difference was that the gelatin/wine mixture became “like glue” for a bit until the heat allowed it to loosen and blend together.  I enjoyed the hint of Chardonnay in the background of the pumpkin pie but will use that for the baked pumpkin pie recipes that I use instead of using it for this recipe.   


Recipe: Pumpkin Wine Brownies

Yup… you read that right… there’s pumpkin in these things.  PumpkinWineBrownies  If you can possibly get past the idea of adding pumpkin into something that is supposed to be a chocolatey, yummy treat, you’ll be pleasantly surprised at the results.  That is, of course, if you can get past the idea that you’re adding a vegetable into your treat.  Can you??

I was hungry for brownies last night.   I wanted to use some red wine in the baking process but I also wanted to experiment with making something yummy.   I’ve made brownie muffins using only pumpkin and chocolate cake mix (Hungry Girl, Lisa Lillian, calls them “Yum Yum Brownie Muffins”) but I wasn’t sure about adding red wine to the mix… so I experimented, I used The Force, and came up with this dessert.

I started with a box of brownie mix.  I poured in some red wine and then added a half can of pumpkin (that solid pack pumpkin stuff… not the “pumpkin pie mix” stuff) but it was still a bit too thick, so I added some more red wine to the mixture.  Once it looked smooth enough, I poured it into a 9 x 13 pan and baked it at 350 degrees for about 30 minutes.

See?  The Force in its truest form… helping me make dessert that tastes so good!

As always, when using The Force, I’ll tweak this recipe when I make it the next time.  I’m going to try making this recipe in a 9 x 9 pan so the brownies are a bit thicker (which means I’ll be cooking them a little longer).  I’ll probably find another box of brownie mix that I want to try, especially since this was the box mix that my darling hubby had picked up to make for his own work event.  I may even come up with some other crazy ingredient to add and see how it turns out.

Whatever I do, I’ll do my best to always share my experiments with you on this blog.  Isn’t that what writing a blog is all about?

Enjoy the experiments in life… they are what can make things fun, unique, enjoyable, and ultimately your own.

Take time to try different things and don’t be afraid of failing… sometimes its the failures that allow you to be the most creative!

Oh… and have a brownie!