Mimi’s Peas

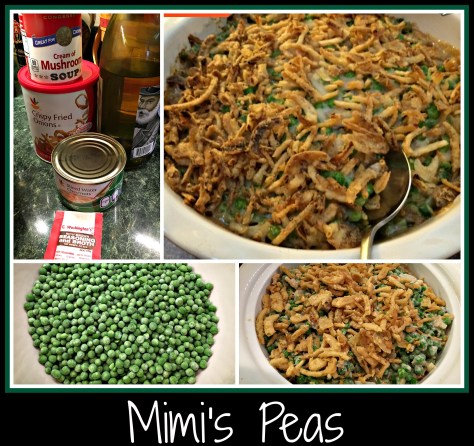
You’ve had the traditional “Green Bean Casserole“, right?  It’s the one on the back of the Campbell’s soup can…. the one that has been around forever… the one that everyone makes for holiday meals.  What would you think if I told you that we make this same casserole with PEAS instead of green beans?  THIS is a game-changer, people.  It’s absolutely amazing and is a staple on almost every holiday menu (or at least Thanksgiving, Christmas, and Easter) in our family.

mimispeas

Ingredients:

  • Frozen Peas (1- 1 1/2 16oz bags)
  • 1 can sliced water chestnuts, chopped
  • 1 can French’s Onion Rings (reserve 1/2-3/4 cup for topping)
  • 1 can Cream of Mushroom soup
  • 1/4 cup white wine (I like a dry or semi-dry wine)
  • 1 packet G. Washington Brown boullion *Trust me, this stuff is worth finding.  LOVE it and use it in so many ways!

Directions:

  1. Mix everything together, topping with the reserved Onion Rings.
  2. Bake in greased casserole dish at 375 degrees for 30-45 minutes, until bubbly.

This is our family’s “must have” recipe on any holiday table.  It also works well when mixing with turkey, stuffing, and gravy (and topped with mashed potatoes) to make a leftover turkey shepherd’s pie.

Give it a try sometime… you may find that you like this even better than the standard recipe!

Advertisement

Recipe: Sausage and Apple Stuffing

I absolutely love making stuffing.  I don’t make it only for Thanksgiving and Christmas, but those are the two times when I make a massive amount and want to use it in sandwiches and leftover meals for a few days.  It’s just so incredibly tasty!

I start making the ingredients for my stuffing a day or so before I actually put everything together for the meal.  It’s easier to cook the sausage a few days in advance and, since I bake the stuffing bread (see previous post) for most of my stuffing, that *has* to be done earlier.

I start two or three days ahead and bake a loaf of bread, then cube it and allow it to dry on a tray.  NOTE: Make sure to let your family know that you’re starting your holiday meal prep or your drying bread may get a little toastier than you expected.  The sausage can be cooked two to three days ahead and kept in the fridge – I like to rinse the sausage once it’s cooked to remove an excess fat, but that’s simply because the cooled fat grosses me out.

Here’s the basic recipe for my Sausage and Apple Stuffing:SausageAppleStuffing

  • 2 loaves of bread cut into cubes (I like to use 1 loaf of Italian bread and 1 loaf of Stuffing bread)
  • 1 lb bulk sage sausage (browned and cooled)
  • 2 apples (I use 1 sweet apple and 1 granny smith apple), chopped fine
  • 1 stick margarine
  • 1 1/2 cups liquid (I use half Oaked Chardonnay and half chicken stock)
  • turkey liver (from the bag inside the bird)
  • 3 ribs of celery with tops, diced
  • 1 small to medium onion, diced
  • 2 packets G. Washington Golden Bouillon (use your own preferred brand)
  • 2 eggs (keep a third egg on hand in case needed)
  • Salt and pepper to taste, herbs as you want * I like to add some poultry seasonings (both ground and dried) and parsley.
  1. Mix the bread, sausage and apple together in a HUGE bowl (you need a big enough bowl to get everything incorporated well)
  2. Melt margarine into the liquid,  and cook the turkey liver.
  3. Once the liver is cooked, add this mixture to the celery and onion and blend until everything is well pulverized.  I use a Stick blender (immersion blender) in a high-sided bowl until everything is totally incorporated and all the veggies are unrecognizable.  Add bouillon packets to the liquids and stir to combine.
  4. Add your liquid to the bread mixture, top with the two eggs, and use your hands to incorporate everything into the stuffing. Add salt and pepper as needed and use the third egg if the stuffing doesn’t hold together well.   NOTE: Take your time with this step and make sure to taste the stuffing as you are blending.  As my mom always said “if it doesn’t taste good raw, it won’t taste good when it’s cooked”.  This may seem gross, but the nuances in taste as you add a little more salt or extra parsley will make the difference between a stuffing that tastes good and one that knocks your socks off.  We’re going for the “knock your socks off” taste here.
  5. Once the stuffing is done, stuff the turkey everywhere you can find space.  I use the neck cavity as well as the body of the turkey.  I’ve also taken to layering stuffing under the skin, on top of the breast meat and between the body and legs of the bird.  This seems to add to the moist taste of the meat when you carve your turkey.

Enjoy!  This should be a great addition to your holiday meal…

Recipe: No-Bake Pumpkin Pie

This recipe is one that my husband loves and it comes to me, courtesy of my wonderful Mother-in-Law.  I have played with this recipe a bit, but try and make it as close to the original as possible, since it’s my husband’s favorite.  Everyone should have a favorite food that doesn’t get “edited” or “upgraded”, so this is the one recipe that I don’t change.  HOWEVER, if you are interested in making a few edits, this is a simple change you can make to include wine in your dessert.  NOTE: Lest my husband reads this post and worries that this year’s pie has wine… it doesn’t.  It *has* in the past, but it doesn’t this year.  NoBakePumpkinPie

Mom’s No-Bake Pumpkin Pie:

  • 14 oz can sweetened condensed milk (I use the Fat-free version)
  • 1 egg, slightly beaten
  • 1 teaspoon ground ginger
  • 1/2 teaspoon nutmeg
  • 1/2 teaspoon salt
  • 1 envelope Knox brand geletin
  • 2 Tablespoons water **Here’s your substitution opportunity
  • 16 oz can solid pack pumpkin (NOT pumpkin pie mix)
  • 1 graham cracker pie crust
  1. Blend the sweetened condensed milk, egg, ginger, nutmeg, and salt together.
  2. In a 2-quart saucepan, sprinkle gelatin over water and let stand one minute.  Stir over low heat until gelatin dissolves.
  3. Blend in milk mixture
  4. Stir over how heat until thickened, about 7-9 minutes.  Blend in pumpkin and mix well to incorporate.
  5. Pour into pie shell and chill for several hours.
  6. Cut and serve with Cool Whip.

NOTE:  I substituted James River Cellars Reserve Chardonnay for the water last year.  The only major difference was that the gelatin/wine mixture became “like glue” for a bit until the heat allowed it to loosen and blend together.  I enjoyed the hint of Chardonnay in the background of the pumpkin pie but will use that for the baked pumpkin pie recipes that I use instead of using it for this recipe.   


NO-WINE Recipe: Golden Truffles

This is a recipe that I altered from something posted in Pinterest… it was originally posted with chocolate sandwich cookies (Oreos) and cream cheese, but since my love much prefers Golden Oreos, this was my altered version.  This is also an incredibly simple recipe – I wanted to post it before Valentine’s Day, but since M reads everything I write (sweet of him, huh?), I needed to hold off until after the holiday.  If you want to do this for your special someone, bookmark this link and make it next year.  I’m not going anywhere… maybe by then I’ll find a way to make truffles with wine?

Ok… on to the recipe:GoldenTruffles

Start with one package of Golden Oreos and one package of cream cheese.  Put both into a food processor and blend thoroughly until totally incorporated.  Since the mixture was pretty soft, I popped the newly formed truffles  into a bowl and let them rest for 30 minutes or so in the fridge.  Once the dough was nicely chilled, I scooped out VERY small mounds of this delicious mixture, rolled then into balls and rolled them in rainbow sprinkles.  I pressed the sprinkles into the dough so they wouldn’t drop off easily and then popped the entire batch into the freezer.  They looked lovely on the red plate I originally used, but the truffles seem to get soft and mushy pretty quickly, so the freezer was the best option for preserving.

I know this is a place for wine recipes, but I just couldn’t resist sharing this recipe – easy, sweet, tasty, and pretty.  What a great combination for Valentines… or anytime you want to show someone how much you care.  Easter is right around the corner – how cute would these look when rolled in Easter-colored sprinkles?

The only limit is your imagination – have fun with this recipe and I’m sure you’ll have people begging for more!