SIMPLI’ – handcrafted soaps with wine

This Christmas, I really want to support small businesses as much as I can and the idea of being able to purchase items directly from an individual is extremely appealing.  If you’re looking for a wonderful stocking item, present for a neighbor, or a hostess gift, this is a company you should consider supporting:  www.simpliartisan.com

Simpli’ is a Gaelic word for simple and straightforward.  My dear friend, J, is the artist who is handcrafting small batch soaps and body products.  She comes up with her own recipes, selects incredible “good for you” skin products, and works diligently to use high-quality ingredients to make her soaps, beard products, and body butters.  The scents alone are wonderful but the fact that her items are made with such pure ingredients is even better… until she started making soaps with WINE!SIMPLI.jpg

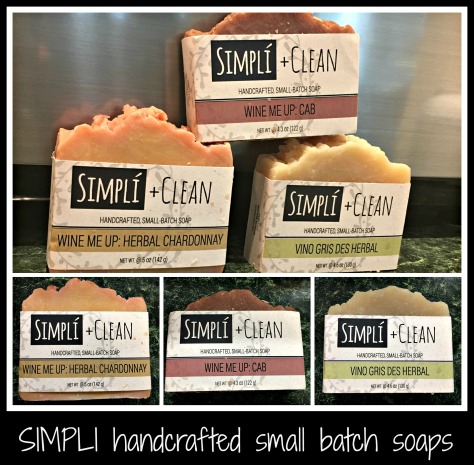
How cool would it be to use a soap made with wine?  Chardonnay, Cabernet, and Pinot Gris all have their own place in Simpli’ soaps.  Each has a wonderful scent, cleansing lather, and is handcrafted in Northern Virginia.  These are a wonderful example of an artisan combining two of her passions… wine and crafting soaps.

I recently visited with J at her home and had the privilege to watch as she created a cooked soap and it was a really fun experience.  Watching the ingredients come together to thicken and become a soap, ready to cool in a handmade loaf pan, was fascinating… and the smell was intoxicating!

If you live in the Northern Virginia/DC area, you should consider finding this company at one of the local craft shows that are coming up this holiday season.  At the very least, you should consider looking through the Simpli’ shop for soaps, body butters, bug balm, salves, and deodorant.

J has been very generous and is offering a special coupon code to anyone who subscribes to this blog!  Sign onto her website, www.simpliartisan.com and use the coupon code BOTWINE17 to receive 10% off everything in her shop… but don’t delay because this coupon expires on 12/31/17.

Advertisement

Recipe: Easy Cheesy Chicken & Beans

We’ve all seen the mayonnaise ad that tells us to smear mayo on chicken, cover with cheese, and bake to create the “juiciest chicken”, right?  If you haven’t, here’s a link to see what they do.  I had been viewing that ad for ages and finally decided to put my own twist on something that would be a simple yet fun adaptation.  My final product was similar to the original, but I thought it had some really tasty flavors going on.  See what you think…

I started with two partially frozen chicken breasts (the kind you can get in the big bag from those warehouse stores?) and sliced them across to open them up like an envelope.  I didn’t want to cut them the entire way through, although I certainly could have done that to create four separate servings.  Feel free to tackle this step however you like.  I laid them on a piece of foil (I really hate to clean baking sheets, so I use foil anytime I can) and flattened them with my hands.EasyCheesyChicken&Beans

I then mixed the creamy topping that would be the “sauce” to hold the cheese onto the chicken.  For this recipe I used mayonnaise, dijon mustard, red wine, and dried parsley.  I blended it all together with a whisk and then brushed the mixture all over the top of the chicken breasts to cover them evenly.  Using a packaged blend of cheddar and colby, I spread the cheese over both chicken breasts and then topped them with salt and pepper.

Since the chicken was so large, I decided to keep things simple and just roast some green string beans as the accompaniment for this dinner.  I could have easily added mashed or baked potatoes, but I really wanted the chicken to be the star.  To make the beans, I grabbed another baking sheet and lined it with foil (easy cleanup, folks… this is my favorite thing about foil!) and spread out the beans on the sheet.  I then sprayed the beans with cooking spray and topped with salt & pepper.  

Baking this dinner was also pretty easy.  I preheated the oven to 375 degrees and baked the chicken for about 40-45 minutes.  I popped the beans into the oven underneath the chicken after the first 10 minutes, so they were cooking for 30-35 minutes.  NOTE: I’ve been under-cooking beans lately, so I went a little overboard on the beans this time – will probably back their cook time down to 20-25 minutes next time, but they were still tasty.

Once dinner was done and plated, I got rave reviews from my husband about the chicken.  It was still juicy but cooked through, full of flavor and simply delicious.  Changing out the flavors and using different ingredients for the “sauce” will be done next time, but this is a great way to start.  Try using white wine, horseradish mustard, different spices, anything that your family likes is fair game in this one.  You could even make it into an Italian version with italian spices and an Italian blend of cheeses… it’s really all up to you.  Enjoy and let me know what you try! 

Recipe: Anniversary Alfredo

Our “dating” anniversary was this past Thursday and, while we don’t go to great lengths to celebrate it, I was in the mood to make a special dinner to commemorate this auspicious occasion.  My husband loves steak, but that wasn’t something I could easily cook in our current apartment, so I opted for a seafood dinner… specifically, a special seafood alfredo.

For this seafood alfredo, I decided to use the meat of one cooked lobster (diced), one pound of large shrimp (sliced in half lengthwise and roasted in a 400 degree oven with salt/pepper/herbes de provence/smoked paprika until pink and curled), and one pound of angel hair pasta (cooked al dente’).AnniversaryAlfredo

NOTE:  A traditional alfredo sauce is made by melting equal parts butter and heavy cream together before adding in mouthwateringly large amounts of parmesan cheese.  Since heavy cream is something that I (1) didn’t remember to purchase and (2) typically try not to use because it doesn’t agree with my stomach, I opted for a unique way to create the taste of an alfredo sauce without the dense feel.  I do hope you’ll consider trying it this way sometime as it’s rather tasty.

For my alfredo sauce, I started by melting a stick of margarine and a dollop of olive oil in a saute’ pan.  Once the margarine was melted, I added a generous splash of white wine (I used a local crisp white wine, but this would have been a great place to use either an oaked Reserve Chardonnay OR a sweeter Vidal Blanc) and then added two palms full of Parmesan Cheese and some garlic, whisking everything together well.  Once the cheese is fairly well melted, you’ll notice that it doesn’t look entirely appealing at this point.  It seemed a bit thin and didn’t really have the creamy texture that I wanted, nor did it have that amazing taste that I wanted.  It was a bit salty to taste, so I added freshly ground pepper and some smoked paprika, along with two spoons of creme’ fraiche that I had picked up at the store.  The sauce thickened up nicely, but to complete the sauce I added a single wedge of Laughing Cow light swiss cheese, which melted into a creamy bit of heaven.  NOTE: I added the diced lobster to the sauce to warm the meat.

When ready to plate the meal, I chose not to add the shrimp to the sauce.  Instead, I placed a serving of the pasta on each plate, divided up the shrimp among the plates and then spooned the sauce (with lobster bites) over the pasta and shrimp.  I had popped a loaf of crusty bread into the oven (as you can see in the corner photo) and sliced this up to serve along with dinner.  While I did cook some snow peas to add a vegetable to round out our meal, these went largely uneaten and could have easily been avoided altogether.

In the end, we had a really lovely anniversary dinner.  It’s been 27 years since our first “date” and 26 years since we married, so I thought it was fitting to name this recipe as our Anniversary Alfredo.  I’ve been blessed with a wonderful man who knows how much I like to cook and will eat just about anything I cook, wine or no, because he loves me.  How much better can life get than that?  Happy Anniversary to my husband… wishing everyone else a fun time with this recipe!

LAST NOTE:  If you don’t like seafood, this recipe would be lovely with roasted bites of chicken, beef or even simple roasted vegetables.  Cook what you like and your loved ones will enjoy it!

Recipe: Red Chicken Parmesan

Chicken parmesan is one of those “easy/go-to” recipes for me.  Saute up some chicken, add sauce, top with cheese and serve with spaghetti noodles.  That’s the quickest way to explain this dish, but I love to add a little bit of flair when I’m cooking (almost always with wine), so my version is a little snazzier.

I start with two chicken breasts and roll them in a little egg white substitute before patting them down in some seasoned bread crumbs.  NOTE:  This is where you have some creative and quantity options – if you’re serving more than two people, use more chicken.  If you want to use Panko or cracker crumbs or even parmesan cheese at this point, feel free.  This is your meal, so enjoy using your favorite products.  RedChickenParm

Once the chicken is prepared, you need to prepare your pan.  Using a nice size saute pan, melt a mixture of a little butter and a bit of olive oil until it’s starting to sizzle a bit.  Place your chicken, breast side down, into the hot oil and allow the meat to cook until it lifts up easily (this will tell you when it’s done).  Flip the chicken and allow it to cook the same way on the other side.  Your chicken is now seared but not thoroughly cooked.

Since the “pretty” side is facing up, I like to leave the breasts alone at this point.  I add some red wine to give the chicken breasts some liquid to soak up and allow to cook thoroughly.  Note: Use as much or as little red wine as you’d like at this point.  You can also substitute chicken stock if you’d prefer, but I do love the depth added by the wine.  I usually use a favorite dry red wine, but I don’t mind using a lovely tasting Malbec or a Meritage if that’s what I’ve got in my cabinet. The idea to remember is to use a wine you’d like to drink because if you cook with wine, you’re concentrating the flavors and if you wouldn’t want to drink it, you definitely don’t want to cook with it.

After adding the wine, I also add some tomato sauce.  I love having the time to make my own sauce, but for the ease of apartment living at the moment, I use some jarred sauce, mix in the wine and the pan drippings, and pop the entire pan into the oven to allow it to bake (usually around 325 degrees or so) until we’re ready for dinner… just remember to leave enough time to cook your pasta so that’s ready when you want to plate your meal.  An extra note:  I have found if you pop a few ice cubes into the pasta when it’s finished cooking, your pasta won’t stick.  I’m not exactly sure why this happens, but it works well for us… better than adding oil or butter to keep the pasta from sticking to itself.

A few minutes before you’re ready to pull dinner out of the oven is when I like to top the chicken breasts with cheese. How much or how little is really up to you.  For the meal pictured, I placed a slice of provolone cheese each breast and then sprinkled on some Parmesan cheese to melt in the oven before serving the chicken and sauce over the pasta.

Enjoy personalizing this meal and making it your own… before long, you’ll have come up with your own favorite variation!

Recipe: Red Chicken and Pasta

I made a really delicious dinner last night that I want to share with you.  It was very simple, as most of my meals are in our current apartment situation, but the result was great.  Feel free to add a salad or green vegetable if you so desire… and bread or a dinner roll is always a great way to stretch your dinner.

I started by marinating two chicken breasts in a mixture of a lightly sweet red wine (Boordy’s Chambourcin Merlot blend could work here), a touch of olive oil, some garlic salt, honey, and herbs de provence.  I put everything into a plastic, resealable bag and left it in the fridge for the day.  NOTE:  I always place a plastic bag into a bowl if I’m leaving it in the fridge for the day so there’s no risk of mess to the fridge if anything happens.

I also reconstituted a half cup of dehydrated sun-dried tomatoes and sliced them to add to the pasta for flavor and color.  This was easily done by pouring some hot water over the dehydrated tomatoes and then allowing them time to plump up before slicing them.  Doing this early in the day (or even the night before) makes things so much simpler when you start cooking.

When I started cooking, I decided to toast some whole wheat pasta in garlic butter to add some flavor to the side portion of this meal. Rather than leaving the whole wheat pasta (spaghetti) whole, I chose to break it up into 2″ pieces so the garlic butter would have a better chance of toasting all the pasta.  Once this was done, I added a handful of bowtie pasta and the sliced sun-dried tomatoes to the mixture and allowed the pasta to pick up some of the flavor before adding a few ladles of chicken stock and some red wine to cook the pasta thoroughly. RedChicken&Pasta

I then began cooking the chicken.  I heated a touch of olive oil in a large skillet and sauteed the chicken breasts on both sides until they were nicely browned but not cooked through.  I added the leftover marinade from the plastic bag and stirred up the browned bits from the bottom of the pan.  At this point, I could have simply left the chicken on the stovetop to cook (with the lid on), but I’m not entirely comfortable with the electric stovetop that I’m currently using so I chose to alter the recipe in mid-stream.

I pushed the chicken off to the sides of the pan and added the pasta/liquid into the pan.  I then put the lid on the pan and popped it into a 350 degree oven to braise everything in the liquid until we were ready for dinner.  Just before serving, I added a Tablespoon of soft cheese to round out the flavors of the pastas, sun-dried tomatoes, *and* the chicken.  NOTE:  Some of the bowtie pasta didn’t get all the way into the liquid and ended up a little crunchy, which is NOT something my husband enjoys. Make sure to keep stirring the pasta throughout the cooking process to make sure that all the pasta is cooked thoroughly before serving.

I really liked this meal – the difference in pasta shapes was fun to me and the chicken was flavorful and yummy.  I’m not always sure how a meal is going to turn out when I start without any sort of structure, but this one was fun.  Next time, I think I will adjust the flavors a bit and make sure that all the pasta is thoroughly cooked before serving… otherwise, this was a good one to repeat.  The basics are all there… now to play with it…

Enjoy!

Recipe: Easy Wine’d Beef

Since the weather was so chilly last week, I was searching out a way to make something for dinner that would warm us up.  Stir-fry would have been tasty, but since I don’t have a good non-stick pan at my disposal yet (still in the apartment), I opted to make a faster version of a traditional Beef Bourguignon.  EasyWine'dBeef

I started with a piece of beef that was on sale at the local grocery store.  I’m not exactly sure what cut of beef I purchased… I just know that there was some great marbling of fat (for yummy flavor) and it was boneless.  I popped it in the freezer for a bit to make it easier to cube, then tossed the cubes of beef with some flour seasoned with salt, pepper, and smoked paprika.

In the meantime, I heated some olive oil in a large stock pot and then sauteed a diced onion, a little green pepper, and a few handfuls of celery until they were softened and fragrant.  I love the way the smells in a kitchen can permeate the entire apartment and make the place smell “homey”, don’t you?

Once everything had a nice browned glaze to it, I moved them over and added the flour/seasoned beef to the pot.  I added a little more fat (some olive oil and a little margarine) to start the browning process for the beef.  This took some time, but it was well worth it.  NOTE: You’re not trying to cook the beef the whole way through, you’re just browning it in preparation for the slow cooking it will do in the liquid you’ll add next.

Once the beef is nicely browned, you are now going to add liquid.  I like to add a half bottle of a delicious red wine (like James River Cellars Merlot, Meritage, Rad Red, or even Hanover Red).  I also add about a cup of water and a beef bouillon cube to add some depth of beef flavor to the meal.  Your seasonings can be added now – I like to use a bay leaf or two, some herbs de provence, some worchestershire sauce, and a glop of ketchup.  Mix everything together, pop a lid on the top, and put the entire pot into a preheated 300 degree oven for an hour or two.  Stir it occasionally, to make sure that you’re getting the right blend of thickness and flavors… feel free to add more liquid if it’s getting too dry and don’t forget to remove the bay leaf before serving.

When you get close to dinner time, choose and cook a vegetable and a pasta of your choice.  As you can see by the photo, I used spaghetti noodles and broccoli.  Since my pantry is limited at the moment, I have an abundance of spaghetti, so I just broke the noodles in half and cooked them in salted water.  I then put a small bag of broccoli into the microwave and cooked it until it was bright green and cooked through.  I love serving this meal with wide egg noodles, but those didn’t make the cut when I was choosing what to bring to the apartment… feel free to use whatever pasta (or even a baked potato) you and your family like best.

I hope my recipes give you some ideas of meals you can make for your family, even if you don’t have a lot of “extras” at your disposal.  Play with what you’ve got on hand, pick up one or two essentials, and you can make a delicious dinner at home instead of spending extra money on dining out every night.  I have a hard time going to a restaurant and ordering something that I know I am able to make at home.  While I believe that going out should be a special experience, I do believe that staying in and making dinner for your family can bring about some pretty wonderful satisfaction as well.  It’s all in how you frame the experience.

Wishing you fun as you re-frame your own cooking experiences with your family!


Leftover Recipe: Sausage Muffin Breakfast Casserole

Have you ever had leftover Sausage Muffins and not known what to do with them?  It  *is* a dilemma, right?  I really hate to waste food, so when I purchased too many sandwiches one Sunday morning (and ended up bringing five of them home that evening), I knew I needed to come up with a workable solution.  After thinking about the composition of the sandwiches for a bit, I came up with a great way to use these tasty treats in a way that changed them into something relatively healthy and totally yummy… a breakfast casserole!

NOTE:  This is a recipe that is best made the night before you plan to bake it, so the bread has time to soak up SausageMuffinBreakfastthe liquid.  I actually put this casserole together when I brought the cold sandwiches home from work on Sunday night so I would have something ready for breakfast that I could also take into work to share with co-workers on Monday. 

I started with five sausage muffin sandwiches.  The ones I purchased simply had english muffins, a sausage patty, and some cheese, so I diced them into bite-sized pieces and loaded them into a pie plate, sprayed with cooking spray.  I then made a mixture of 3/4 cup egg substitute, 1 cup unsweetened vanilla almond milk  (you could certainly substitute any milk product you like, but I really like almond milk for baking… and for the low calorie count), 1/2 cup shredded 2% cheddar cheese, 1/2 cup shredded 2% colby cheese, 1 Tablespoon dry mustard, 1 teaspoon each of parsley and herbs de provence, and 1/2 cup James River Cellars Reserve Chardonnay white wine.  As with all my recipes, you’re welcome to substitute your favorite ingredients wherever you see something you’d prefer.  Different flavored cheeses and any sort of white wine you like (or have open) is a great way to personalize this recipe.

I whisked the liquids and cheeses together and poured them over the sausage muffins in the pie plate.  I then pressed the muffins down into the liquid so they would have the best chance to become thoroughly soaked before I baked the casserole in the morning.  I covered the casserole with some plastic wrap and allowed the dish to sit overnight.  NOTE: You can also place a weighted plate on top to continue the pressure on the casserole until you bake it.  I ended up adding an additional drizzle of 1/4 egg substitute before baking in the morning because mine just didn’t look quite “soaked” enough.  Just before baking the casserole, I garnished the top with some smoked paprika and popped the dish into a preheated 350 degree oven for 35-40 minutes.

This was a really delicious casserole.  I shared it with my co-workers and it got rave reviews from everyone, which made me very happy.  I was able to create something that tasted totally “new”, using something that otherwise might have gone to waste.  To me, that counts as a win-win!

I hope you’ll try this recipe sometime.  Being able to make a totally new meal with a leftover ingredient is pretty fun!

Easy Beef Bourguignon

Note: This recipe is an homage to “Bob’s Short Ribs Bourguignon”, by one of my favorite chefs from the Outer Banks.

A few years ago, I was privileged to spend some time with a chef during a group cooking class.  He cooked in a way that was very similar to my own, using his hands/eyes as a way of measuring ingredients and his intuition as a way of creating a dish that was both delicious and flavorful.  Having a trained chef share his take on a traditional, classic recipe was a gift beyond compare and I’ll always be grateful to him for opening my own eyes to cooking this way.  This recipe used some basics from Bob’s recipe and added my own twist, allowing me to use my own intuition (The Force) to create a new dish.

I was at a wine/food festival recently and was asked if I had a Beef Bourguignon recipe on my blog.  Since I hadn’t “formally” cooked and blogged about this recipe, I decided to remedy that problem as quickly as possible.  EasyBeefBourguignon

I started with a package of beef that I found on sale at my local grocery store. NOTE: I try and pick up packages of meat anytime they go on sale, that I can use in various recipes, and keep them in my freezer until needed.  This helps keep my costs down and I can “shop” in my freezer for dinner inspirations most any day.  I sliced the beef into 1-2″ chunks and, using my favorite large stock pot, browned them in a bit of olive oil after dusting them with some flour, salt, and pepper.  Since I had so much beef, I did this step in two stages, removing the first half of the beef once it was browned and repeating the process.  

Once all the beef was crispy, I placed it all back into the pot and added the following ingredients:  1 sliced onion, 4 diced bacon slices, 4 cloves of garlic, 2 bay leaves, 1 beef bouillon packet (I like G. Washington Brown), a few globs of ketchup, and covered everything with a lovely red wine (think James River Cellars Monitor).  I stirred everything to combine it nicely, popped the lid on the pot, and put the entire dish into a 300 degree oven to cook for awhile.  I think it cooked for about 2 hours, but I was really waiting for the entire recipe to reduce and mesh together well.  You could easily reduce the heat on the stove top, pop the lid on, and cook it for the two hours, but I prefer to use the oven when I can for this sort of meal.

Once the wine had reduced and the sauce was thick and rich, I added half a bag of frozen peas to bump up the color factor on the meal.  The final touches involved adding a few dashes of worchestershire sauce and a small bit of butter to gloss the sauce.  It looked delicious!

As we got closer to dinner time, I cooked some egg noodles and sliced some crusty bread to complete the meal.  The final product was deep, dark, and rich… a perfect meal for a cold, snowy evening, even if it *was* March.

I hope you’ll try making your own version of this wonderful recipe.  Using short ribs (when on sale) is a great alternative to a piece of pot roast, but you can use most any meat that will handle this sort of long, slow cooking process.  Changing up the vegetables by using carrots, pearl onions, or any other favorite vegetable is a great way to add nutrition and tailor the recipe to your family’s preferences.

Remember, cooking is about sharing your love with the ones you love.  Enjoy!

Crock Pot Recipe: Pork Roast

This recipe was so ridiculously easy that I’m almost embarrassed to post it… almost.  I was on the schedule to work earlier this week and decided to through a few things in my crock pot to see how dinner would turn out.  The meal was filling and flavorful, just what I needed after a busy day, but it came together so simply that I just had to share it with you.

CrockpotPork

I found (literally… my husband defrosted our freezer over the weekend) a lovely 2-3 pound pork loin that needed to be used and decided to be a bit creative in what I was making that evening.  To the bottom of the crock pot, I layered 2 sliced onions, 1 sliced apple, 1/2 cup James River Cellars Rad Red, and 1/2 cup James River Cellars Reserve Chardonnay.  I un-bagged the pork loin, placed it on top of the vegetables, seasoned it with garlic salt, pepper, and herbs de provence.  I realized that I wouldn’t have time to cook and make mashed potatoes, so I popped 4 small potatoes in the same pot and cooked everything on low for 6-8 hours.  By the time I got home, the house smelled amazing!

Adding the finishing touches on dinner was fairly simple.  I pulled the potatoes out and mashed them in a bowl.  I added some of the liquid (along with the cooked veggies) from the pot to the potato mixture to smooth everything out, then added a touch of margarine (or butter), salt, and pepper before serving.  I sliced the pork, which honestly was falling apart at this point, and served dinner in under 15 minutes after my arrival home.  It was simple, tasty, and satisfying… three things that I look for when trying to come up with a work-night recipe.

I hope you’ll consider trying this recipe or a variation thereof… making dinner doesn’t have to be a huge production… it can be as easy as thinking ahead.  Enjoy!

“Using The Force” for the first time

I was talking with a friend yesterday about what to make for dinner, when we stumbled upon the idea of having him “use The Force” to create a meal for him and his girlfriend.  We talked about a few recipes, contemplated different degrees of difficulty, and came up with the plan to use my Chicken Prosciutto Roll recipe.  He didn’t want to spend an inordinate amount of time on dinner, so we discussed ways he could “shortcut” the recipe and tailor it to their tastes.  I was so excited for him that I had to write a quick blog post to share this with you all.

AMUsingTheForce

Here’s his final product:

Doesn’t it look terrific?  THIS is what I mean when I say, if you’re planning to use one of my recipes,  that you should alter the original to fit what your family likes best, using the flavors and spices that you most enjoy.  He made his own version of a Chicken Prosciutto Roll and it turned out wonderfully.  He *did* use chicken breasts, Bourcin Cheese, and James River Cellars Gewurztraminer white wine, but swapped out ham for the prosciutto, since that’s what he had on hand.  More importantly than simply following the recipe, he used what he had at his disposal and took the time to prepare a meal that he and his girlfriend would enjoy.

My friend, AM, did a fabulous job of tailoring a basic recipe to make it his own.  I hope you’ll consider trying this same sort of thing in your own home.  It’s not hard to make dinner… it just takes a little thought and the ability to let your efforts shine as your own.

If you want me to blog about it and share your steps, just send me a message and take a few pics of the beginning/middle/end of your efforts so you can send them to me.  I’d be more than happy to help as you create dinners for your friends and loved ones… after all, it’s just food!

Enjoy the process…