Tuscan-style sauce

Oh, my goodness…. this sauce is so delicious! A friend recently mentioned a crock pot dinner that she’d made that sounded good, but I didn’t want to use my crock pot. I got the basics of the recipe from her, looked at a few other recipes, and went to “work”.

INGREDIENTS:

  • 2 TBSP butter
  • 1/3 cup half & half (fat-free is fine)
  • 2-3 forks of julienned sun dried tomatoes *I like to add a spoonful of the oil to this sauce as well
  • 2 handfuls of spinach
  • 1 TBSP Parmesan
  • 1 wedge Laughing Cow light cheese
  • 1-2 T white wine (I used Boordy Vineyards Vidal Blanc)
  • Salt and pepper to taste
  • Pasta water, as needed/if available, to thin or extend sauce

DIRECTIONS:

  • In a heavy sauce pan, simmer butter with half & half until butter melts.
  • Add sun dried tomato and fresh spinach, stir and allow spinach time to wilt.
  • Add Parmesan and Laughing Cow, stir to combine and allow the flavors to meld.
  • Add wine, salt & pepper, then taste sauce, adjusting flavors as needed. Add pasta water, if needed.

I typically spoon this sauce over baked chicken, pasta, and broccoli, as seen in the photo. I’ve also served this sauce over shrimp. It’s a delicious addition to enhance that plain chicken and vegetable dinner. It doesn’t take long to make this sauce and makes for a beautiful dinner plate!

Advertisement

Sausage Balls (Pork and Turkey)

It’s been a very long time since I’ve written a complete wine blog post – please forgive me.  We moved last year and life got more chaotic than usual.  If you ever want to see what I’m doing with wine, or have any questions, please follow me on this blog’s Facebook page (FromTheBottomOfAWineBottle).

Today, I’m sharing this recipe from my childhood.  My mom found this recipe in our church cookbook and she used to make these sausage balls all the time.  They call for three main ingredients and are easy to bake/freeze for a quick breakfast, an after school snack, or even a light dinner.  I’ve added a little white wine, simply to make the finished product slightly less dense, but you can certainly leave the wine out if you prefer.

SausageBalls

Ingredients:

1 pound bulk pork sausage (I used pork sausage, but you can easily substitute ground turkey sausage, if you can find it)

3 cups Bisquik or Jiffy baking mix (I prefer Jiffy mix since we used to live in Chelsea, MI, where the Jiffy company is located)

10 oz shredded cheese (I used sharp cheddar)

White Wine (I used a white wine from Boordy Vineyard, called Rockfish, but you can use your favorite dry white wine)

Fresh Rosemary (This is one of my favorite flavors with sausage – feel free to omit if you’re not a fan)

Directions:

  1. Preheat oven to 375*.  Cover two large baking sheets with parchment paper.
  2. Blend sausage, baking mix, and cheese until it comes together thoroughly.  I use a mixer, but this can be made in the same way you would mix up a meatloaf.
  3. Using a 1/4 cup ice cream scoop, form balls of the mixture and place them on the prepared baking sheets.  They won’t spread out as they bake, but I like to spread them out on the baking sheets so air can circulate for cooking.
  4. Bake sausage balls for 15 minutes, until lightly browned.
  5. Serve warm or allow to cool and put into bags in the freezer.  These make an excellent snack or light dinner and simply need to be warmed up in the microwave.

FOR TURKEY SAUSAGE BALLS:  If you prefer to use ground turkey instead of ground pork, here are a few photos from that option.  I also adjusted them to a smaller size, using a 1/8 cup (2 Tablespoons) scoop.  Here’s a photo of them, in all their cheesy goodness:

TurkeySausageBalls

I hope you enjoy this recipe.  As an alternative, I like to make this recipe into even smaller balls for appetizers.  You can turn up the heat by using a hot sausage or you can make it even more savory by adding other herbs.  It’s a great basic recipe to have on hand to share with friends.  Have fun with it!

Recipe: Easy Cheesy Chicken & Beans

We’ve all seen the mayonnaise ad that tells us to smear mayo on chicken, cover with cheese, and bake to create the “juiciest chicken”, right?  If you haven’t, here’s a link to see what they do.  I had been viewing that ad for ages and finally decided to put my own twist on something that would be a simple yet fun adaptation.  My final product was similar to the original, but I thought it had some really tasty flavors going on.  See what you think…

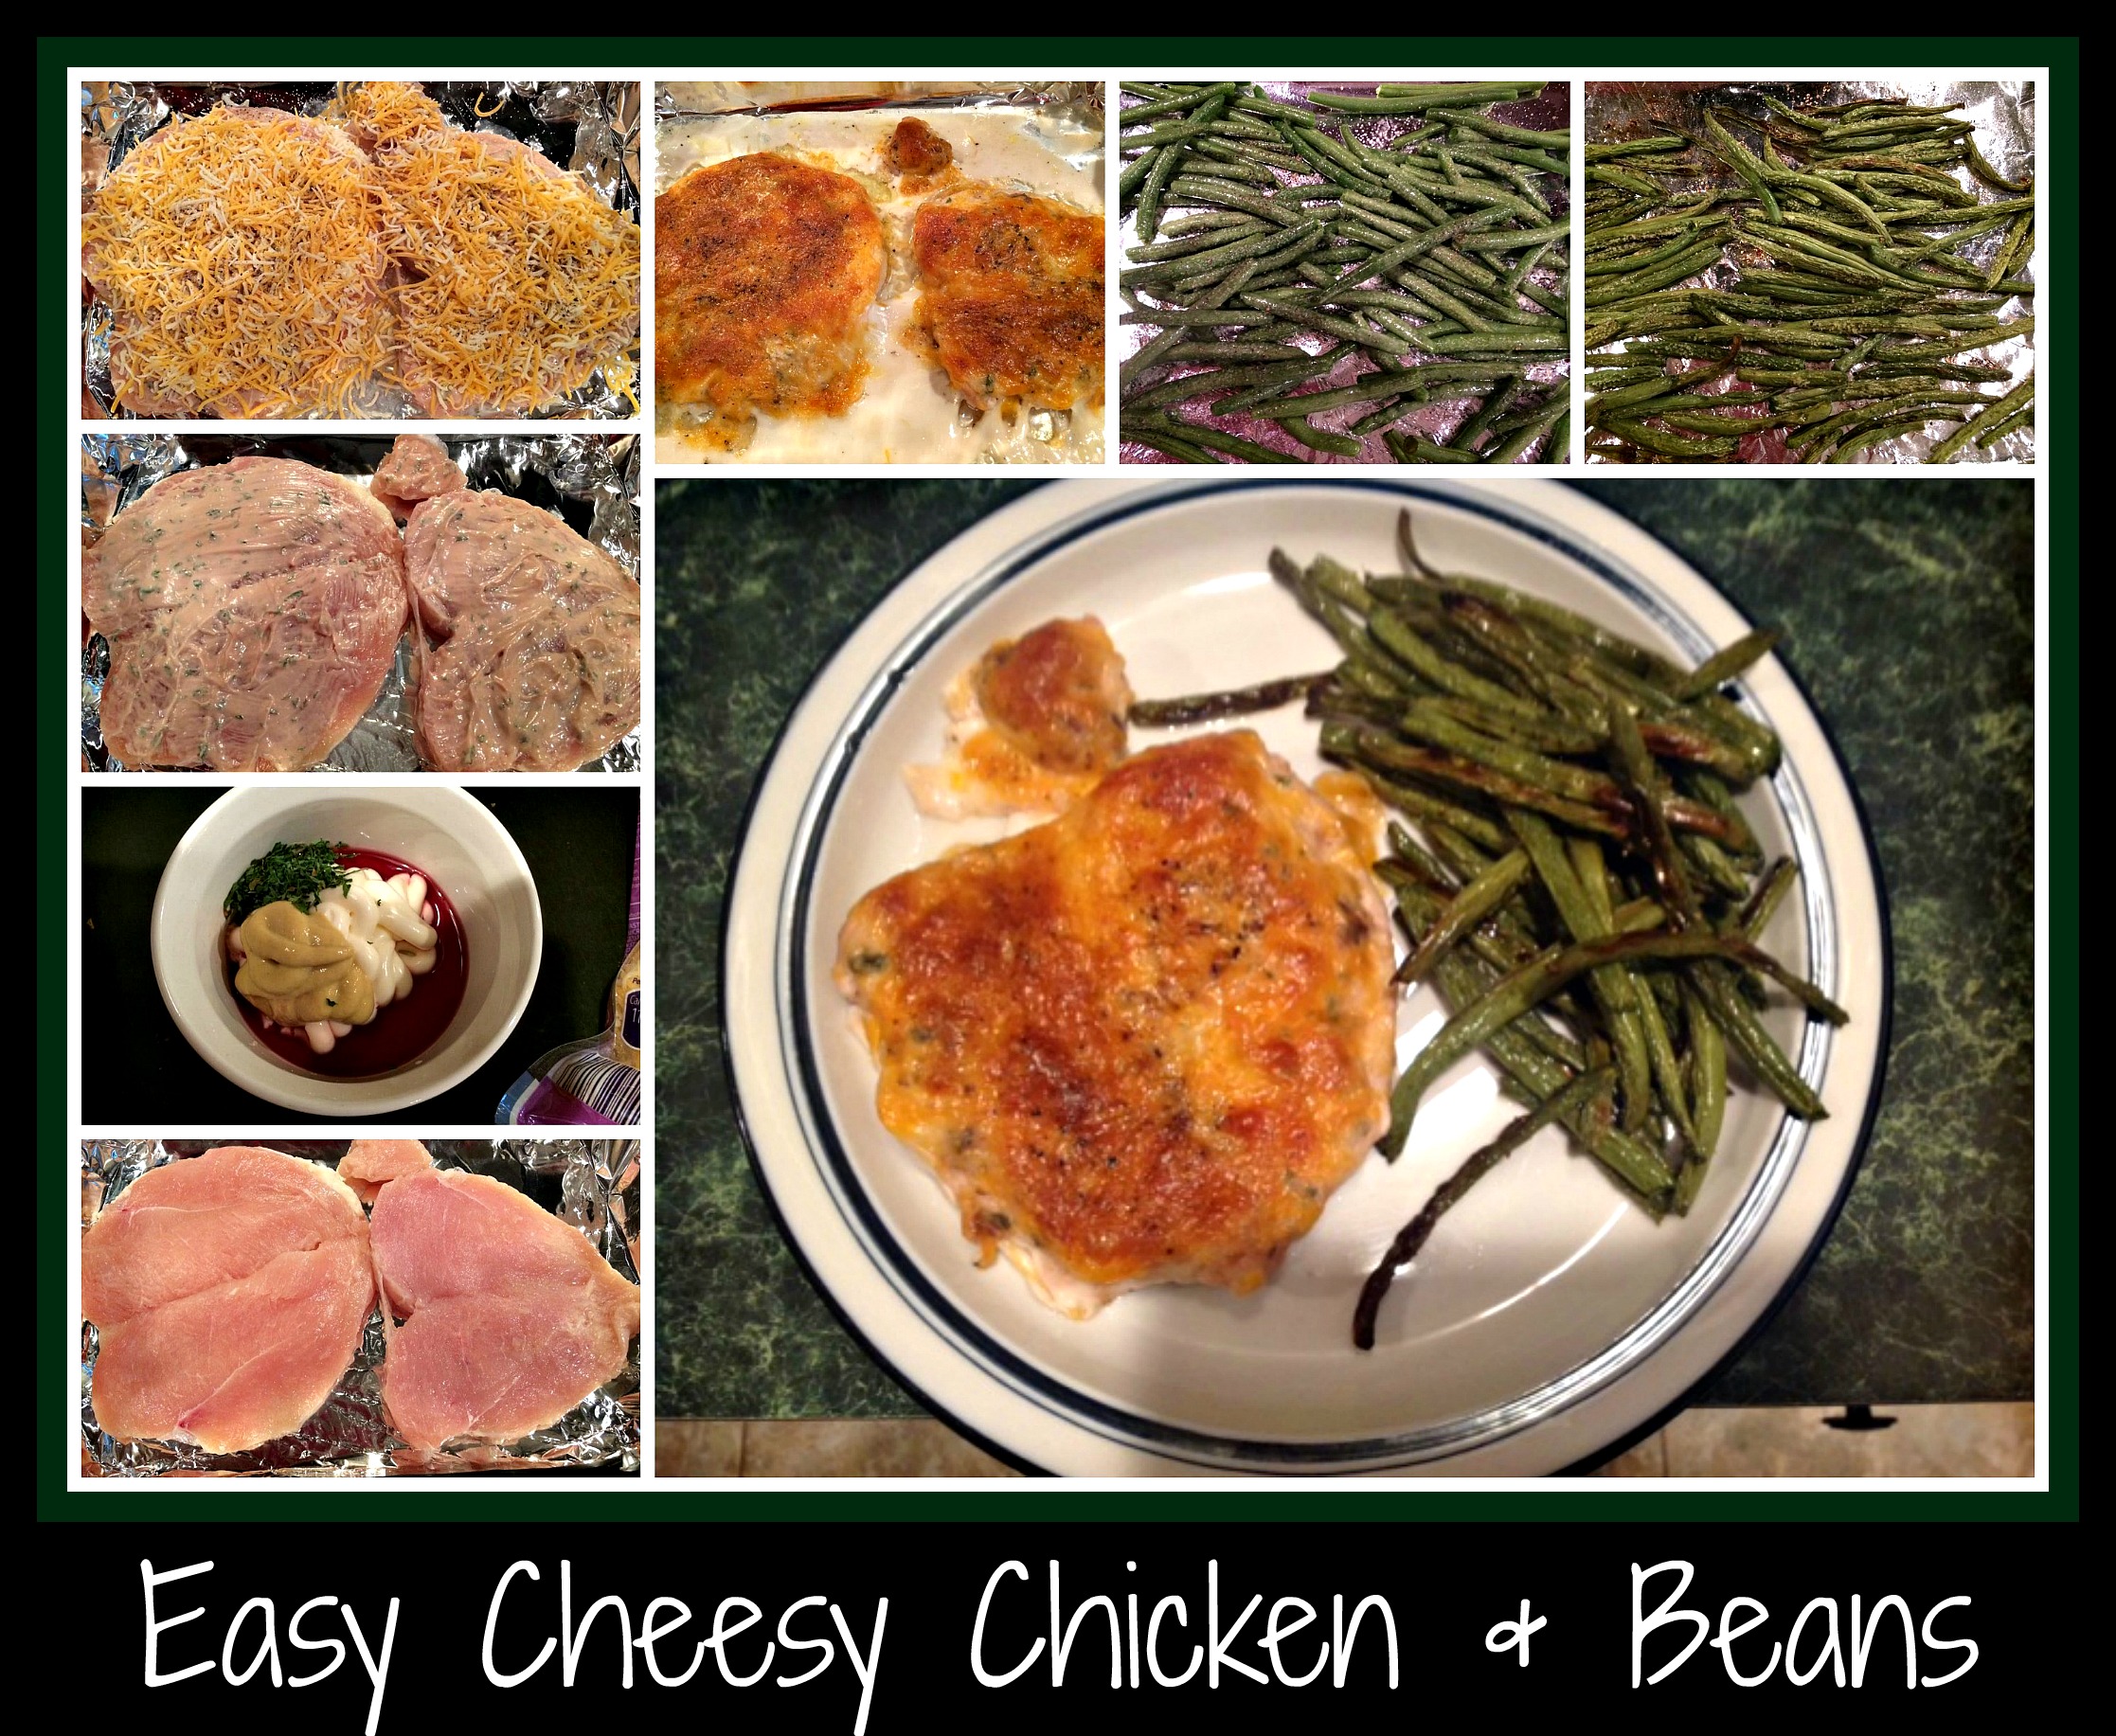
I started with two partially frozen chicken breasts (the kind you can get in the big bag from those warehouse stores?) and sliced them across to open them up like an envelope.  I didn’t want to cut them the entire way through, although I certainly could have done that to create four separate servings.  Feel free to tackle this step however you like.  I laid them on a piece of foil (I really hate to clean baking sheets, so I use foil anytime I can) and flattened them with my hands.EasyCheesyChicken&Beans

I then mixed the creamy topping that would be the “sauce” to hold the cheese onto the chicken.  For this recipe I used mayonnaise, dijon mustard, red wine, and dried parsley.  I blended it all together with a whisk and then brushed the mixture all over the top of the chicken breasts to cover them evenly.  Using a packaged blend of cheddar and colby, I spread the cheese over both chicken breasts and then topped them with salt and pepper.

Since the chicken was so large, I decided to keep things simple and just roast some green string beans as the accompaniment for this dinner.  I could have easily added mashed or baked potatoes, but I really wanted the chicken to be the star.  To make the beans, I grabbed another baking sheet and lined it with foil (easy cleanup, folks… this is my favorite thing about foil!) and spread out the beans on the sheet.  I then sprayed the beans with cooking spray and topped with salt & pepper.  

Baking this dinner was also pretty easy.  I preheated the oven to 375 degrees and baked the chicken for about 40-45 minutes.  I popped the beans into the oven underneath the chicken after the first 10 minutes, so they were cooking for 30-35 minutes.  NOTE: I’ve been under-cooking beans lately, so I went a little overboard on the beans this time – will probably back their cook time down to 20-25 minutes next time, but they were still tasty.

Once dinner was done and plated, I got rave reviews from my husband about the chicken.  It was still juicy but cooked through, full of flavor and simply delicious.  Changing out the flavors and using different ingredients for the “sauce” will be done next time, but this is a great way to start.  Try using white wine, horseradish mustard, different spices, anything that your family likes is fair game in this one.  You could even make it into an Italian version with italian spices and an Italian blend of cheeses… it’s really all up to you.  Enjoy and let me know what you try!