Tuscan-style sauce

Oh, my goodness…. this sauce is so delicious! A friend recently mentioned a crock pot dinner that she’d made that sounded good, but I didn’t want to use my crock pot. I got the basics of the recipe from her, looked at a few other recipes, and went to “work”.

INGREDIENTS:

  • 2 TBSP butter
  • 1/3 cup half & half (fat-free is fine)
  • 2-3 forks of julienned sun dried tomatoes *I like to add a spoonful of the oil to this sauce as well
  • 2 handfuls of spinach
  • 1 TBSP Parmesan
  • 1 wedge Laughing Cow light cheese
  • 1-2 T white wine (I used Boordy Vineyards Vidal Blanc)
  • Salt and pepper to taste
  • Pasta water, as needed/if available, to thin or extend sauce

DIRECTIONS:

  • In a heavy sauce pan, simmer butter with half & half until butter melts.
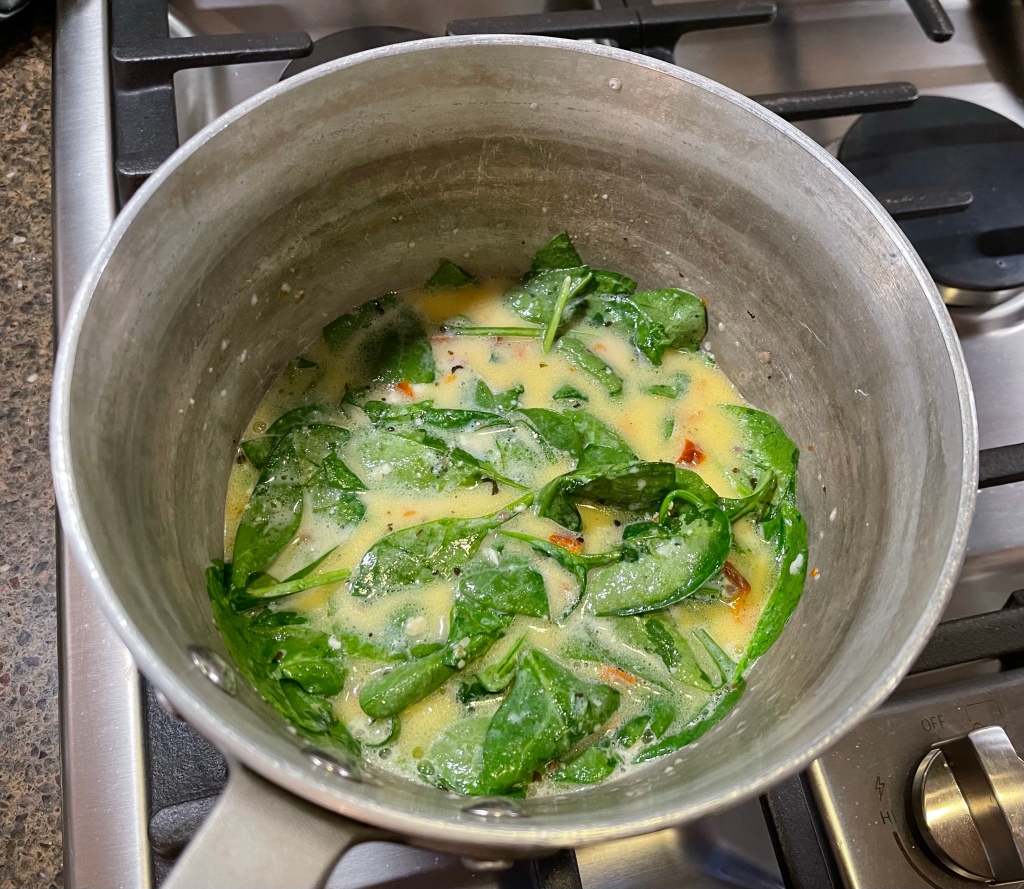
  • Add sun dried tomato and fresh spinach, stir and allow spinach time to wilt.
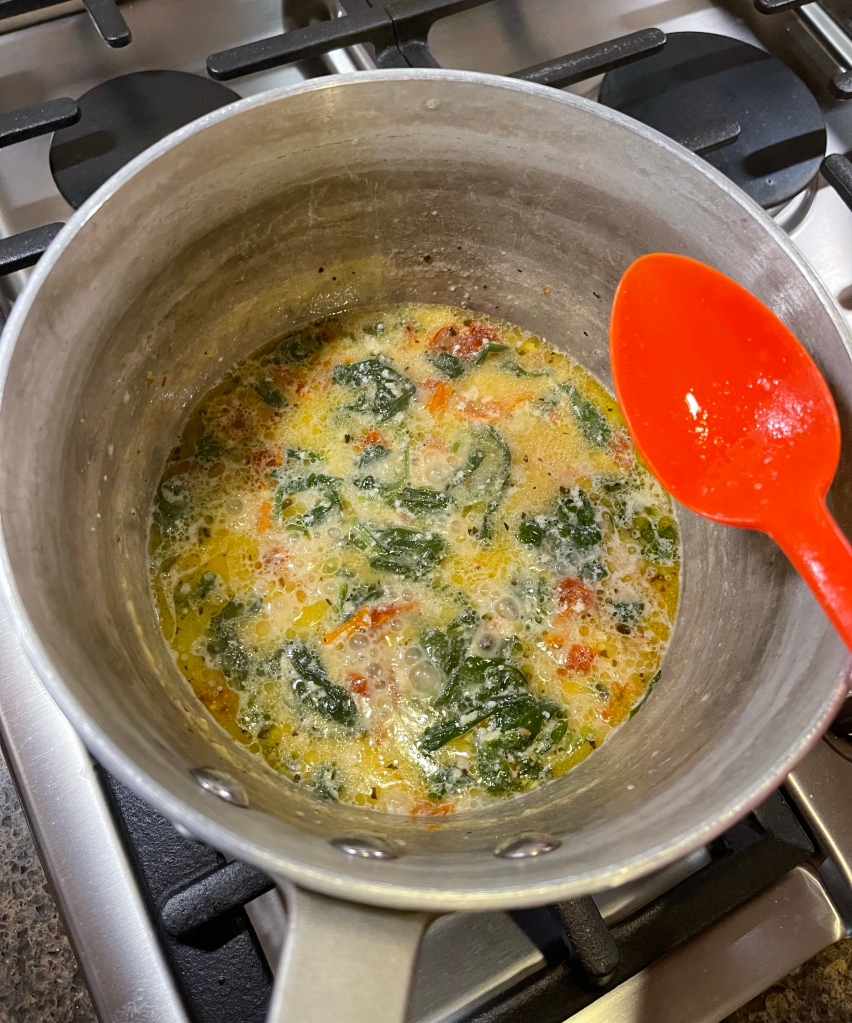
  • Add Parmesan and Laughing Cow, stir to combine and allow the flavors to meld.
  • Add wine, salt & pepper, then taste sauce, adjusting flavors as needed. Add pasta water, if needed.

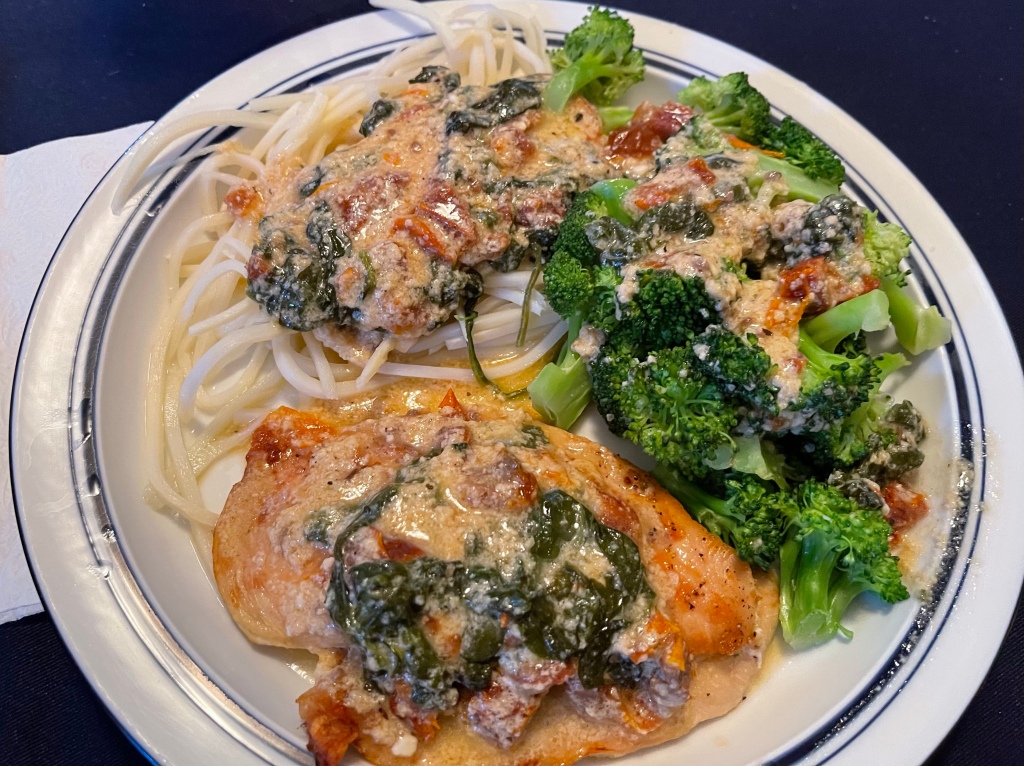
I typically spoon this sauce over baked chicken, pasta, and broccoli, as seen in the photo. I’ve also served this sauce over shrimp. It’s a delicious addition to enhance that plain chicken and vegetable dinner. It doesn’t take long to make this sauce and makes for a beautiful dinner plate!

Sausage and Pepper Casserole

My neighbor had a health issue with her mom last night and I thought that the nicest thing I could do for her would be to make dinner and dessert for them tonight.  I know her mom loves sweets, so I had to make sure to have some sort of dessert included, so I made a platter of chocolate chip cookies, since I already had the dough in the fridge… the question was now “what do I make for dinner”?

I looked through my freezer and found a package of turkey kielbasa and a half package of bacon, so that became the base of my recipe.  Since I also had some green peppers and an onion in the crisper, I decided to make a turn on a “sausage and pepper sandwich” and add some linguine and a creamy cheese sauce to pull it all together.  Here’s how I went about making dinner. NOTE: Remember that I was making two dinners for two people each, so these could have easily been made into a single 9×11 casserole instead of two individual 9″ round casseroles.

I crisped up the half package of bacon and then removed the bacon to a plate, leaving the bacon drippings in the saute pan.  I diced one package of turkey kielbasa and crisped that up in the saute pan as well before removing that to a plate. I sliced one green pepper and half a large onion and sauteed these in the bacon grease until softened.  While cooking all these individual pieces, I cooked 3/4 package of linguine (broken in half) until just al dente, then drained the pasta, saving some of the water in case I needed it for the sauce that would top the entire casserole.Sausage&PepperCasserole

I then assembled the casseroles, placing a little of the bacon and half the kielbasa and half the vegetables on top before adding half the pasta.  Once this was done, I was able to turn my attention to the sauce.  I wanted something that was creamy and slightly cheesy but didn’t just want to throw cheese on top of the pasta and hope it melted correctly.

I started the sauce by simmering 2T butter and 2T flour together to make a roux.  I then added some white wine (using chardonnay was my choice this time… crisp and clean) and chicken stock to start a great tasting sauce.  To make the taste unique to this particular dish, I added half a can of cream of mushroom soup (leftover from Christmas dinner), some parmesan cheese and some cheddar cheese for creaminess and a few dashes of Worchestershire sauce for flavor.  Once the sauce tasted “right” (you HAVE to be willing to taste your sauces during the cooking phase so they balance out once they’re added to a dish), I poured half over each casserole and topped each with a sprinkling of leftover bacon.

I have no idea if my neighbors will enjoy this casserole, but I hope they feel the love that comes from wanting to do something nice for others in times of stress.  Karma is a tricky thing… but I believe that if you always reach out to others in a positive way and from a place of kindness and love, that same thing will come back to you tenfold.  I’m not expecting them to do anything in return…. I just know that they shouldn’t have to worry about feeding their family when they’re facing a difficult time.

May we all approach life in this manner… give when you can and your life will be made better for the effort.

Happy New Year Blessings to you all, my friends.  Wishing you health and happiness as 2015 begins!

Shrimp and Peas with Pasta

We were looking for something easy and delicious for dinner tonight.  I knew I wanted to use shrimp, so I started there.  Scrounging around the fridge produced grape tomatoes and some frozen peas, so I came up with this yummy meal.

ShrimPeasPasta

Ingredients:

  • 1 bag frozen shrimp, thawed and shelled.  Salt and pepper shrimp before cooking.
  • 1/2 cup frozen peas
  • 1/2 cup grape tomatoes, sliced in half
  • Coconut oil
  • White wine
  • Savory nutritional yeast flakes
  • Parmesan cheese
  • Pasta water
  • Thin Spaghetti, cooked al dente’
  • 1 Egg yolk, whipped with a fork and tempered with a few spoons of pasta water

Directions:

  • In boiling, salted water, cook your pasta, saving 1 cup of pasta water
  • In a large saute’ pan, heat coconut oil and sear shrimp on both sides until toasty.
  • Add peas and tomatoes, saute’, then add some white wine and allow to cook through.
  • Season dish using dashes of yeast flakes, parmesan cheese, and a bit of pasta water. Taste after each addition before moving forward, adjusting as needed.  Pasta water will add a bit of thickening, so take your time with this step.
  • Drain pasta and add cooked pasta to shrimp mixture and toss to combine.
  • Remove from heat and add whipped egg yolk to add in a bit of creaminess.
  • Toss well and serve.  I like to top with parsley or minced chives.

This is one of those meals that can be thrown together fairly easily.  I like to keep bags of frozen shrimp and peas on hand.  If you don’t happen to have grape tomatoes in your fridge, you can substitute a small amount of sun-dried tomatoes (sliced thin) or leave them out altogether.  Play with your ingredients and come up with your family’s favorites. Enjoy creating your own version!

Starter Recipe: Easy Red Sauce

When you’re cooking, it’s always nice to have a great basic recipe for an easy pasta sauce in your arsenal.  Something that you can pull together with items from your pantry can make you feel prepared to whip up a great dinner any night of the week.  This is that sort of a recipe… it’s foolproof, yet easy to adapt to each family’s favorite tastes, which makes it a perfect “starter recipe” to have on hand.EasyRedSauce (1)

Ingredients:

  • 1-28oz can of crushed tomatoes
  • 1 can tomato paste (you’ll only need an amount the size of your thumb)
  • Seasonings (I like Italian Seasonings, Basil, and Oregano, as well as salt & pepper)
  • Red wine (Use as much or as little as you like – I used a dry red that I had in the fridge)
  • Balsamic Vinegar (One of my favorite ingredients to use to punch up the flavor)
  • Brown Sugar (I used 2 spoons-worth, but use as much or as little as you like)

In a medium saucepan, blend the entire can of crushed tomatoes, a thumb-worth of tomato paste, the seasonings and red wine.  Once this mixture simmers for a bit, add a bit of the vinegar and the brown sugar… make sure to taste your pasta sauce as it cooks and adjust the seasonings as needed.

For the latest dinner, I roasted a few turkey meatballs and added them to the sauce before dinner.  I served the meatballs and sauce on a bed of cooked thin spaghetti and it was a huge hit… everyone soaked up the last bits of sauce with pieces of bread, which is a positive sign in our house.

Hope you enjoy making this sauce for your own family… feel free to adjust and alter ingredients to make this sauce your own!

Red Turkey Lasagna

I have a confession to make…. I love lasagna.  Rarely will I order it in a restaurant because I know that I love the taste of this recipe and can’t imagine ordering something *out* that I can make myself.  I’m sure that there are tons of variations on this recipe… with or without meat, red sauce vs white sauce, cooked noodles vs the no-bake noodles… but this is my favorite “go to” recipe to use if I’m being honest.  It originally came from a Weight Watchers cookbook but, as with most anything I make, it’s been altered and adjusted to fit our unique tastes.  Here’s how I make it:RedTurkeyLasagna (1)

Ingredients:

  • 1 package ground turkey
  • 1 large onion, diced
  • Dry red wine, about 1/2-3/4 cup
  • Spinach leaves (I used about 1 1/2 cups and sliced them fairly thin)
  • 1 large can pasta sauce (use your favorite… I like a basic meat sauce)
  • 1 16-oz container of low-fat ricotta cheese
  • 2 cups part-skim mozzarella cheese, shredded
  • 2 egg whites, lightly beaten
  • Italian seasoning (1 teaspoon or so… I simply shake it on until it “looks right”)
  • freshly grated nutmeg (don’t go crazy on this… you just want a hint)
  • 1 package lasagna noodles (you won’t use the entire package… I typically use about 9 or 10)
  • 1/4 cup Parmesan cheese

Directions:

  • Preheat oven to 375 degrees.
  • Spray large skillet with cooking spray and heat on medium high setting.  Brown ground turkey, using a potato masher to break up the meat into small pieces.  NOTE:This is the BEST way to brown meat, in my humble opinion. Add onion and red wine to the meat and cook until the wine is thoroughly incorporated.  Add spinach (or any other vegetables you care to add), cook until spinach wilts, then add pasta sauce and bring to a simmer.  Remove from heat and set aside.
  • Boil noodles, as directed on package, or immerse them in boiling water until softened.  Drain and set aside.
  • Combine the ricotta, mozzarella, egg whites, Italian seasoning, and nutmeg in a medium bowl and set aside.
  • Begin to layer your lasagna together. NOTE: I used a 9×9 pan and a 9×3 pan – normally, I’d simply use a single 9×13 pan.  This is where your noodle amounts may vary.  I used 11-12 noodles to cover these two pans, but the rest of the ingredients remained the same.  I also vary the direction of the noodle placement with each subsequent layer so the finished lasagna holds together well.  
  • Start by spooning a bit of the sauce to lightly cover the bottom of your pan(s). Place noodles over the bottom in a single layer.  Top with 1/3 sauce mixture, then dollop half of the cheese mixture over the sauce.  Repeat noodle, sauce, and cheese layers.  Top with noodles and final third of the sauce, then sprinkle with Parmesan.  NOTE: If making ahead or freezing lasagna, this is the place to stop.  Cover with foil and pop in fridge or freezer, then allow dish to thaw overnight before continuing.
  • Cover and bake lasagna for 45 minutes.  Uncover and bake until lasagna is bubbling and cheese is lightly browned.  Remove from oven and allow the lasagna to set for 5 minutes before serving.

As I mentioned, this is my favorite lasagna recipe.  Not only is it easy to make, it has delicious flavor and is a simple way of getting vegetables into your meal without much effort.  I like to add a side of garlic toasts to accompany this dish.

NOTE: To make garlic toasts, I start with a roll from the freezer (Ciabatta rolls work well for this, as do sub rolls).  Slice the frozen roll into bite sized slices and lay them on a foil-lined baking sheet.  Spray the slices with cooking spray and sprinkle with garlic salt.  When you remove the lasagna from the oven, turn oven off and pop the baking sheet into the hot oven.  The toasts will crisp as the oven cools and be ready to eat by the time you finish plating the lasagna.  I put the garlic toasts into a wooden serving bowl and pitch the foil… no messy cleanup!

I hope you’ll try this lasagna recipe sometime… it makes an amazing dinner and is always appreciated by my neighbors if I am able to share.  Enjoy!

Starter Recipe: Easy Mazetti

Another one of our family “staple” recipes is this easy and simple Mazetti, a recipe that my mother-in-law gave me early in my marriage.  Over the years, I’ve adjusted the recipe she gave me to either include lots of “hidden vegetables” or to use whatever quick ingredients I had on hand.  NOTE:  for those who are interested in the history of the name of this recipe, I would point you toward my friend, Jenna, at The Gleeful Gourmand, who wrote up this version of “Johnny Marzetti“.  I was fascinated to read the back-story of this great recipe, including her own recipe.  Back to my simple Mazetti… here’s the “down and dirty” of making a quick, hearty meal using just a few ingredients.EasyMazetti

Main Ingredients:

  • One package of ground turkey
  • 1-2 cans tomato soup (I would use one can soup and one can of red wine)
  • 1 1/2 cups of your favorite pasta
  • Cheese (for topping, as desired)

Directions:

  1. Brown your ground turkey in a large skillet in a small amount of olive oil or margarine (whatever you have on hand).  I also like to add 1/2-1 whole diced onion or some green pepper if I have things on hand and want to stretch the food a bit.  I typically will add some red wine and brown the turkey and veggies until the liquid is totally absorbed.
  2. Once the turkey is browned and starting to get a bit crispy, add your tomato soup (or soup and water/wine) and your pasta.  I really like to use large elbow macaroni, but have used ziti, bow tie pasta, or even small shells… use your favorite pasta shape but don’t use egg noodles as they won’t hold up to the cooking process.  NOTE:  You are welcome to cook your pasta separately, but I like the way the sauce flavors the pasta pieces.  Again, it’s entirely up to you.
  3. I enjoy playing with flavors at this point, so I have the unique flavor that I want from each mazetti dish.  I have been known to add more red wine at this point, but I’ve also added a shot of espresso (this darkens the flavor considerably), or just some stock or water.  If the liquid is absorbed and the pasta isn’t thoroughly cooked, you just need to add more liquid.  The pasta will soak up the liquid and become more al dente’… don’t ever give up on the dish as you’re cooking.
  4. To serve, you can pop this into a casserole dish, top it with some shredded cheese and warm it up in a 350 degree oven for 20-30 minutes until everything is bubbly.  If you’re serving from the skillet, you can either omit the cheese or add it on top just before serving and put the lid on your pan to give the cheese time to melt.  Either way is delicious… my boys have eaten this dish in many different variations and have loved it each time.

An extra way to make this dish special is to top it with buttered bread crumbs.  I have a recipe for making buttered bread crumbs on my website as a “bonus recipe”, included with “How to make a sauce“.  Both of these recipes would qualify as “starter recipes”, so please feel free to check this one out as well. I’ve just added the “starter recipe” tag, so you should be able to find it that way as well.

I hope you’ll check out Jenna’s recipe and her history of this recipe… it’s so interesting to find out where recipes originate! Since my Mother-in-Law lives in Michigan and is originally from Rhode Island, her recipe could be a variation of Johnny Marzetti, but it will forever be one of my favorites from her.  I was so touched when she shared one of her favorite recipes with me… it always reminds me of her, no matter how I actually end up making the final dish… it’s comfort food to me.


Recipe: Anniversary Alfredo

Our “dating” anniversary was this past Thursday and, while we don’t go to great lengths to celebrate it, I was in the mood to make a special dinner to commemorate this auspicious occasion.  My husband loves steak, but that wasn’t something I could easily cook in our current apartment, so I opted for a seafood dinner… specifically, a special seafood alfredo.

For this seafood alfredo, I decided to use the meat of one cooked lobster (diced), one pound of large shrimp (sliced in half lengthwise and roasted in a 400 degree oven with salt/pepper/herbes de provence/smoked paprika until pink and curled), and one pound of angel hair pasta (cooked al dente’).AnniversaryAlfredo

NOTE:  A traditional alfredo sauce is made by melting equal parts butter and heavy cream together before adding in mouthwateringly large amounts of parmesan cheese.  Since heavy cream is something that I (1) didn’t remember to purchase and (2) typically try not to use because it doesn’t agree with my stomach, I opted for a unique way to create the taste of an alfredo sauce without the dense feel.  I do hope you’ll consider trying it this way sometime as it’s rather tasty.

For my alfredo sauce, I started by melting a stick of margarine and a dollop of olive oil in a saute’ pan.  Once the margarine was melted, I added a generous splash of white wine (I used a local crisp white wine, but this would have been a great place to use either an oaked Reserve Chardonnay OR a sweeter Vidal Blanc) and then added two palms full of Parmesan Cheese and some garlic, whisking everything together well.  Once the cheese is fairly well melted, you’ll notice that it doesn’t look entirely appealing at this point.  It seemed a bit thin and didn’t really have the creamy texture that I wanted, nor did it have that amazing taste that I wanted.  It was a bit salty to taste, so I added freshly ground pepper and some smoked paprika, along with two spoons of creme’ fraiche that I had picked up at the store.  The sauce thickened up nicely, but to complete the sauce I added a single wedge of Laughing Cow light swiss cheese, which melted into a creamy bit of heaven.  NOTE: I added the diced lobster to the sauce to warm the meat.

When ready to plate the meal, I chose not to add the shrimp to the sauce.  Instead, I placed a serving of the pasta on each plate, divided up the shrimp among the plates and then spooned the sauce (with lobster bites) over the pasta and shrimp.  I had popped a loaf of crusty bread into the oven (as you can see in the corner photo) and sliced this up to serve along with dinner.  While I did cook some snow peas to add a vegetable to round out our meal, these went largely uneaten and could have easily been avoided altogether.

In the end, we had a really lovely anniversary dinner.  It’s been 27 years since our first “date” and 26 years since we married, so I thought it was fitting to name this recipe as our Anniversary Alfredo.  I’ve been blessed with a wonderful man who knows how much I like to cook and will eat just about anything I cook, wine or no, because he loves me.  How much better can life get than that?  Happy Anniversary to my husband… wishing everyone else a fun time with this recipe!

LAST NOTE:  If you don’t like seafood, this recipe would be lovely with roasted bites of chicken, beef or even simple roasted vegetables.  Cook what you like and your loved ones will enjoy it!

Recipe: Asian Chardonnay Chicken and Pasta

The inspiration for tonight’s dinner came by way of the salad dressing in my fridge… really!  I picked up a national brand Asian Sesame salad dressing recently and wondered how it would pair with chicken for dinner.  Thankfully, it paired beautifully and became the focus of this recipe.  NOTE: You can substitute your own favorite dressing in this recipe… if you like it, feel free to use it for more than a salad.AsianChardChickenNPasta

I started with two chicken breasts.  I made a foil packet (using two pieces of foil) in my baking dish and placed the breasts together  on the bottom of the dish.  I then poured some Chardonnay white wine (I love using James River Chardonnay for this sort of recipe) and drizzled the dressing on the breasts before closing up the packet.  I could have easily cooked the chicken for 30 minutes at 350 degrees,  but I wanted to cook dinner much slower, so I let the breasts steam in the packet at 250 degrees for an hour.  NOTE: Even at this much longer time frame, the breasts were tender and juicy… I love when an experiment goes well!

About 20 minutes before I wanted to serve dinner, I started making the bow tie pasta and added a touch of Chardonnay to the cooking liquid to flavor the pasta to mirror the chicken’s sauce.  After taking the chicken out of the oven and opening the packet, I realized that the sauce was much too thin to be “good enough”, so I had some work to do.

I removed the chicken to a plate and poured the cooking liquid into a saute pan.  Using a bit of the cooking liquid, I made a slurry with some flour, whisked the slurry into the pan, and cooked the sauce until it thickened (which happened really quickly).  For flavor, I added a few tablespoons of a garlic/herb light cheese, some salt and pepper, and a sprinkling of herbs de provence.  Then, using a spoon and a fork, I turned the cooked chicken breasts over twice to pick up the sauce and warm the chicken a bit.

Serving dinner was easy… I ladled pasta onto the plates, placed the chicken breast on top, then poured sauce over the entire meal.  A side salad or a vegetable would have added a bit more color and a great boost of nutrition, but we opted to go with a very simple meal tonight.  If my entire family was coming to dinner, I could have easily cooked more chicken/pasta and the additional vegetables/salad would have completed the meal.

It’s the little things that can add to your meal each night.  Adding your family’s favorite vegetable or some crusty bread to dinner can round things out quickly.  Follow your instincts when it comes to cooking… and wait to hear the sounds of happy, satisfied family members singing your praises.

Enjoy the food journey we all travel… it’s so much fun that way!

Recipe: Red Chicken and Pasta

I made a really delicious dinner last night that I want to share with you.  It was very simple, as most of my meals are in our current apartment situation, but the result was great.  Feel free to add a salad or green vegetable if you so desire… and bread or a dinner roll is always a great way to stretch your dinner.

I started by marinating two chicken breasts in a mixture of a lightly sweet red wine (Boordy’s Chambourcin Merlot blend could work here), a touch of olive oil, some garlic salt, honey, and herbs de provence.  I put everything into a plastic, resealable bag and left it in the fridge for the day.  NOTE:  I always place a plastic bag into a bowl if I’m leaving it in the fridge for the day so there’s no risk of mess to the fridge if anything happens.

I also reconstituted a half cup of dehydrated sun-dried tomatoes and sliced them to add to the pasta for flavor and color.  This was easily done by pouring some hot water over the dehydrated tomatoes and then allowing them time to plump up before slicing them.  Doing this early in the day (or even the night before) makes things so much simpler when you start cooking.

When I started cooking, I decided to toast some whole wheat pasta in garlic butter to add some flavor to the side portion of this meal. Rather than leaving the whole wheat pasta (spaghetti) whole, I chose to break it up into 2″ pieces so the garlic butter would have a better chance of toasting all the pasta.  Once this was done, I added a handful of bowtie pasta and the sliced sun-dried tomatoes to the mixture and allowed the pasta to pick up some of the flavor before adding a few ladles of chicken stock and some red wine to cook the pasta thoroughly. RedChicken&Pasta

I then began cooking the chicken.  I heated a touch of olive oil in a large skillet and sauteed the chicken breasts on both sides until they were nicely browned but not cooked through.  I added the leftover marinade from the plastic bag and stirred up the browned bits from the bottom of the pan.  At this point, I could have simply left the chicken on the stovetop to cook (with the lid on), but I’m not entirely comfortable with the electric stovetop that I’m currently using so I chose to alter the recipe in mid-stream.

I pushed the chicken off to the sides of the pan and added the pasta/liquid into the pan.  I then put the lid on the pan and popped it into a 350 degree oven to braise everything in the liquid until we were ready for dinner.  Just before serving, I added a Tablespoon of soft cheese to round out the flavors of the pastas, sun-dried tomatoes, *and* the chicken.  NOTE:  Some of the bowtie pasta didn’t get all the way into the liquid and ended up a little crunchy, which is NOT something my husband enjoys. Make sure to keep stirring the pasta throughout the cooking process to make sure that all the pasta is cooked thoroughly before serving.

I really liked this meal – the difference in pasta shapes was fun to me and the chicken was flavorful and yummy.  I’m not always sure how a meal is going to turn out when I start without any sort of structure, but this one was fun.  Next time, I think I will adjust the flavors a bit and make sure that all the pasta is thoroughly cooked before serving… otherwise, this was a good one to repeat.  The basics are all there… now to play with it…

Enjoy!

Recipe: Easy Wine’d Beef

Since the weather was so chilly last week, I was searching out a way to make something for dinner that would warm us up.  Stir-fry would have been tasty, but since I don’t have a good non-stick pan at my disposal yet (still in the apartment), I opted to make a faster version of a traditional Beef Bourguignon.  EasyWine'dBeef

I started with a piece of beef that was on sale at the local grocery store.  I’m not exactly sure what cut of beef I purchased… I just know that there was some great marbling of fat (for yummy flavor) and it was boneless.  I popped it in the freezer for a bit to make it easier to cube, then tossed the cubes of beef with some flour seasoned with salt, pepper, and smoked paprika.

In the meantime, I heated some olive oil in a large stock pot and then sauteed a diced onion, a little green pepper, and a few handfuls of celery until they were softened and fragrant.  I love the way the smells in a kitchen can permeate the entire apartment and make the place smell “homey”, don’t you?

Once everything had a nice browned glaze to it, I moved them over and added the flour/seasoned beef to the pot.  I added a little more fat (some olive oil and a little margarine) to start the browning process for the beef.  This took some time, but it was well worth it.  NOTE: You’re not trying to cook the beef the whole way through, you’re just browning it in preparation for the slow cooking it will do in the liquid you’ll add next.

Once the beef is nicely browned, you are now going to add liquid.  I like to add a half bottle of a delicious red wine (like James River Cellars Merlot, Meritage, Rad Red, or even Hanover Red).  I also add about a cup of water and a beef bouillon cube to add some depth of beef flavor to the meal.  Your seasonings can be added now – I like to use a bay leaf or two, some herbs de provence, some worchestershire sauce, and a glop of ketchup.  Mix everything together, pop a lid on the top, and put the entire pot into a preheated 300 degree oven for an hour or two.  Stir it occasionally, to make sure that you’re getting the right blend of thickness and flavors… feel free to add more liquid if it’s getting too dry and don’t forget to remove the bay leaf before serving.

When you get close to dinner time, choose and cook a vegetable and a pasta of your choice.  As you can see by the photo, I used spaghetti noodles and broccoli.  Since my pantry is limited at the moment, I have an abundance of spaghetti, so I just broke the noodles in half and cooked them in salted water.  I then put a small bag of broccoli into the microwave and cooked it until it was bright green and cooked through.  I love serving this meal with wide egg noodles, but those didn’t make the cut when I was choosing what to bring to the apartment… feel free to use whatever pasta (or even a baked potato) you and your family like best.

I hope my recipes give you some ideas of meals you can make for your family, even if you don’t have a lot of “extras” at your disposal.  Play with what you’ve got on hand, pick up one or two essentials, and you can make a delicious dinner at home instead of spending extra money on dining out every night.  I have a hard time going to a restaurant and ordering something that I know I am able to make at home.  While I believe that going out should be a special experience, I do believe that staying in and making dinner for your family can bring about some pretty wonderful satisfaction as well.  It’s all in how you frame the experience.

Wishing you fun as you re-frame your own cooking experiences with your family!