Recipe: Espresso Wine Biscotti

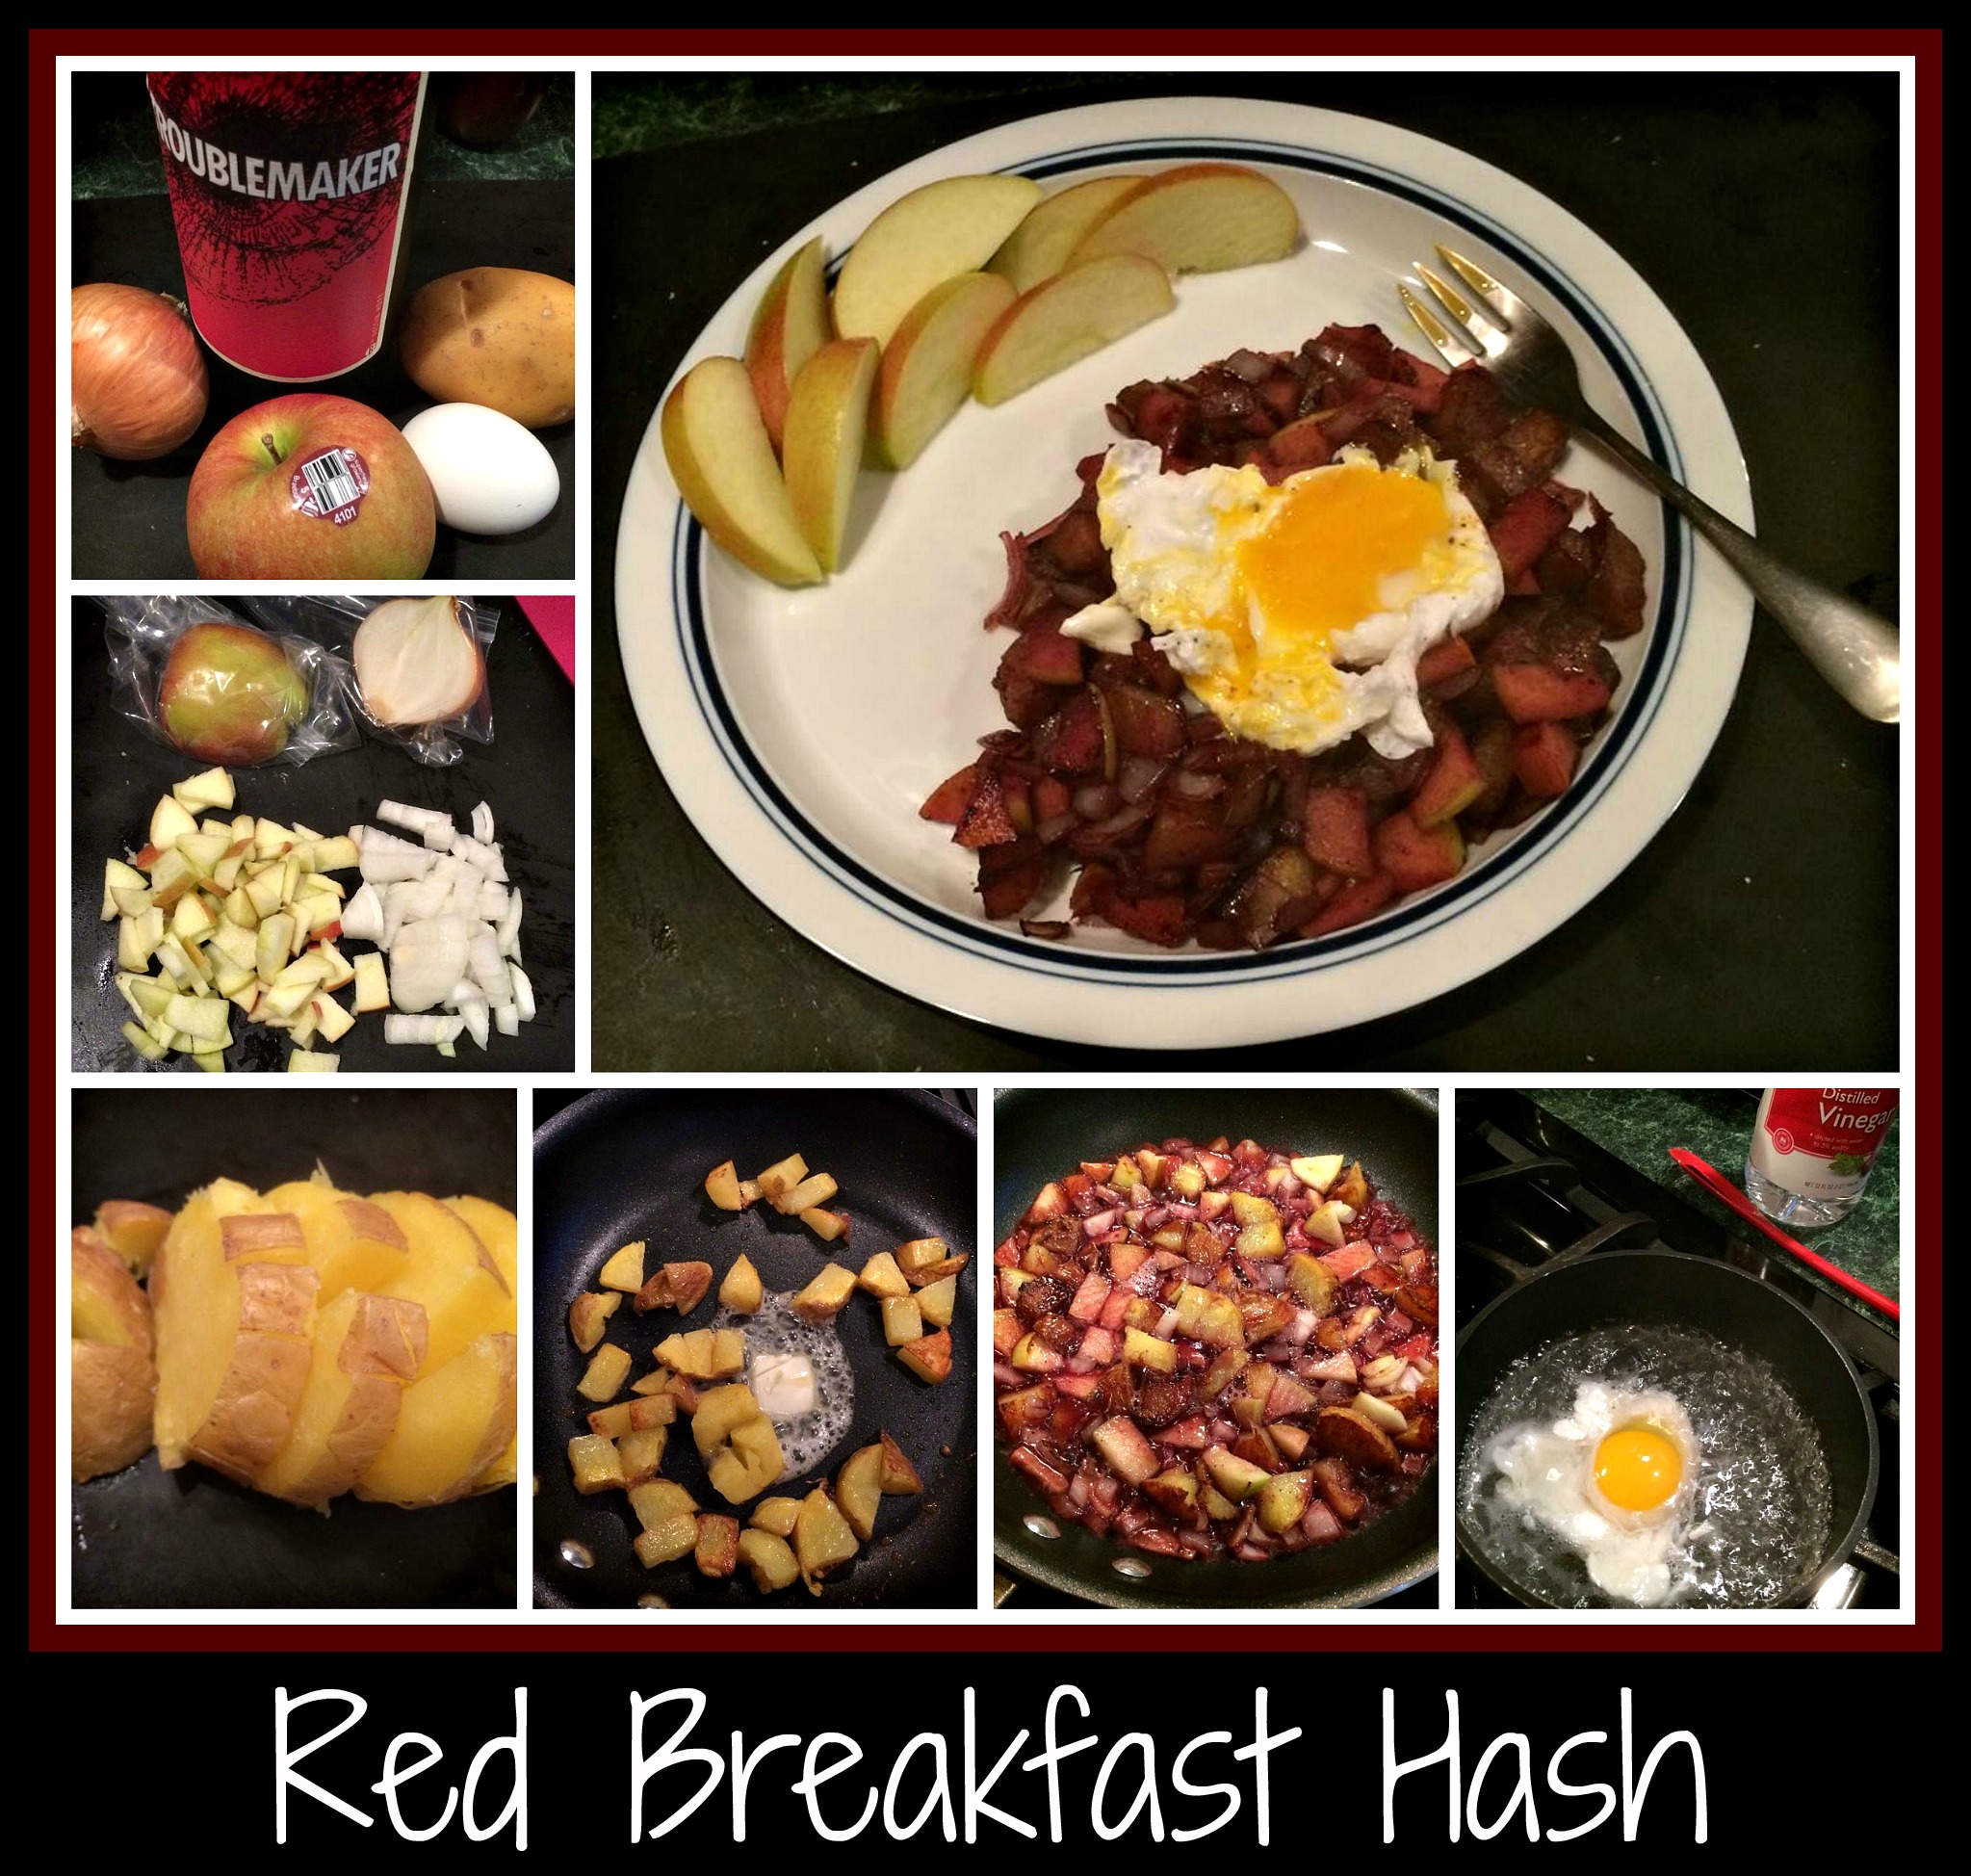
I really love to snack.  I know it’s not what we’re supposed to do to maintain (or lose) weight, but I find myself wandering around the house when I’m bored, looking for something that might be delicious.  This recipe has saved me multiple times by being easy to make, yet satisfyingly delicious while still being fairly healthy.  Since I love to incorporate wine into anything I make or bake, this recipe has become one of my own after starting as one from a published cookbook (Simply Delicious).

  1. Start by preheating the oven to 350 degrees and spray a baking sheet with cooking spray.  EspressoWineBiscotti
  2. Mix your dry ingredients together:  1 1/8 cup flour, 1T ground espresso coffee, 1 t baking powder, 1/4 t cinnamon, and 1/8 t salt.
  3. Whisk your wet ingredients until frothy:  1/2 cup sugar, 1 egg, 1 1/2 T brewed espresso, 1/2 t vanilla, and 1 T red wine (I used a Merlot in this recipe, but use whatever red wine you like).
  4. Combine your dry ingredients into the wet, until they just come together.
  5. Roll the dough gently, on a floured board with floured hands, to form a log. Carefully transfer the log onto the baking sheet and pat it into a form about 3/4 inch high and 2 inches wide.
  6. Bake the log until it’s firm to touch, about 20 minutes, then transfer to a cutting board and allow to cool for 5 minutes or so.  Reduce heat in oven to 300 degrees.
  7. While log is still warm, cut into 1/4 inch slices, using a serrated knife, and lay the slices back on the baking sheet in a single file.  Bake biscotti for 10 minutes, flip, and bake for another 10 minutes, or until dry.  Remove to a wire cooling rack and cool completely.  The biscotti will become more crisp as they cool.
  8. If you want to add an extra touch, warm chocolate chips and drizzle over an end of the biscotti.  This is not necessary but is a delicious addition if you’re not planning to use these for dunking in coffee or hot cocoa.

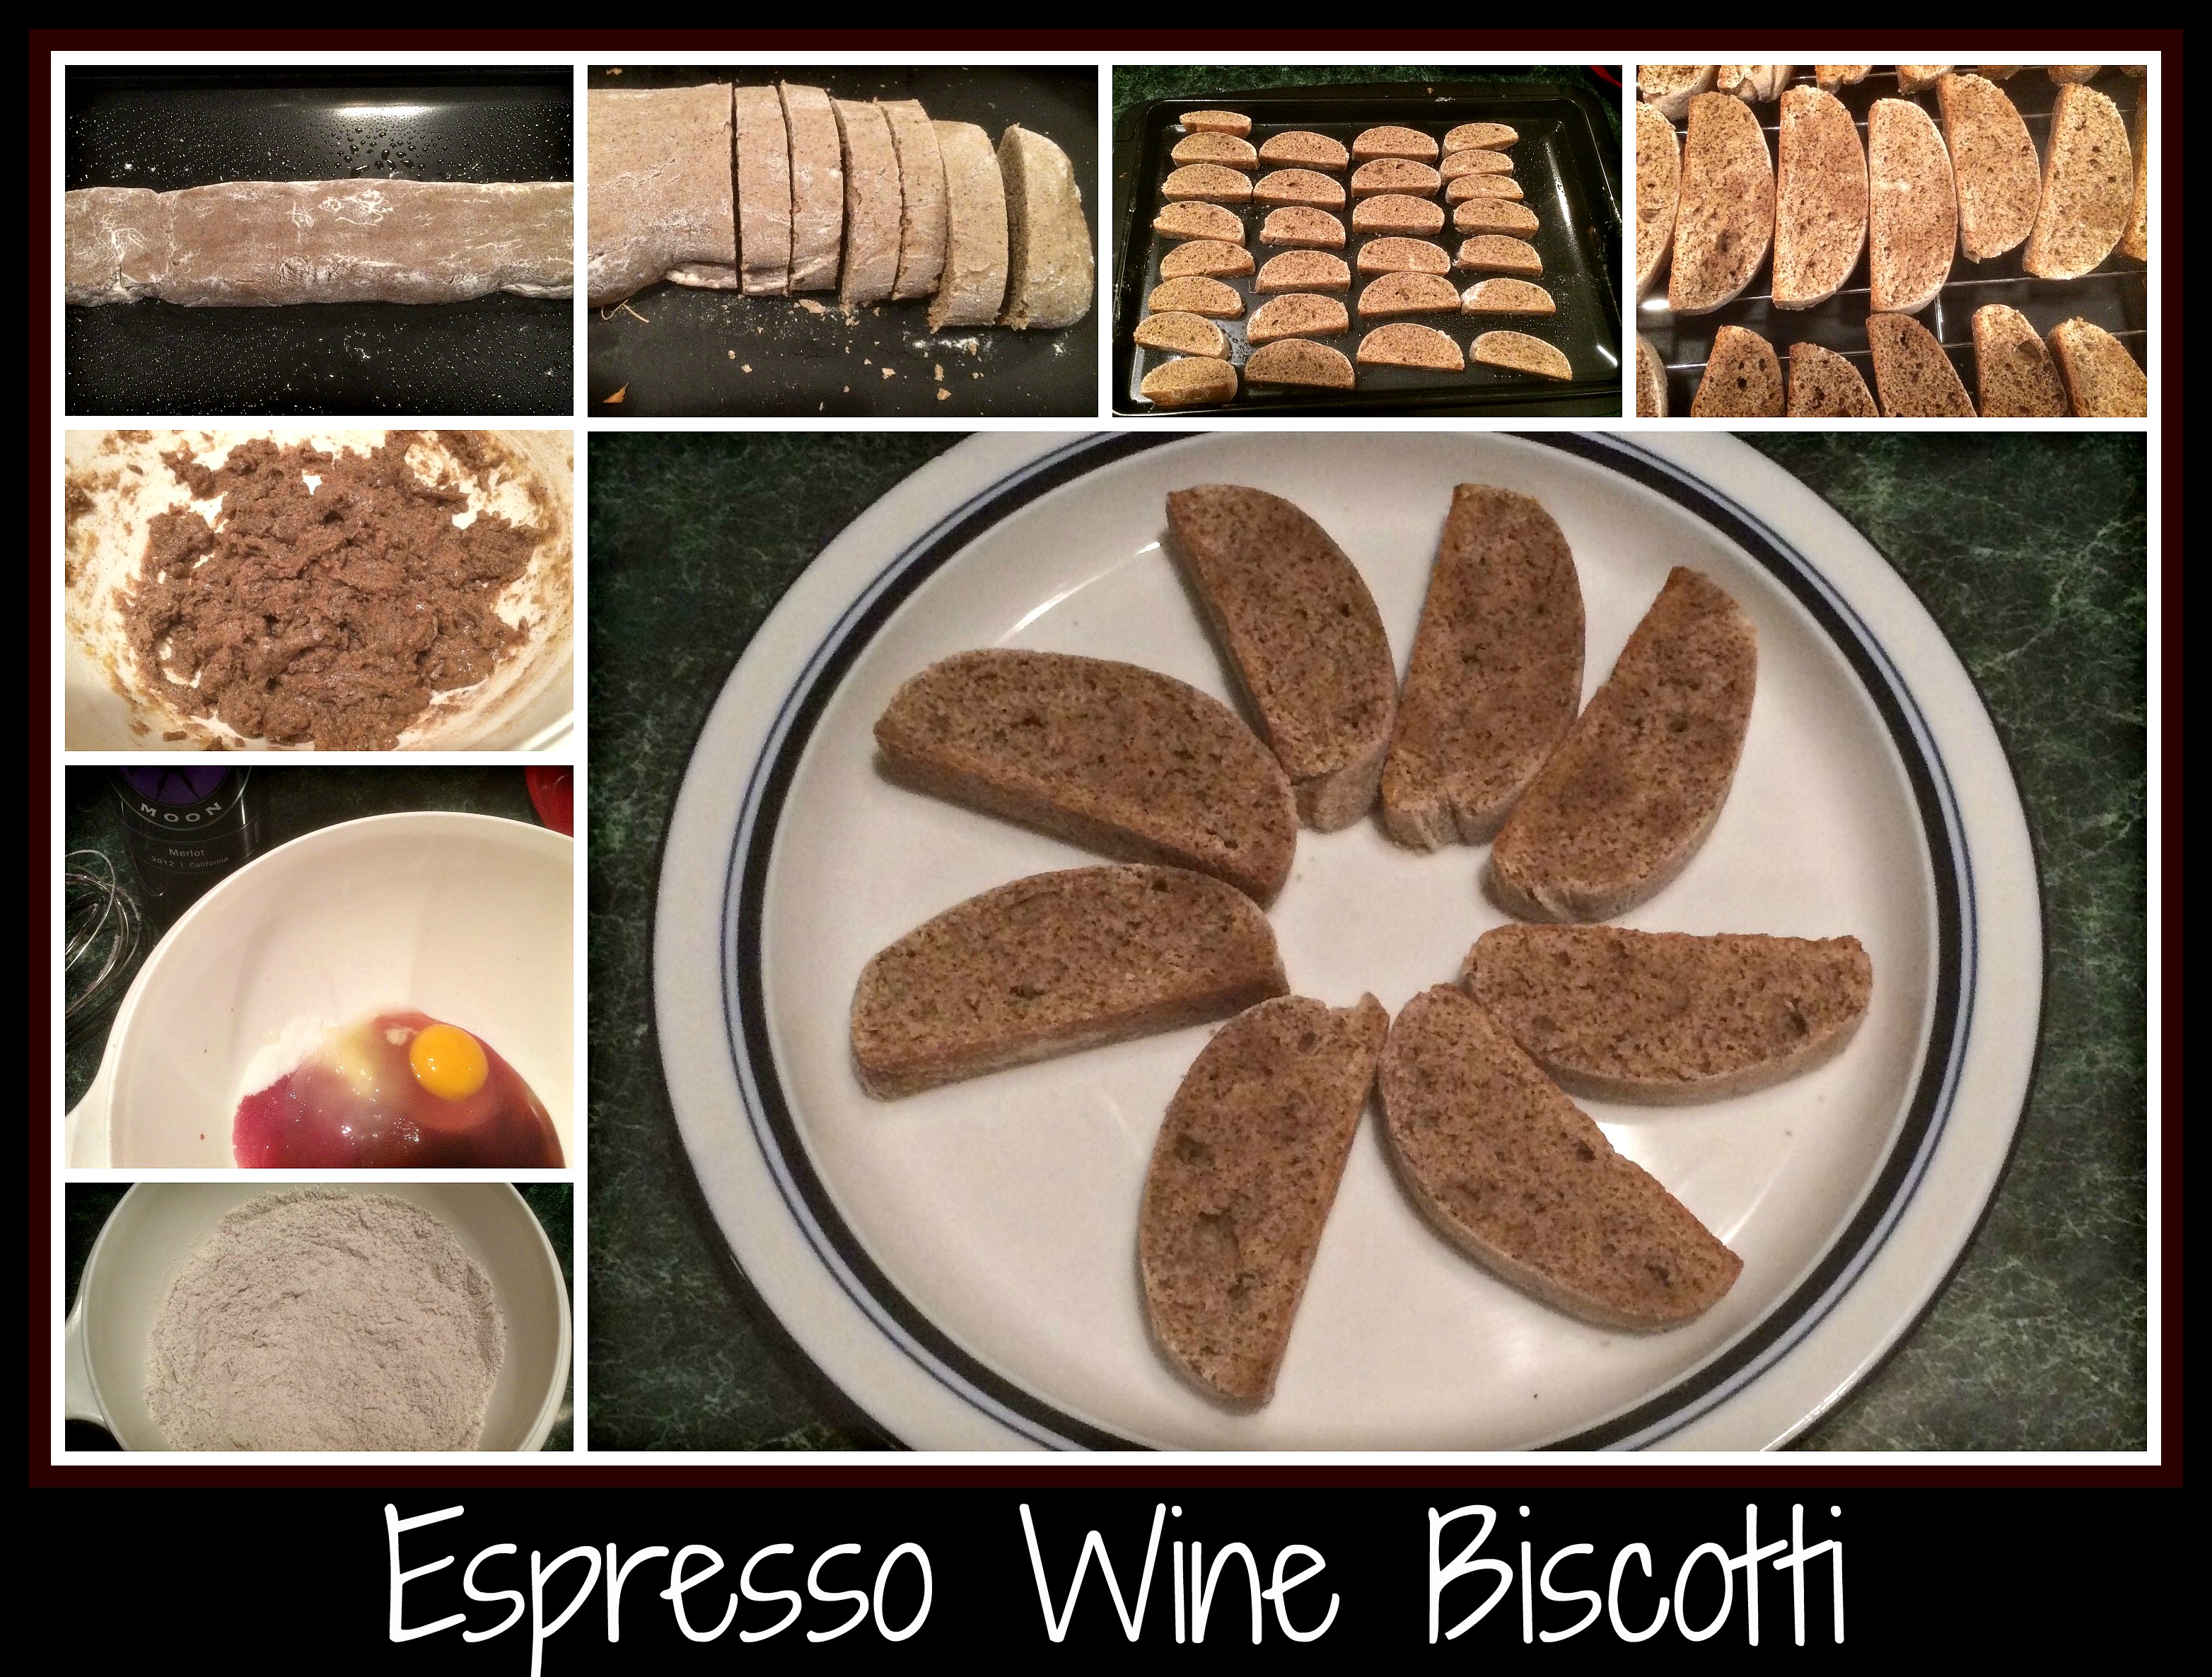
I really liked the addition of the red wine to this recipe.  The flavor was just a touch deeper and it didn’t alter the consistency of the biscotti in any discernible way.  I like keeping these on hand for when someone stops by to visit… it’s always nice to seem prepared for company with such an elegant thing to add to a shared cup of coffee.  Hope you find them as tasty as I do… I love these!

Recipe: Winter Crab Bisque

One of the best things about this recipe is that it uses up the leftover Crab Dip that I had from our family’s Thanksgiving dinner this past weekend.  Crab Dip is a thing of beauty…. thick, creamy, and so very decadent.  The hard part comes when the entire recipe isn’t eaten and you have to find something that is equally delicious in which to use all that fabulous crab… and this, in my opinion, is it!WinterCrabBisque

I started my Winter Crab Bisque by making the soup base.  I diced half an onion and sauteed it in a bit of olive oil.  I then diced 3/4 of a butternut squash (about 4 cups) and one large sweet potato and added them to the large stock pot, turning the heat to medium to start a simmer.  Quickly adding equal parts chicken stock and white wine, I gave the vegetables time to cook on a low boil until everything was soft.  I had chosen to use marjoram, some fresh rosemary, and pepper for my seasoning, so added these to the cooking vegetables so the flavors would combine.

Once the vegetables were soft (almost “falling apart” soft), I used a stick blender to thoroughly mash everything until smooth. The soup was still very warm at this point, so I turned off the heat and added the cold leftover crab dip.  NOTE: My Crab Dip recipe couldn’t be easier… it comes from my cousin, Kris, and it’s as easy as warming 1 stick of butter and 1 block of cream cheese in a double boiler, then adding 1 lb crabmeat and seasoning with Old Bay and parsley.  

After adding the cold crab dip, I simply folded the soup over the dip until everything came to the same temperature and combined nicely.  The crab dip had already been seasoned with Old Bay and parsley, so this was a lovely addition to the winter vegetables in the soup, coming together to make a thick and hearty bisque that could warm the coldest hearts on a winters day.

One extra note on the crab dip: my official recipe from Kris says to use Lump crab meat, but the cost was about to make me choke, so I substituted claw meat, which was half the cost of the lump crab meat.  I was pleased with the results, but I was also serving a bunch of guys who don’t mind the difference.  If you’re trying to impress, the lump crab meat is definitely more “perfect”, but I tend to lean more toward something that’s less costly if I’m mixing it into other ingredients.

I do hope you’ll try this simple, yet elegant dish.  I made it in under an hour this morning and am very happy with the results.  If you’re looking for a delicious bisque recipe that isn’t going to send you running to the store for new/unique ingredients, this is a great option!  Enjoy!

Recipe: Zinful Orange Cranberry Sauce

If you’d been given the task of bringing the Cranberry Sauce to the family Thanksgiving table, this is definitely a recipe to try. The flavors of the red wine and cranberry, combined with a citrus-y touch of orange make this cranberry sauce recipe a simple and delicious addition to any style of holiday spread.ZinfulOrangeCranberrySauce

The recipe is incredibly simple.  Into a medium sauce pan, mix 1 cup of dark red wine (I used a deep, dark Zinfandel but you’re welcome to use whatever wine you like.), 1 cup of sugar, and most of a bag of fresh cranberries (saving 1/2 cup of berries to add at the end of the cooking process), the zest and juice of one navel orange, and 1/4 teaspoon salt.  Cook this mixture on medium until it starts to boil, then reduce and cook at a low simmer until the sauce becomes thick and all the berries have popped.

While the sauce is cooking, chop the saved 1/2 cup of berries to a fine dice.  Once the sauce is thoroughly cooked, stir in the diced berry pieces and remove from heat.  Move the completed sauce into a resealable container and store in the fridge until you need it.

If you only have a white wine on hand, feel free to use that in place of the Zinfandel in this recipe, or check out the other cranberry sauce recipes on this blog.  While I don’t remember ever enjoying cranberry sauce when I was younger, it has become one of my favorite sides for holiday meals.

Happy Holidays!

Sharing a new wine-related challenge

Starting this Friday, I will be working for Opici Family Distributing doing in-store tastings.download  I am very excited about this new challenge as it will offer me the chance to learn about a large number of imported wines and allow me to share that knowledge with the general public.  I will have a day or two to become familiar with the 3-5 wines I’ll be pouring at the event, then be present to share these wines with anyone who comes into the store in which I’ll be working.  I’m very much looking forward to the opportunity and hope that I will meet people who share my interest in wine.

One of the best things about this new job is that I will be working with some pretty interesting and fun wines.  I’ll be working for Opici Family Distributing and  I get to represent the sister company’s – Opici Wines, Wine Enthusiast Importer of the Year – portfolio.   Even so, it’s hard *not* get excited about working with wine and sharing information with others.  Check out the links I’ve included – the Opici Family Distributing Company is linked first… the Wine Enthusiast’s article is linked second.

Stay tuned for info on the wines I get to share with people and find out more about this great opportunity.  I’m really excited to share the Opici wines as well as my recipes and blog with those who might be interested.

The only questions now are… Red or White… dry or sweet… serious or sparkling…

Recipe: Apricot Chicken and Snow Peas

This recipe was such a huge success this week!  I was trying to come up with a simple recipe to use a sweet/spicy sauce with chicken and I ended up with this winner of a meal.  You’ve GOT to try this one… truly!

I started with a package of boneless, skinless chicken thighs.  I salted/peppered each side and seared them in a medium-large skillet pan into which I had melted a small amount of olive oil and sesame oil.  Once they were nicely browned, but definitely NOT cooked through, I added a rather creative sauce.ApricotChickenSnowPeas

My sauce consisted of the following ingredients:  Gewurztraminer (dry) wine, sesame oil, garlic, ginger, apricot jam, commercial orange sauce, and soy sauce.  All these ingredients can be used, to varying degrees, depending on your taste preferences. NOTE: I chose to use a dry Gewurztraminer wine because of the heat that was going to come out from the orange sauce, but you could easily switch out a sweeter Riesling or Vidal Blanc white wine (or even chicken stock if you don’t want to use wine) but if you choose a sweeter wine, I’d decrease the amount of jam used.  It’s totally up to you!

Once I rolled the chicken in the sauce, I chose to roast this dish, covered, in a 200 degree oven for 2 hours.  I had the time and really wanted to have the scent permeate the house before we had dinner.  If I were more pressed for time, I could easily have left this on the stove top and kept the heat on medium for about 45 minutes or until the chicken thighs were cooked through.

Once the chicken was done, I added half of a small package of snow peas (sugar snap peas would be a great substitute) and allowed them time to cook in the sauce. Just before serving, while the sauce was still a bit runny, I mixed a few tablespoons of sauce with a little bit of cornstarch to make a slurry and added that into the sauce to thicken the mixture.  NOTE:  Make sure to add the cornstarch to a small amount of liquid rather than adding the cornstarch directly to the pan to prevent lumps in your sauce.

When I added the snow peas, I started cooking a small batch of egg noodles so they would be ready in time for dinner. This was a great bed for the dish and really allowed the flavors to pop.  If you prefer, brown rice would also make an excellent accompaniment.

I do hope you’ll try this recipe sometime.  I’ll be using the basic idea of this sauce for a shrimp dish tonight for dinner and expect it to present the same stellar results.  It’s all about finding the flavors that mix best for your family and playing with them to make your own arsenal of go-to recipes.  Enjoy!

Recipe: Red Turkey Chili

Last night was windy, cold, and rainy here in Maryland, so my first impulse was to make chili.  This dish is one of my favorite things to make, especially in the fall and winter, because I can change out the recipe so easily.  I’ve made it many different ways, but last night’s was a much healthier rendition that still warmed us up nicely.  See if you and your family notice a difference if you try this version!

I started by heating a large stock pot on the stove and dropped in one diced onion with some olive oil. Once the onion was translucent, I added one package of ground turkey and took some time to let it all brown thoroughly.  To add a bit of smokiness to the finished product, I added a bit of bacon that I pulled from the freezer and gave that some time to cook. RedTurkeyChili
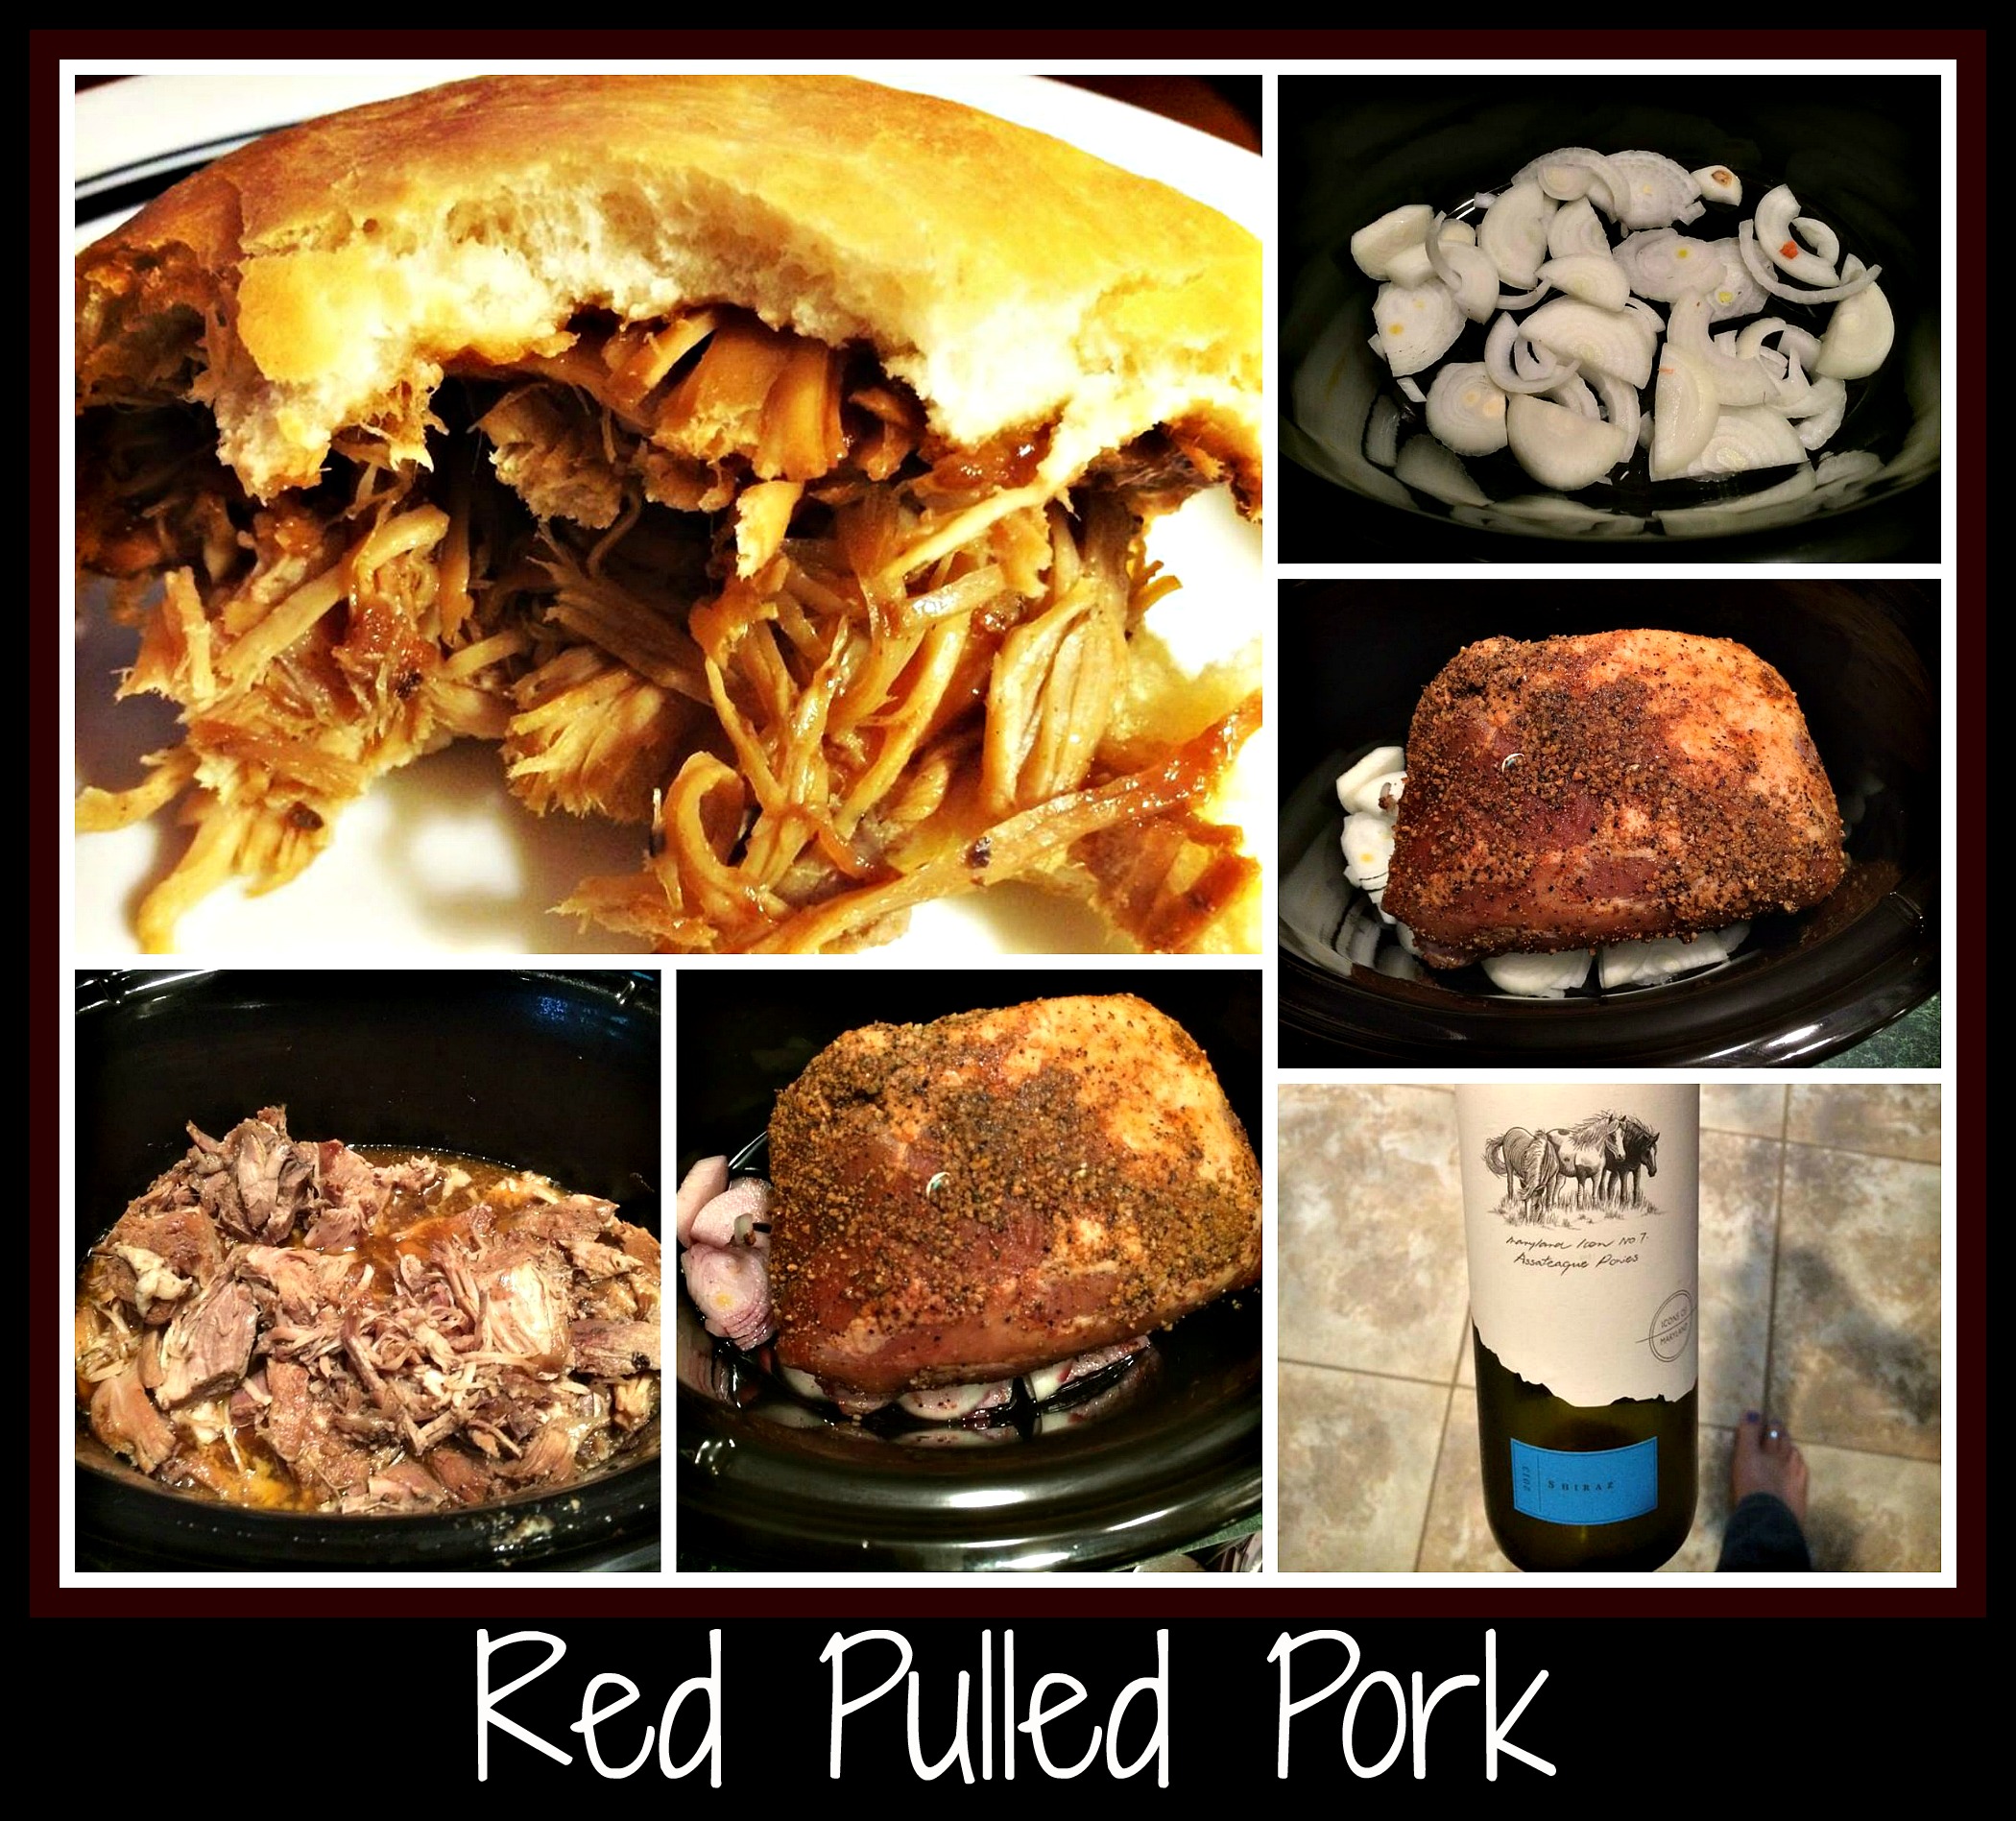
NOTE:  I had previously taken a one-pound package of bacon and sliced it into 8 portions.  Each portion went into a small freezer bag and I use a portion any time I want a little bacon flavor without having to thaw or cook an entire package.  I diced this portion so the bacon wasn’t discernible, but the flavor permeated the chili nicely.

I then added about a cup of diced sweet pepper (as you can see, I used a variety of green, red, orange, and yellow peppers) as well as a generous pour of red wine.  NOTE:  For this recipe, I had a bottle of red wine from Adams County, PA, but any good dry red wine is great to add, provided it’s a red wine that you like to drink.  Don’t ever add wine that you wouldn’t drink to a recipe, since cooking will concentrate the flavors from the wine.  

Once the vegetables and wine are incorporated into the chili, I then added one can each of light and dark red kidney beans (rinsed and drained) and one can of diced tomatoes (not drained).  I was now ready to add my spices to make this dinner into something memorable.

Since my family is not a fan of hot/spicy flavors, I used a conservative amount of dark chili powder, ground cumin, and smoked paprikaone teaspoon of unsweetened cocoa powder, along with some salt and pepper.   At the very end, I drizzled in a bit of a prepared Balsamic Glaze, which really gave this dish a bit of zing without overpowering the traditional chili flavors.

I do hope that you’ll try your hand at this chili recipe.  Feel free to substitute other meats, beans, or vegetables as you like – that’s what makes each person’s recipe unique and special.  We thought this version had a great balanced flavor… exactly what I wanted on a cold, rainy fall evening.  This would be a great dish to share with friends and will freeze nicely, so feel free to double or even triple the recipe if you have the time (and freezer space)!

Recipe: Red & White Stir Fry Salad

Here’s a recipe PLUS a bonus!  Each part of this recipe deserves it’s own post, but since they are connected, I decided to post them together.  It’s a recipe for “stir fry” AND a chicken salad recipe…in one recipe!RedNWhiteStirfrySalad

I was trying something new… I wanted to make a shrimp stir fry, but wondered how it might work if I tried to “bake” the ingredients for a stir fry.  To do this, I sliced a pound of de-shelled shrimp length-wise and used them to cover the bottom of a 9×9 pan.  I sprinkled a  package of slaw (the kind with shredded cauliflower and broccoli) over the shrimp and then made a sauce of hoisin sauce, red wine, garlic, ginger, and a little cornstarch (for thickening) to pour over the entire pan.  I covered the pan with foil and allowed it to bake at 350 degrees for 20-25 minutes.  A package of microwave brown rice finished off my first meal nicely (see top right-hand photo).  While the technique was unconventional, it was a great way to make a simple dinner without standing beside the stove top.

The second half of this recipe (the “Salad” portion) came about from my need to use up the half-cup of leftover stir fry.  I had a chicken breast in the fridge that also needed to be used, so I decided to try putting everything together to make a chicken-shrimp stir fry salad sandwich.  Weird, but it really was tasty.  I combined the following ingredients: leftover stir fry, one diced chicken breast, one diced stalk of celery, a small palmful of craisins, some mayo, white wine, salt and pepper.  I mixed everything until it was well combined, adding either mayo or white wine, depending on the desired texture, and then put the mixture on some toasted low-calorie bread to make a sandwich.  The threads of veggies from the stir-fry provided some interesting texture in the salad, but it was a great mix and the bits of leftover stir fry sauce added some zing to the flavor.  It was definitely a great way to use up leftovers in my fridge.

I hope this set of recipes gives you some ideas of ways to re-use foods in your own fridge.  Using red wine in the stir fry and white wine in the chicken salad was a fun inspiration as well… see what you can create when you go beyond the traditional and let your creative juices flow!

Recipe: Red Breakfast Hash

I’m sending this recipe to The Today Show for a segment by Joy Bauer on healthy apple recipes. The writing below is a bit different than my typical babbling about how to make something (I thought this might sound more professional) but I wanted to share this recipe with you all first.  It’s just so darn tasty… I hope you agree!

I make a Red Breakfast Hash that is a great brunch recipe – full of flavor and color!  I’ve put a few variations on my wine blog (www.fromthebottomofawinebottle.wordpress.com) but this is one of my favorite offerings.  The recipe can be increased or decreased as needed and it uses up any leftover baked potatoes or extra veggies left in your fridge, so it’s healthy AND a good value.RedBreakfastHash

Basic Ingredients for two:

*1 tablespoon butter

*one baked potato, diced

*one onion, diced

*one apple, cored and diced (I like to leave the skin on)

*Red Wine (I use whatever is in my fridge at the time)

*Salt/pepper to taste

*2 eggs (plus some white vinegar to poach eggs)

Directions:

  1. Melt butter in a non-stick skillet and saute’ potato, onion, and apple until browned and a little crispy.
  2. Add red wine to your skillet and give your potato mixture some time to soak up all that flavor and color. Add salt and pepper to taste
  3. While you’re working on #1 and #2, boil some water with some white vinegar added and drop the eggs in to poach just before your wine is totally absorbed.
  4. To serve, divide the red potato mixture onto two plates, top with the poached eggs and break the yolk to share that yummy goodness with the rest of your food.
  5. ENJOY!

I came up with this recipe while working at a winery in VA.  There’s an old joke that goes “what do you call a meal without wine?  Breakfast”, so I decided that I had to fix that problem.  This can be made healthier by using more of the onion/apple mixture, but I really like using a 1:1:1 ratio so the flavors are easily recognizable.  You can also add sautee’d peppers into the mix, if you’d like.  If you’re not a “poached egg fan”, feel free to fry the egg or simply use Fat-free egg substitute as your egg choice.

Note:  the photo mashup I included was created on Picmonkey, using iPhone photos of the food in various stages of creation.  I like to use these on my website to entice people into trying to make my recipes, since they tend to be fairly easy and enjoyable to make.

Crock Pot Recipe: Red Pulled Pork

If you’ve been following my blog, you may remember that I’ve already posted a recipe called “Red Wine Pulled Pork“.  That recipe is really great… but I also wanted to post this one because it is just so incredibly simple.  Simple to the point of being a “marinate, cook, shred, serve” type of recipe… how tough could that be?

I started with a large pork roast… I bought it because it was on sale that Friday and I was looking for something that could feed a crowd while watching Saturday football games in our living room.  When I got home from the store, I put the roast into a plastic storage bag and poured a mixture of smoked paprika, Montreal steak seasoning, and Lawry’s Seasoned Salt over the pork, massaging the seasonings into the meat.  I then put the bag into the fridge to marry the flavors overnight.RedPulledPork

On Saturday morning, I pulled out my crock pot and put dinner together.  I sliced two onions into thin strips (cut the onion in half, root to tip, cut off the top and slice the onion into strips the entire way down to the root, discarding the root) and put it into the bottom of the pot.  I placed the seasoned roast on top of the onions and then poured the end of a bottle of dry red wine (feel free to use as much or as little as you like) into the bottom of the pot.  I chose not to pour the wine over the roast because I really wanted the spices to have time to season the top fat layer as the meat cooked.

I set the crock pot to cook on high for 6-7 hours, but I could have easily chosen to cook it on low for 7-8 hours.  Much will depend on how comfortable you are with your crock pot.

I’m impatient when I use the crock pot, so I did check this about an hour before it was ready.  I like the feel of the meat when it falls apart, so I tend to push the envelope when I’m making this sort of dish.  I removed all the bones and then allowed it to cook until al the meat fell apart exactly as it should.  The onions were a nice addition into the meat, since they just “melted” into the pulled pork.

When I got ready to serve this dish, I sliced homemade kaiser rolls in half and spooned some meat into each roll before topping with a small bit of a jarred BBQ sauce from my fridge.  Potato rolls or chewy rolls from the store are also delicious with this meal… don’t feel that you *have* to make your own rolls for this meal to work.  This recipe was simple… the pork cooked all day and perfumed the entire house with a spicy warm smell that ushered football season into our home in the best possible way.  Enjoy playing with this recipe and making it your own… feel free to use whatever spice your family likes so your meal hits all the “high notes” for your favorite fans. Most of all… have fun!

Red Fudge Sauce

Wow… this sauce is such a wonderful recipe that it’s worth making so you can dress up almost any dessert.  Company coming over?  Toast some slices of pound cake or angel food cake (or even ice cream) and drizzle this fudge sauce over top.  Sweet tooth craving something decadent?  Spoon a little warmed sauce over cut up fruit.  Dinner still an hour away and you’re looking for something to “hit the spot” so  you don’t over indulge and ruin your dinner?  Have a small spoonful of this sauce, cold, right out of the fridge.  It’s dark, deep, and oh, so delicious.  I’m confident that you’ll want to keep this recipe on hand for the foreseeable future.RedFudgeSauce

The best part of this recipe, in my opinion, is that it’s just so darn easy to make.  The original recipe came from my boys’ elementary school cookbook, but I just had to tweak it until it hit all the high notes for me (read:  needed wine).  You’ll want to have the following ingredients on hand and ready to go.

Ingredients:

  • 5 squares of Baker’s unsweetened chocolate
  • 1/2 cup margarine
  • 3 cups confectioner’s sugar
  • dash of salt
  • 1 tall can evaporated milk (it’s about 1 2/3 cup total)
  • 2 Tablespoons of red wine
  • 1 1/4 teaspoon vanilla

Directions:

  1. To start, melt chocolate and margarine over low heat, whisking until the chocolate is thoroughly melted.
  2. Add the salt to the sugar and add the wine to the evaporated milk.
  3. Alternately add sugar/salt and milk/wine to the chocolate mixture, blending well with a whisk.
  4. Once thoroughly incorporated, bring sauce to a boil over medium heat, stirring constantly.
  5. Cook and stir until thick and creamy, about 8 minutes, then turn off heat and stir in vanilla.

That’s all there is to making your own homemade fudge sauce.  The red wine adds just a touch of richness without altering the flavor to a great degree.  I have tasted it both ways…. feel free to omit the wine if you prefer, but I really enjoyed its’ addition.  Store this sauce in jars (or plastic containers) in the fridge and heat to serve as desired.  I used this sauce recently to pair with a loaf of angel food cake when bringing dinner and dessert to my neighbors.  Such a simple thing, but it was a wonderful thing to share with friends.

Fudge sauce… the new way to share some love with others?  Enjoy!