Recipe: Raspberry Wine Taffy

What’s a girl to do when her college roommate gives her four bottles of good Raspberry Syrup? Why, create a recipe using the syrup and WINE, of course!

Armed with the fore-mentioned syrup, I decided to play in the kitchen today. I didn’t want to waste the syrup, so I thought I’d make a simple reduction of the syrup and red wine that would drizzle nicely over desserts. While my end product didn’t exactly meet my expectations, it definitely wasn’t a total loss… I ended up with Raspberry Wine Candies!

I decided to start small… I poured 1/2 cup raspberry syrup and 1 cup red wine into a small saute’ pan and allowed this mixture to simmer for awhile. Note: I used Boordy Vineyard’s Chambourcin Merlot for this recipe, but I could have easily used James River Cellars’ Meritage… I just had an extra bottle of the BoRaspberryWineTaffy
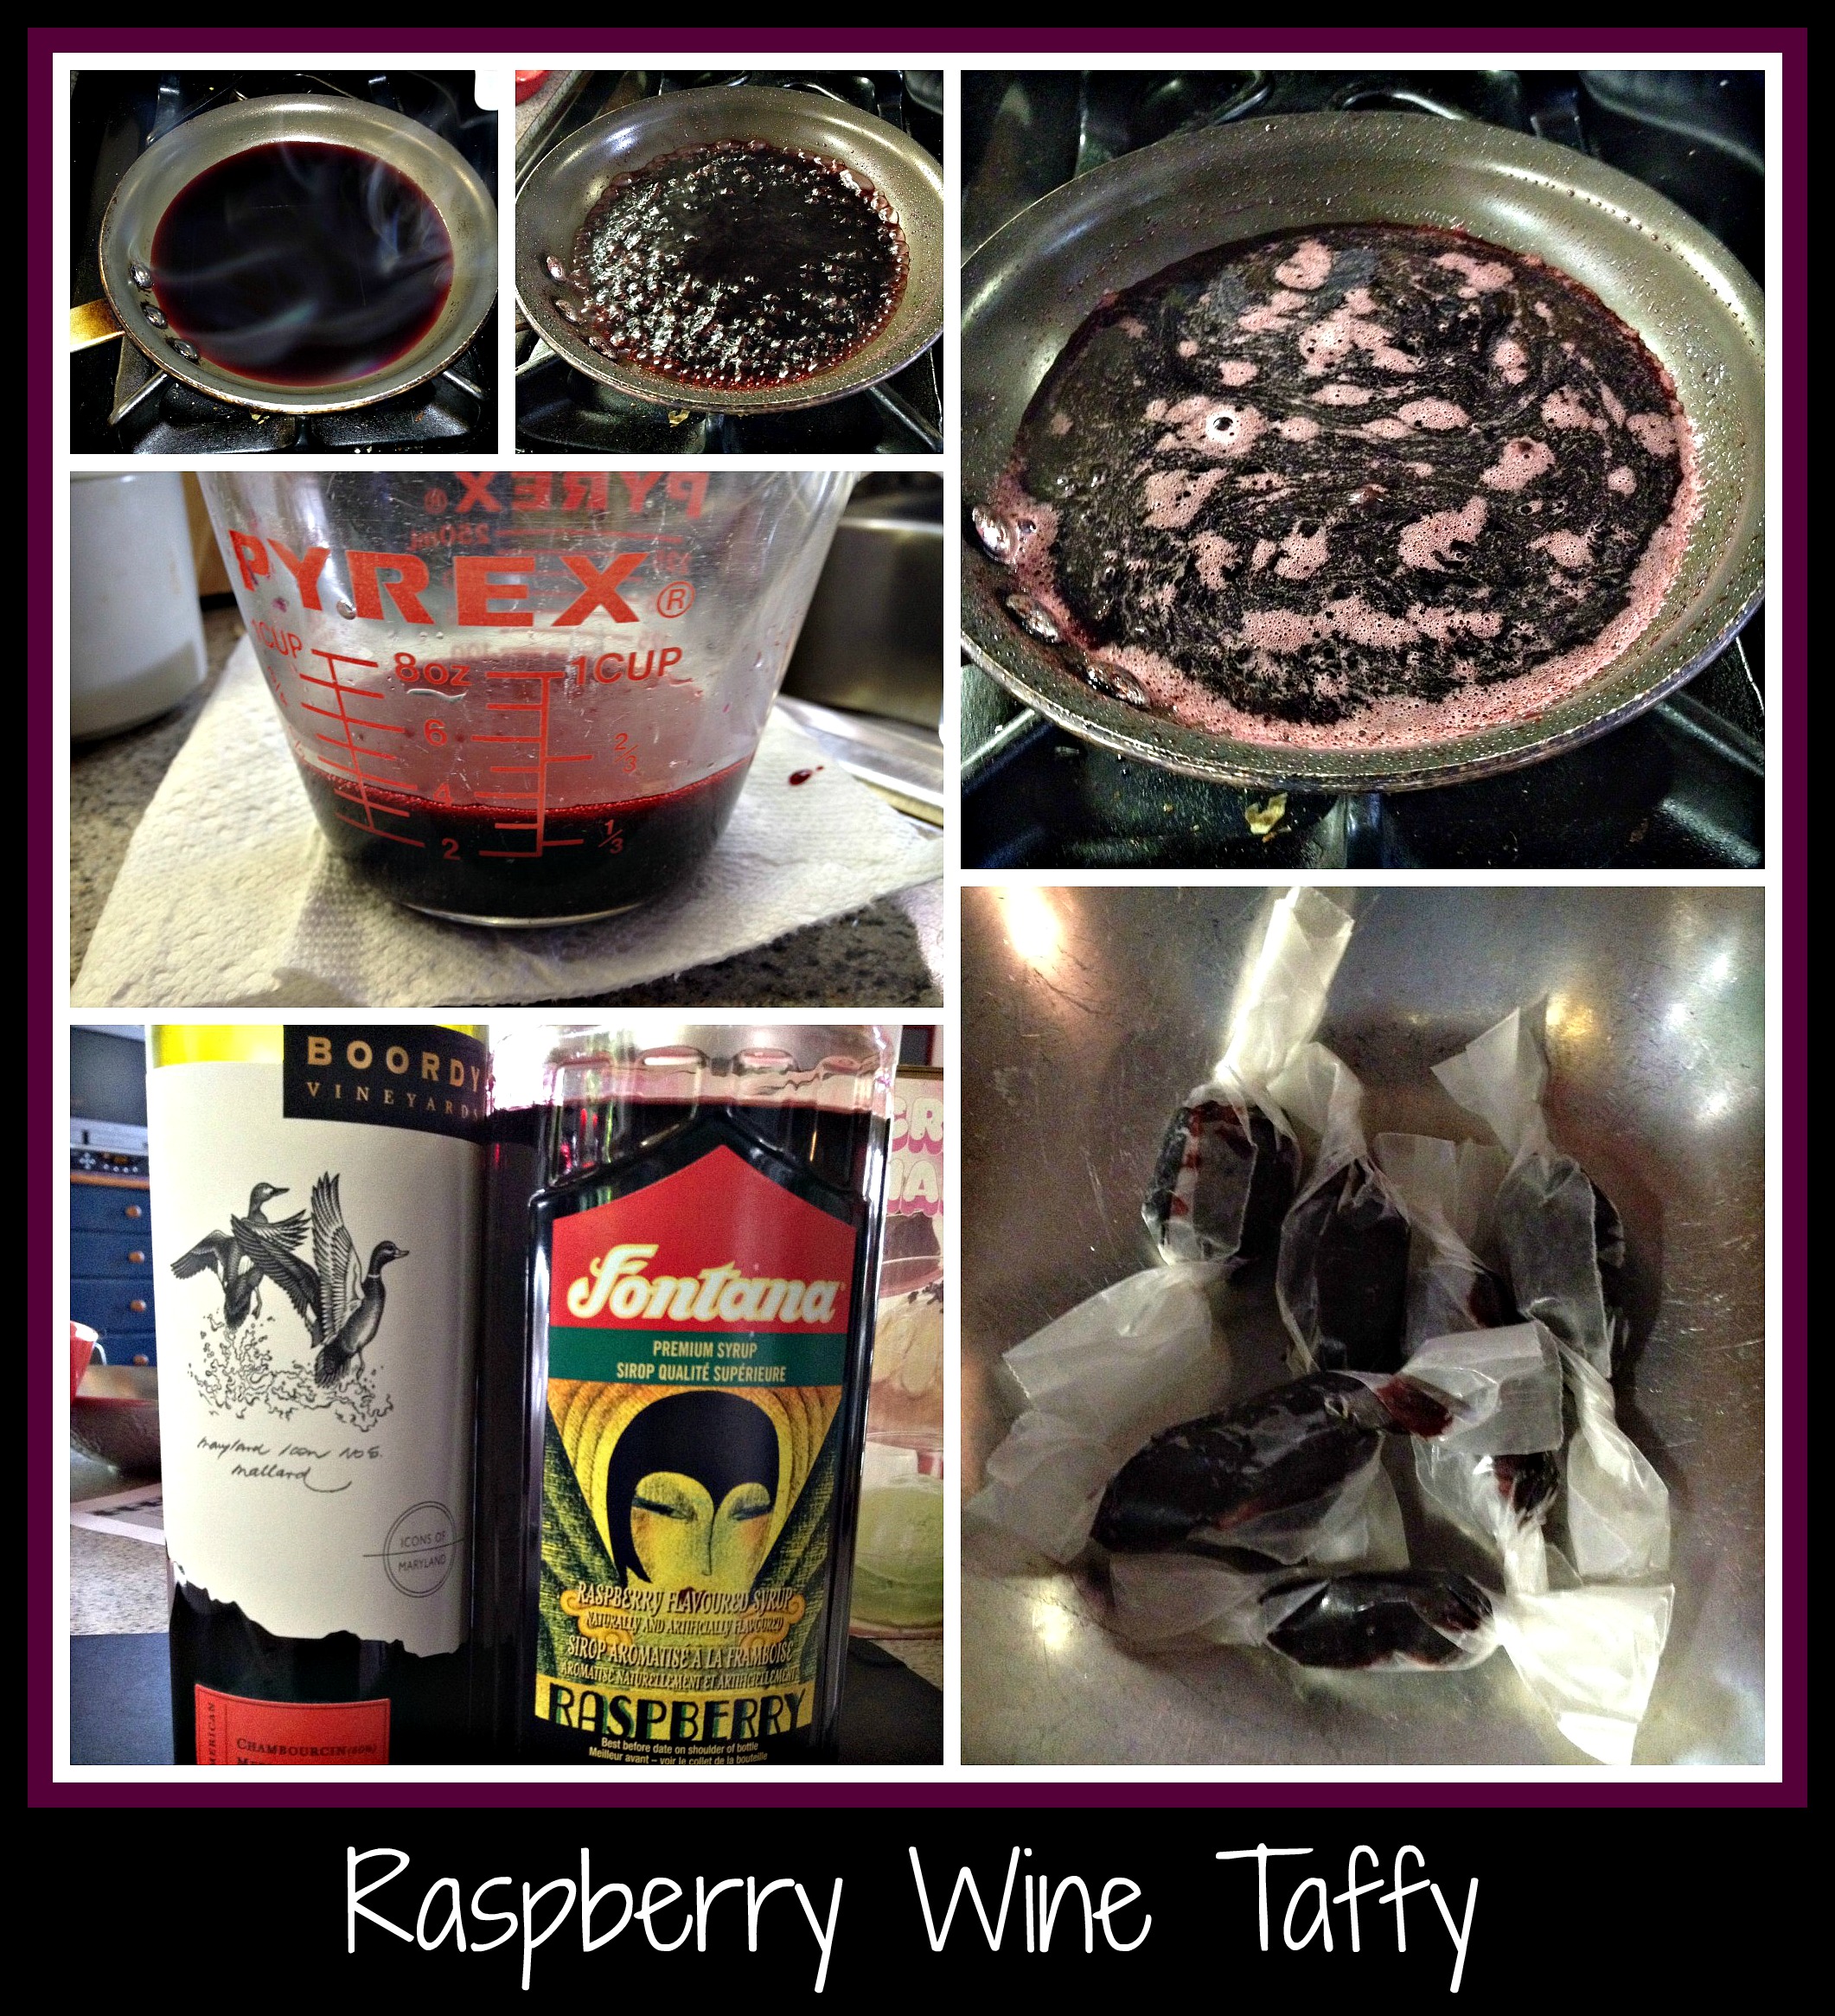
ordy wine and wanted to use it up. I allowed this syrup/wine mixture to simmer for about 30-45 minutes – I wasn’t paying close attention to the clock and I was simply cooking the mixture until it reduced significantly and started to look “thick”.

Once the mixture had cooked down to the look of a heavy syrup, I added a dash of salt and a teaspoon of margarine. I stirred these two additions into the mixture and allowed it to simmer a little longer.

At this point, I probably should have removed it from the stove and used it as a drizzle for pound cake or ice cream. Instead, I continued to cook it until it was even thicker and looked as if a spoon could leave a trail down the center of the pan. I removed the confection from the stove and poured it into the Pyrex measuring cup (as seen in photo) to find that the entire mixture had reduced from 1 1/2 cups of liquid to a scant 1/2 cup of confection. It tasted lovely, but I had no idea what to do with it… so I popped it into the fridge.

An hour in the fridge allowed this recipe to thicken so much that I could manhandle a small spoonful onto a piece of waxed paper and eventually eat it as a soft taffy… hence the recipe’s name. I’ve never intentionally made taffy before, but this is what I thought of when I tasted it.

Next time, I’ll stop cooking this mixture earlier and allow it to cool so it can be used as a flavorful topping for ice cream or pound cake (as I mentioned before)… but maybe not. It’s kind of fun to create something totally unexpected!

Here’s to the unexpected sweetness of life… may we all create more of it to share with others!

Recipe: Easy Chicken Divan

I was recently tasked with using our new Cabernet Franc Blanc wine (James River Cellars’ 2012 Montpelier) in a recipe and this fabulously easy recipe was the result.  It uses both Montpelier wine AND Monterey  Jack cheese in a sauce that has it’s beginnings in my childhood, so for me, this was a win-win recipe.  I hope you find it that way as well!

EasyChickenDivan

I started with a leftover chicken carcass that I pulled from the freezer.  Typically, I’ll purchase a roasted chicken from our local grocery store and cut out the breast meat to use in a meal early in the week.  Once the white meat is gone, I like to bag up the chicken remains and pop it in the freezer for just such an occasion.  While the original recipe called for a can of cream of mushroom soup, I wanted to make my version a little healthier, so I put the frozen chicken into a large stock pot with about 2 inches of water and set it to a low simmer until the chicken was soft and easy to pick off the bone.  Most of what was left on the bone was dark meat, which suited me just fine.  I transferred all the meat into a large casserole dish and tossed the bones in the trash.   I quickly cooked a bag of broccoli florets in the microwave and layered them on top of the chicken in the dish.  Now to make the sauce that would pull everything together.

The remaining liquid in the pot had a deep chicken broth smell and taste, so that was the beginning of my sauce.  I added one pat of butter and a few spoons full of flour and whisked everything together until the flour had been thoroughly cooked and all lumps were gone.   I slowly introduced the Montpelier wine (you could certainly use a white wine, but a lightly dry rose’ would handle the flavors a bit better, in my opinion) and added a handful of Monterey Jack cheese, whisking again until the cheese melted nicely and the wine was thoroughly incorporated.  I also added a few spoons of Miracle Whip Lite and a generous amount of curry powder.  NOTE: I like to sweet/tangy addition of Miracle Whip in this recipe, so if you really want to use traditional mayonnaise, I would suggest adding a touch of sugar.  Once your sauce is smooth, creamy, and tasty (you HAVE to taste-test the sauce to make sure your flavors are combined well), pour the sauce over the chicken/broccoli in your casserole dish.

Using the same stock pot that you used to warm your chicken (and then make your sauce) add some butter, olive oil, salt, crushed garlic, and pepper.  Allow the seasonings to blend over medium heat and then toss in a few hands full of bread crumbs.  Toast the bread crumbs until they have soaked up the seasoned butter/oil mixture and become a bit crispy.  Layer them on top of your casserole dish and plan to bake your final dish at 350 degrees for 30 minutes or until bubbly.

You can absolutely plan to serve this with a simple green salad and some bread, but we love it just by itself.  The flavors combined nicely and everything tasted clean and fresh.  While it reminded me of my Aunt Treva’s Chicken Divan, it seemed a little healthier to me… maybe part of that is mental, but I do know that I was using fresh ingredients so I did feel better about how I made this version.

Try it with your own favorite childhood recipe… maybe you’ll come up with an updated recipe of your own!

Recipe: Stephanie’s French Toast Bites with Blueberry Wine Sauce

I have to start this recipe by saying that I love breakfast foods.  Eggs Benedict… pancakes… french toast… hash browns… sausage… waffles… bacon… you get the picture.  I could have breakfast-for-dinner at least once a week (although my husband much prefers to limit breakfast foods to “breakfast/brunch time”).  Because of this love affair I have with breakfast, I enjoy creating different sorts of recipes that showcase some of my favorite options, especially when I can incorporate wine into the mix.  The best of both worlds, right?

This recipe was created for my dear friend, Stephanie, who’s having a difficult time eating full-size servings of food these days.  To tempt her into eating breakfast one day, I came up with the idea of having small crouton-size bites of french toast that she could eat with her fingers or dip into a fruity sauce.  It was a big success, so I thought I would share this special recipe with everyone here.  I’ve named this recipe in her honor because without her, I wouldn’t have thought to make this delicious breakfast dish in such a unique manner.

I started by cutting up a few slices of whole wheat bread into bite-sized cubes.  Using my memory, I blended an egg (you can absolutely use egg substitute if you prefer), some milk (I like using almond milk if that’s on hand), some white wine (I used Vidal Blanc last time but use whatever you may have in your fridge… just decrease the amount of sugar if you’re using a sweeter wine), a sprinkling of sugar (as desired), a touch of vanilla, and a dash of cinnamon (to taste).  Using a wire whisk, beat the egg mixture until it’s just becoming frothy.  I wanted something that would taste light, so I opted to whip the mixture until it was light and airy.  I then tossed the bread cubes in the egg mixture until all the cubes were soaked with the egg-y-yumminess.  When you’re ready to cook the toast bites, melt a pat of butter (and a touch of olive oil if you’d like) and transferred the toast bites to a very warm saute pan to cook.  Note: don’t crowd the pan, so feel free to do this in two sections if necessary.  

Stephanie'sFrenchToastBites

In the meantime, using a small saute pan (or sauce pan), melt a pat of butter and add a handful of blueberries,  Feel free to use whatever berries you have on hand or prefer.  We had quarts of blueberries in the fridge, so they were the natural choice when I was creating the sauce to go along with these toast bites.  As the berries begin to warm and pop open, add some red wine (I went around the pan twice with a lovely Pinot Noir… again, because that’s what was in the fridge.  If I’d had a different red wine available, I might have changed to that one instead.  Use what you have and what you enjoy!) sprinkle some sugar to sweeten the sauce, and I decided to add a dash of cinnamon, to mirror the taste from the french toast bites themselves.  Allow the sauce to cook until it reduces and thickens.  If it gets too thick, add a little more wine… if it’s not thick enough, feel free to add a little more sugar.  This is a Use The Force sort of recipe… make it your own!

You’ll notice that there are also some bites of sausage on the serving plate in the photo – we had turkey sausage that needed to be used (and it was a good source of protein), so I browned the sausage until it was crispy and delicious.  It’s not a prerequisite… just another flavor to temp my dear friend into eating more than she had planned.

Sometimes, you’ll find that you need to expand your horizons when it comes to feeding your loved ones.  If someone isn’t feeling particularly well, feel free to play with your recipe to tempt them into eating something tasty and good for them.  It’s not about who’s doing the cooking or even about how they’re cooking… it’s about the love that is conveyed by the simple act of feeding people.

As you cook, may you enjoy the challenge and turn it into an expression of love.  That’s what it’s all about…

Recipe: Sloppy Joes and Pretzel Rolls

My boys will recognize this recipe as the one we always have on Halloween.  You know… the time of year when everyone is ordering pizza because it’s so much easier to handle with all the trick-or-treating?  I started making a recipe of my Auntie Jean’s Sloppy Joes (she calls it BBQ) when the boys were small because I wanted them to have a filling dinner before heading outside to beg for candy.  I’m not a huge fan of Halloween (See my feelings on this “holiday” on my other blog) but since my boys loved it, this was my way to add some “normal” to the evening… add in some homemade rolls, and I was a happy camper.

Some of you will be happy because this recipe starts as an actual “recipe”.  My aunt gave us the ingredients, my cousin dutifully wrote them down, and I amended it into my own version.  I always pull out the recipe card when making Sloppy Joes, because I can’t always remember exactly what goes into this delicious meal, but I also rarely use a measuring device of any sort, since I cook using The Force.  Here’s the original:

Auntie Jean’s BBQ (Sloppy Joes)

  • 2 lb hamburger – brownedSloppyJoes and PretzelRolls
  • 1 bottle ketchup (small, 28 oz size)
  • 3 Tbs vinegar (we always use apple cider vinegar)
  • 3 Tbs mustard (plain yellow mustard works best here)
  • 3 Tbs worchestershire sauce
  • 4 tsp sugar
  • 2 tsp celery seed

Note: I typically use one package of ground turkey instead of ground hamburger – I think it takes flavors even better than traditional beef.  I also like to add a diced onion along with the meat, but this is purely up to you.   When I make my version of Auntie Jean’s Sloppy Joes, I also add two turns around the pan of red wine to the ground meat to bump up the flavor a bit.  For this recipe, I used a bottle of Pinot Noir that I had open in the fridge, but if I were opening something specifically for this dish, I’d reach for James River Cellars’ Rad Red or James River Cellars’ Meritage.  Both have great cooking capability and are delicious all alone.

I browned the diced onion, added the ground turkey until everything was nicely browned.  Add the wine at this point and allow it to cook until the wine is incorporated into the mixture.  Start adding your Sloppy Joe ingredients at this point.  Remember that this recipe is written for DOUBLE the amount of ground meat, so you’ll need to have a light hand when adding ingredients.   I always add much less ketchup than is called for, simply because you can always add more of an ingredient but you can’t remove it once it’s been incorporated.  Allow the mixture to cook for a good half hour to really meld the flavors.  I’ve found that really makes a difference with this recipe.  NOTE: I served my Sloppy Joes on spaghetti squash (a la MomUncorked) and it was amazing!

We have loved this Sloppy Joe recipe on all sorts of rolls, but here’s a BONUS RECIPE for you… Pretzel Rolls!

PRETZEL ROLLS: (using a recipe from Donna German’s Bread Machine Cookbook VI)

  • 1 1/8 cups water
  • 2 tsp sugar
  • 1/2 tsp salt
  • 3 cups all-purpose flour
  • 1 1/2 tsp yeast

I make my pretzel dough in my bread machine, according to the machine’s directions.   I then divided it into 10 sections and formed thick pretzel shapes before allowing them to rise for about an hour in a warm, dry place.  The key to making pretzel rolls is to boil the rolls (2-3 at a time) in 2 quarts of water plus 2 Tbs baking soda, flipping the roll and allowing to boil on both sides.   I removed the rolls to baking sheets, sprayed with cooking spray and dusted with cornmeal (I used grits, since I was out of cornmeal).  As the rolls came out of the water mixture, I  brushed them with an egg wash and sprinkled them with coarse salt.  Once all the rolls had been treated, I baked them in a preheated 400 degree oven for 10-13 minutes.  Note:  If you want to make this recipe into large soft pretzels instead of rolls, you can adjust the directions by making the pretzels thinner and then bake them just a little longer, until they’re even chewier.  

We did find that these rolls are a little chewy for sloppy joes… they’re more suited to burgers or grilled chicken… but they are just so darn delicious that I had to include this recipe for my readers.   I hope you try this recipe sometime… they are TOTALLY worth the effort!

Recipe: Roasted Mustard Pesto Potatoes

I was really lazy last week and wanted to make dinner without going through too many extra steps.  This recipe was born from my laziness (if you want to call it “laziness”, cuz I was *still* making dinner).  I started with the idea of roasting some Yukon Gold potatoes and this recipe emerged.  Please remember that you can always use whatever ingredients you like when making one of my recipes… I am only attempting to give you ideas from which you can branch out and create your own family favorites.

I started with four Yukon Gold potatoes and one onion.  I cut the potatoes into same-size chunks and cut the onion in half before slicing it into half-moon shapes.  I sprayed a baking sheet with cooking spray and then laid the potatoes and onions in a single layer on the sheet pan.   Being lazy, I simply plopped the ingredients on top of the potatoes, but next time I will probably mix them in a bowl and pour the sauce over top.  For the “sauce”, I used olive oil, dijon mustard, kale pesto, salt and pepper.  I tossed the potatoes and onions with these ingredients and then “thumbed” some James River Cellars’ Chardonnay over the whole mixture.  RoastedMustardPestoPotatoes

At this point, I realized that I had totally neglected to add any meat for our dinner… and that would never fly.  Since I didn’t want to roast a package of chicken tenders separately, I just added the individual tenders into the potato/onion mixture and turned them in the “sauce” to pick up some flavor.  This was my “easy out” way of making a two course dinner without any extra effort.

I roasted the entire baking sheet at 375 degrees for about an hour – this really was too long, but I had started making dinner so early that I was getting hungry before we were planning to eat.   Next time, I’ll adjust the oven temp and the cooking time so things don’t get quite so crispy but even so, dinner turned out really well.

BONUS RECIPE:  I found out that my husband isn’t as big a fan of roasted onions as my son, so I had quite a few left over to go with my extra potatoes for the next day’s lunch.  Since I had leftovers, here’s a quick way to use them up in a simple lunch-for-one.  I cut the remaining potatoes into smaller pieces, added the roasted onions and cut up two of the leftover chicken tenders, tossing all in one of my favorite salad dressings.  This became a really easy and tasty lunch for me and I didn’t feel like I’d wasted food.  Always a plus in my book!

Have fun making this recipe your own.  Use a different mustard… leave out the pesto… use a salad dressing or add balsamic vinegar with the oil… this is when you can let your creative juices flow to make something entirely your own.  I wish you a delicious meal… as always!


Recipe: Teriyaki Shrimp Stir Fry

I have to give my husband credit for the inspiration for this recipe.  I asked what he wanted me to make (using a pound of shrimp) for dinner and he rattled off a list of options that included the name of this dish.  I wasn’t thinking “teriyaki” until he threw that idea out… but it sounded yummy to me, so I set about rifling through the fridge to come up with ingredients that might work as a teriyaki sauce.

What I found, already in my fridge, were the following items:  half a jar of orange marmalade, Bragg Liquid Aminos (something like soy sauce, that *isn’t* soy, that my niece mentioned once on her blog so I bought it), homemade BBQ sauce, and a bottle of James River Cellars Montpelier wine (this new vintage is 100% Cabernet Franc, made as a semi-sweet blanc/rose’ wine… soooo yummy).  Since I hadn’t cooked with Montpelier yet, I was eager to try and find a way to use this fun wine.  NOTE: If you don’t have access to this specific wine, you’re welcome to substitute your favorite semi-dry/semi-sweet white wine or a lightly dry rose of your choice.  You could also just substitute chicken stock, if you prefer, but I really like the back note of wine in this dish.

TeriyakiShrimpStirFry

I defrosted a pound of frozen shrimp (I always like to have this on hand for quick and easy dinners that I know my husband will love) and sliced them in half, length-wise.  I love doing this with shrimp because they end up looking like little cork-screws of shrimp and they cook so quickly.  Feel free to cut them up or leave them whole… it’s entirely up to you!

I sauteed the shrimp in good olive oil until they were slightly toasty and browned.  Again, cook your shrimp according to your family’s preference… this is simply the way we like to have shrimp.  I wanted to add some sort of vegetable into dinner, so I used about a cup of broccoli slaw and tossed that with the cooked shrimp until it started to look a little glossy from the olive oil.  NOTE: If you’ve never used broccoli slaw before, you can find it in most grocery stores in the bagged vegetable area.  I love this stuff and try to keep it on hand to add to dinners whenever possible.  It cooks amazingly fast and is a nice addition to stir fry dinners.  I also like to use it in egg rolls, but that’s for another post on another day…

Once the veggies were well incorporated, I added the sauce that I’d made, using the ingredients i found in my fridge.  To be more specific, I used the half jar of orange marmalade, a few tablespoons of liquid aminos (this stuff is really salty, so go slow when adding and taste as you go), 2-3 Tablespoons of BBQ sauce, and 1/4-1/3 cup of Montpelier wine.  I tasted the sauce to make sure all the flavors combined well and adjusted as needed.  I let the sauce simmer with the shrimp/veggies until it had reduced a bit and didn’t look quite so wet in the pan.

Once the stir fry was done, I plated dinner in two different ways.  My husband really likes rice, so I like to keep microwaveable brown rice in the cupboard for meals.  I heated his rice and chose to put my dinner over a bag of Shiritake (tofu) noodles.  Let me say that I really like substituting regular pasta with these spaghetti-shaped noodles.  They’re low cal, low carb, gluten-free, vegan, and only about 30 calories for the entire bag (which is the amount I always eat).  They need to be rinsed REALLY well, as they are kept in a brine of some sort, but I find them to be a fun substitute that works well for me and how I want to eat.  I’m very visual, so I want to see a big plate of food or I feel like I haven’t eaten enough (no matter what my stomach actually says) and will snack more later.  NOTE:  The link I’ve included is the the Google search page for Shiritaki noodles… I didn’t want to limit you by suggesting a specific brand, since I’ve tried a few and don’t really have a favorite.

This dinner was super-simple and used things that I already had in my fridge or pantry.  I love being able to create something for dinner that doesn’t need tons of unique/single-use ingredients.  Orange marmalade is a terrific example of something that I keep on hand for tons of different uses.  Find your favorites and you’ll be able to pull dinner together in a snap – this was even faster (and cheaper) than take-out!

Enjoy!

Recipe: Healthy Bread Pudding

Ok… I’m probably pushing it by saying this recipe is “healthy”, but it’s certainly got more healthy ingredients included than some of my recipes, so hopefully you’ll forgive this slight.  In any case, I think this bread pudding recipe is fabulous… I’ve made it twice now and it’s only tasted better each time.  If you’re not a huge fan of bread pudding, then feel free to skip this one.  If you like bread pudding at all, this is definitely one to try!

HealthyBreadPudding

This recipe makes a single serving, so if you’re planning to make this for more people, just increase the ingredients as needed.  I made my recipe with the following ingredients:  2 cups of cubed ciabatta bread,1 mini-box of raisins, 1 Tablespoon of chocolate chips (I chopped mine), 1/4 cup fat-free egg substitute, 1/3 cup unsweetened vanilla almond milk, 1/4 cup white wine, 2 teaspoons Chia Seeds, 2 packets of Equal (feel free to use your sweetener of choice), and some cinnamon to taste.  I also sprinkled the pudding with regular sugar just before popping it into the oven.

I started by assembling all my ingredients, pre-heating my oven to 350 degrees, and spraying my baking dish with Pam cooking spray.  Note:  I neglected to spray my baking dish the first time I made this recipe and it took ages (and some serious elbow grease) to get the dish clean.  I put the bread cubes into the baking dish and then mixed the remaining ingredients in a measuring cup.  I then poured the liquid (and the raisins/chips) over the bread and, using my hands, mixed and mashed the liquid into the bread cubes until they were sufficiently soggy (see the lower right photo).

Once the bread was heavy with the egg/milk mixture, I sprinkled a bit of sugar on top and popped the baking dish into the oven for 30-40 minutes or until a knife inserted into the center came out relatively clean.  I let the pudding rest for 10 minutes, til the dish was cool enough to hold, and dug in with a spoon.  It was heavenly, in my opinion, with tiny bits of chocolate and plump raisins found throughout the dish, with a very faint back note from the wine.

This recipe was wonderful and a great example of comfort food to me.   The reason I called it “healthy” was the use of Fat-free Egg Substitute (in place of eggs), Almond Milk (in place of cow’s milk of any sort), along with the use of Chia Seeds (rich in Omega-3 fatty acids) and raisins with a small amount of chocolate.  Even with the wine, this recipe came in under 275 calories, which was a definite plus in my book.  Another plus?  This is a dish that you could serve to company as a dessert, simply by adding a hard sauce or ice cream to top each serving.

I hope you’ll try this recipe out sometime.  Call it whatever you like, it’s simply delicious to me!

Recipe: Kale’d Squash with Chardonnay

Just wanted to add a follow up recipe to the Kale Pesto recipe that I posted yesterday.  I shared lots of ways to use kale pesto, but here’s a recipe that I used for breakfast this morning.  This recipe would make a great side dish and can certainly be altered as needed if you are following a diet plan that doesn’t allow for wine or other ingredients.

Kale'd Squash

I had already roasted and cooled some spaghetti squash, so I started with this ingredient as my focus.  In a saute pan, I heated a small amount of olive oil, some crushed garlic, and a large spoonful of Kale Pesto.  Once this was sizzling, I added  2 cups of spaghetti squash, along with a nice amount of James River Cellars Chardonnay, and tossed all the ingredients together, cooking them until everything was toasty and fragrant.  

As I completed this recipe, I added some salt and pepper to taste and topped with a small amount of grated asiago cheese.  Since the alcohol in the wine had cooked out and I still had the back-taste of chardonnay in my food, this was a really tasty breakfast, but would have made an equally yummy lunch or even a full meal (if I added some protein).

 Isn’t that a great way to kick off a new day?  Enjoy!

Recipe: Chardonnay Broccoli Buds

Hey, James River Cellars’ Wine Club Members!  Are you looking for an interesting recipe that uses the Stainless-Steel Chardonnay that you got at tonight’s release party?  You’re in luck… I’ve got just the thing… Chardonnay Broccoli Buds.  It’s a recipe that can be either an appetizer or side dish (cold OR roasted).  YUM!

ChardonnayBroccoliBuds

I first had this recipe as a child, during Sunday picnics at summer camp with relatives and friends.  I had never had broccoli as a cold appetizer before and it was delicious… crisp, tangy, and flavorful.  I have made this recipe many times throughout my adulthood but it always seemed a bit too oily, so I decided to remake it.

Since I used an actual recipe to start, it’s only fair that I give you the new recipe as one with specific ingredients (but please realize that I’ll always alter things slightly when I remake a recipe, so even these are guidelines).

Start by mixing 1/2 cup cider vinegar, 1/2 cup oil (I used canola oil), 1/2 cup James River Cellars’ Chardonnay, 1/2 Tablespoon sugar, 1/2 Tablespoon dried dill, 1/3 Tablespoon accent, 3/4 teaspoon salt, 1/2 teaspoon fresh ground pepper, and 1/2 teaspoon garlic salt together in a large resealable bowl or resealable plastic bag.  Add 1 1/2 to 2 bags fresh broccoli florets and toss well.  Allow broccoli to marinate for 24-48 hours, re-tossing in the dressing occasionally.  Once the vinaigrette has thoroughly flavored the broccoli, they can be served cold (drained of any access vinaigrette) as seen in the left photo OR drained and roasted in a 350 degree oven for 12-15 minutes as seen in the right photo.

I hope you and your family enjoy this side dish/appetizer as much as I always do… it reminds me of the magical summers I spent in PA as a child and it makes me happy.  I hope it becomes a recipe that makes you happy as well!

Enjoy… from my childhood and family to yours!

Recipe: Wine’d Up Kale Pesto

I have a college friend who has a Paleo-focused blog that I just love.  If this sounds like something interesting to you, I would encourage you to check out her blog (MomUncorked) as she has lots of recipes, helpful hints, and thoughts on how and why to follow this lifestyle.  While this plan is not for me, I really enjoy looking through her recipes and playing with them until they become something that would better fit my family’s eating habits.

Kale Pesto

This recipe is a mash-up of a pesto recipe that my niece posted on her blog (Peanut Butter Fingers) and one that my Paleo-friend has created on her blog.  It’s a Kale Pesto that incorporates wine… James River Cellars’ Hanover White Wine to be exact.  If you don’t have access to this lovely sweet white wine, I would suggest trying a Vidal Blanc or even a Sauvignon Blanc that has a bit of residual sugar.  You don’t want to use something as sweet or bubbly as a Moscato, but a little sugar isn’t a bad thing against the bitter taste of the raw kale in this recipe.

Enough of the lead in…. let me tell you how I made this fun recipe, using actual measurements, no less!.  Using my small food processor, I popped a large handful of chopped kale into the bowl, along with a few crushed garlic cloves1/4 cup sunflower seeds, 1/4 cup walnuts, and 1/8 cup pine nuts and began processing everything to a fine crush.  When it began whirling around, there didn’t look to be enough kale, so I added another small handful and continued to process the pesto.   I alternated between using the pulse setting and the continual setting until all the kale and the nuts seemed uniformly crushed.

Once the pesto started looking like… well… pesto, I turned the machine to the “on” position and slowly drizzled equal amounts of olive oil and Hanover White wine until the pesto was smooth and sauce-like.  I started with the olive oil, added wine, then went back to olive oil and finished with some wine.  It was definitely a “Using the Force” sort of situation and I stopped to taste-test before deciding it was finished.  I also added some freshly ground salt and pepper, seasoning the pesto to my preferred taste.

This recipe is definitely one that I will continue to keep in my fridge. It’s just sooo versatile!  I’ve used it as a sandwich condiment (fabulous on a BLT or even a simple tomato sandwich), I’ve added it to pasta (with a little warm cooking liquid, it softens and adds so much to a side dish), and even added some cream instead of cooking liquid for a creamier pesto dish with chicken or shrimp that is really yummy.   While kale is not my first choice for a green vegetable, it has some amazingly great dietary stats that make it something worth adding to your diet if you are willing.

Want an added bit of knowledge?  If you massage your kale leaves before using them, you can remove some of the bitterness of this hearty green.  Don’t believe me?  Read this great article from the Huffington Post that explains the why, what, how, and “really??” of this cool trick.

I hope you’ll consider trying this pesto recipe… with all the benefits out there about kale, it’s worth a whirl!

“Whirl”… get it?

Have a great and healthy day!