Recipe: White Wine Seafood Stew

Sometimes, you have to alter what you’re going to make for dinner when you find a good deal at the local grocery store.  This is what happened to me yesterday… the store had some beautiful scallops and shrimp on a 50% off sale, so my recipe plan took on a life of its own.SeafoodStew

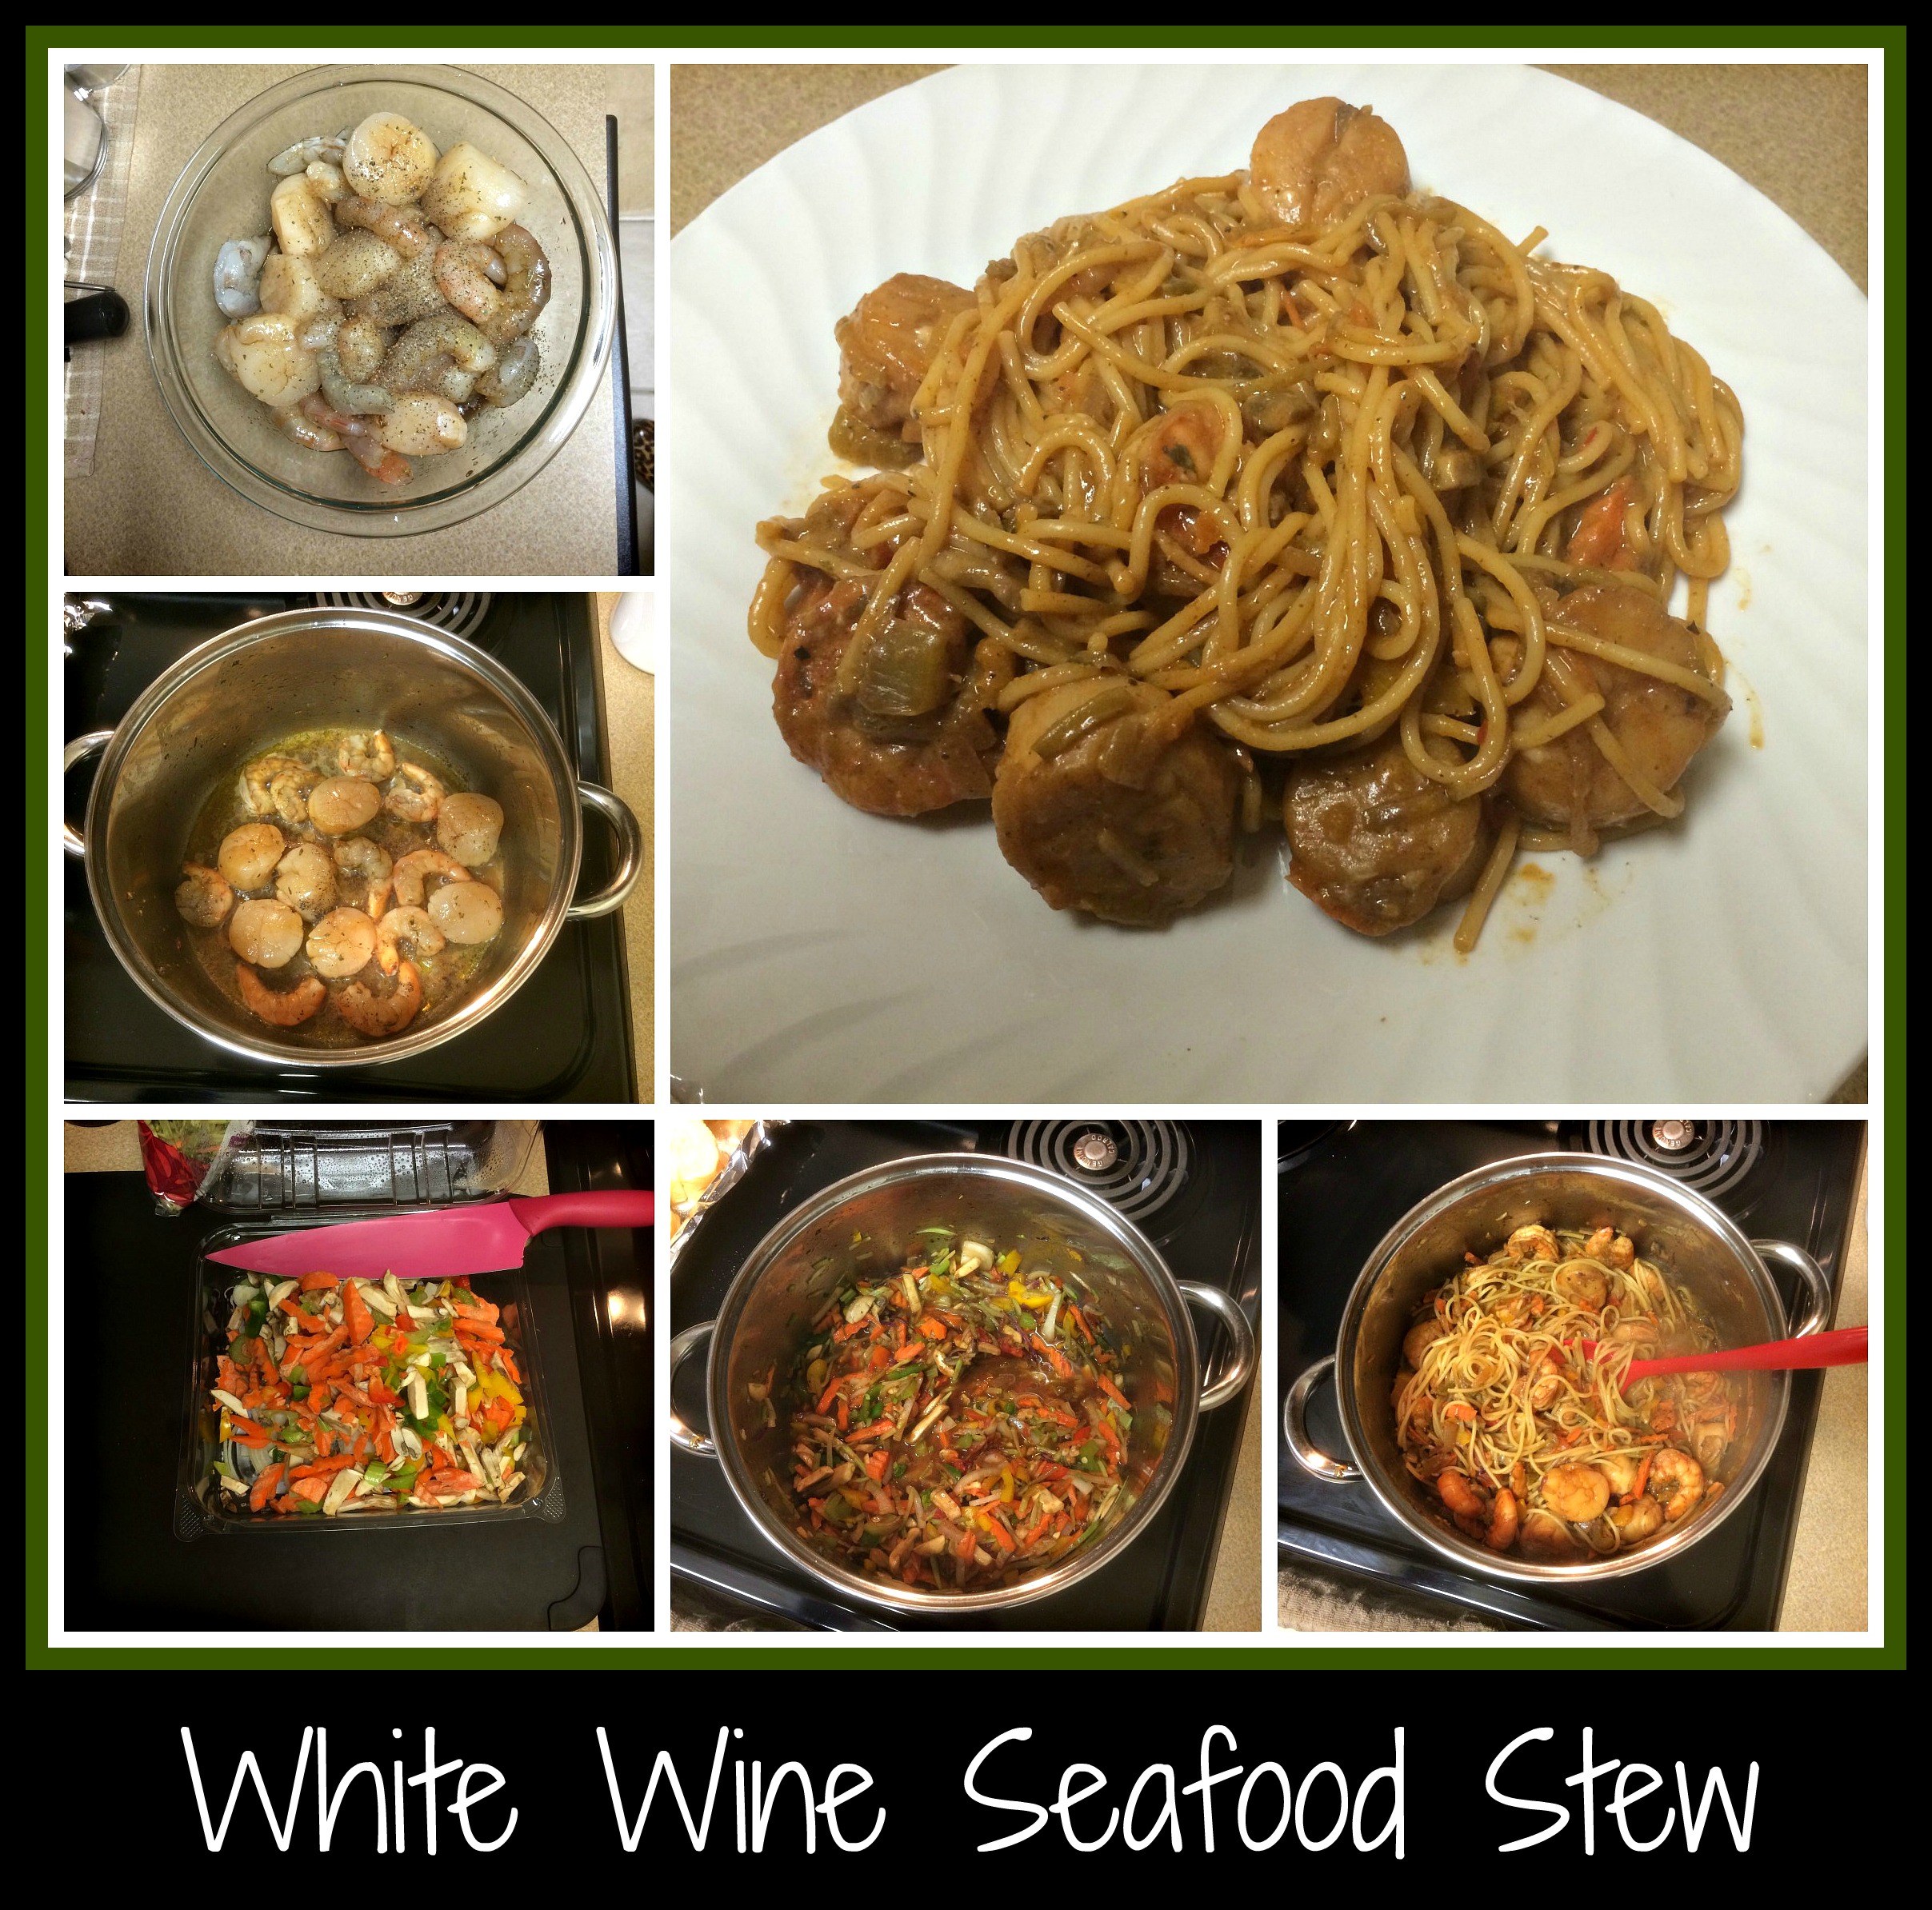
I started with two small packages (each) of scallops and shrimp.  I shelled the shrimp, washed the seafood, and then seasoned everything with a dash of soy sauce, herbs de provence, salt, and freshly ground pepper, before letting it sit in the fridge for an hour or so.  NOTE: This step isn’t necessarily important… I was bored and wanted to get dinner prep started early.

Once I started cooking, I began by sauteing the seafood in some olive oil.   Since I had so much seafood, I did this in two batches to keep the heat up.  Once the seafood was cooked through, I removed it all and added a few cups of diced vegetables.  I also added a healthy amount of Viognier white wine for flavor.  NOTE: If I’d had it around, I would have used either James River Cellars Gewurztraminer or Vidal Blanc… either would be a great background taste for this stew.  The vegetables were ones that I had picked up at the salad bar of the grocery store recently, so it was a great way to use up leftovers that needed to be eaten or tossed.  While the vegetables were cooking, I decided to cook some pasta to throw into the stew, so I boiled some spaghetti noodles that I broke in half.  I added the cooked spaghetti to the vegetables and then also added the seafood back into the stew.

Once the components of the stew were together, I decided to play with the seasonings a bit.  I used varying amounts of parmesan cheese, Viognier white wine, a little mozzarella cheese, and bumped up the tastes of the original spices.  It was a fun dinner to create and delicious to eat… I added some garlic toasts and called it a night!

Enjoy playing with your spices… they can make a huge difference in the flavor of your final product.  Try one new spice at a time and see how it works with your meals and recipes.  Have fun with your cooking… after all… it’s just food!

Recipe: Wine’d Up Meatloaf

Since I’m trying to make healthy recipes that also count as comfort foods and tasty dinners, this recipe ended up as a triple winner.  My husband actually went back for seconds and I had another serving for breakfast… that, for me, makes this dinner even better.  Aren’t we always looking for a new and unique meatloaf recipe?  This one definitely earned a gold star in my book.WinedUpMeatloaf

I started with a package of ground turkey.  NOTE: I like using ground turkey instead of ground beef in most of my recipes because I think it takes flavors better and more thoroughly than beef… but you should feel free to use whatever sort of ground meat you like best.  I placed the thawed meat in a bowl and added a palmful of parmesan cheese, a half an onion (diced), 1/3 an apple (diced), two cloves of garlic (diced fine), a big squirt of horseradish mustard, some red wine (I love using James River Cellars’ Rad Red or Boordy’s Petite Cabernet for this sort of dish), and seasonings (I used herbs de provence and salt/pepper).  I also needed some breadcrumbs, and I didn’t have any on hand, so I diced four pieces of toast and added that to the mixture as well.  Once everything was in my bowl, I gently blended it all together with my hands… best tools ever!

I like to change up how I form meatloaf patties from time to time, but I decided that I’d go “old school” and just bake this recipe in a traditional loaf pan.  Since I didn’t have ketchup in the fridge (I’m going to have to get some at the store the next time I go), I spooned a bit of spaghetti sauce over the top of my meatloaf and then sprinkled it with a bit of sugar to replicate the taste of ketchup.  Once baked (in a 375 degree oven for an hour), I found this dish to be thoroughly cooked, yet still moist enough to be flavorful.  I loved it.

Meatloaf is a fun recipe to use when you’re feeling creative.  I don’t always use horseradish mustard… I rarely use apple… it’s just a great way to play with different ingredients to make a delicious meal.  Try it sometime and let me know what you think… It’s fun!

Easy Beef Bourguignon

Note: This recipe is an homage to “Bob’s Short Ribs Bourguignon”, by one of my favorite chefs from the Outer Banks.

A few years ago, I was privileged to spend some time with a chef during a group cooking class.  He cooked in a way that was very similar to my own, using his hands/eyes as a way of measuring ingredients and his intuition as a way of creating a dish that was both delicious and flavorful.  Having a trained chef share his take on a traditional, classic recipe was a gift beyond compare and I’ll always be grateful to him for opening my own eyes to cooking this way.  This recipe used some basics from Bob’s recipe and added my own twist, allowing me to use my own intuition (The Force) to create a new dish.

I was at a wine/food festival recently and was asked if I had a Beef Bourguignon recipe on my blog.  Since I hadn’t “formally” cooked and blogged about this recipe, I decided to remedy that problem as quickly as possible.  EasyBeefBourguignon

I started with a package of beef that I found on sale at my local grocery store. NOTE: I try and pick up packages of meat anytime they go on sale, that I can use in various recipes, and keep them in my freezer until needed.  This helps keep my costs down and I can “shop” in my freezer for dinner inspirations most any day.  I sliced the beef into 1-2″ chunks and, using my favorite large stock pot, browned them in a bit of olive oil after dusting them with some flour, salt, and pepper.  Since I had so much beef, I did this step in two stages, removing the first half of the beef once it was browned and repeating the process.  

Once all the beef was crispy, I placed it all back into the pot and added the following ingredients:  1 sliced onion, 4 diced bacon slices, 4 cloves of garlic, 2 bay leaves, 1 beef bouillon packet (I like G. Washington Brown), a few globs of ketchup, and covered everything with a lovely red wine (think James River Cellars Monitor).  I stirred everything to combine it nicely, popped the lid on the pot, and put the entire dish into a 300 degree oven to cook for awhile.  I think it cooked for about 2 hours, but I was really waiting for the entire recipe to reduce and mesh together well.  You could easily reduce the heat on the stove top, pop the lid on, and cook it for the two hours, but I prefer to use the oven when I can for this sort of meal.

Once the wine had reduced and the sauce was thick and rich, I added half a bag of frozen peas to bump up the color factor on the meal.  The final touches involved adding a few dashes of worchestershire sauce and a small bit of butter to gloss the sauce.  It looked delicious!

As we got closer to dinner time, I cooked some egg noodles and sliced some crusty bread to complete the meal.  The final product was deep, dark, and rich… a perfect meal for a cold, snowy evening, even if it *was* March.

I hope you’ll try making your own version of this wonderful recipe.  Using short ribs (when on sale) is a great alternative to a piece of pot roast, but you can use most any meat that will handle this sort of long, slow cooking process.  Changing up the vegetables by using carrots, pearl onions, or any other favorite vegetable is a great way to add nutrition and tailor the recipe to your family’s preferences.

Remember, cooking is about sharing your love with the ones you love.  Enjoy!

Crock Pot Recipe: Tuscan Chicken and Sausage Stew

I love using my crock pot.  Having a slow cooker can help you make a lovely, healthy meal any night of the week.  All it takes is a little thought beforehand and a few minutes in the morning before you leave the house (or start working from home).  This was a recipe that I thought looked particularly yummy, but the ingredients needed to be changed out before I could make it for my family.  I know that they balk at large pieces of mushroom or the texture of artichoke hearts, so I did some substituting and came up with a version that worked well for me.

Since I started with an actual recipe (thanks to Weight Watchers for the inspiration) so the ingredients are much more accurate that I typically offer on my blog.  I used “The Force” for this recipe, but vaulted from the actual recipe, so I’ll be kind today and share it with you that way.

Ingredients:TuscanChickenSausageStewMB

  • 8 small chicken thighs, skinless and boneless, cut into 2″ cubes
  • 1 package Turkey Polska Kielbasa, cut into 2″ chunks
  • 1 cup, chopped Onions, raw
  • 1/2 cup Chicken broth, canned, low sodium
  • 1/2 cup James River Cellars Montpelier Wine – you could use a nice Chardonnay, if you prefer
  • 1 cup, cubes, all varieties Squash, winter type, baked, no fat or sugar added in cooking, butternut
  • 1 cup, sliced Pepper, raw
  • 4 cloves Garlic, raw
  • 3 tsp, leaves Spices, oregano, dried
  • 1 tbsp Spices, rosemary, dried
  • 2T cornstarch, if needed for thickening

In true “not originally mine” style, here are the steps to follow when you make this recipe, using the ingredients I’ve used in my own swap.

Instructions

  1. Chop onion and butternut squash into chunks – place on the bottom of a crock pot.
  2. Collect the thighs and sausage that you’ve already cut into 2″ chunks and layer them on top of the onions/squash
  3. Layer peppers (in a variety of colors) on top of meats, then top with spices.
  4. Add broth and wine.
  5. Cover and cook until chicken is tender and vegetables are cooked through, 4-5 hours on high or 8-10 hours on low.
  6. If you want to thicken the broth at the end, whisk 2T of cornstarch with some of the cooking liquid (in a separate cup) until there are no lumps, then return it to the pot and allow the broth to thicken.
  7. Serve over polenta (which my family doesn’t like) or mashed potatoes (which my family *does* like).

I’ve been trying to be better about using a “recipe builder” application (for my iPad) so that I know the actual nutrition analysis of my recipes.  I got a FitBit Flex from my husband for Christmas this year, so I’m coupling that with the (free) MyFitnessPal app to get a better handle on my own health.  To that end, I’m working to make better choices with regards to the foods that I make.  This stew actually makes six servings, with the following nutritional information:  Calories 302, Total Fat 14g, Saturated 3.9g, Polyunsat.  2.9g, Monounsat. 5.4g, Cholesterol 80mg, Sodium 903mg, Total Carbs 16g, Dietary Fiber 2.5g, Sugar 2.8g, Protein 25g, Vitamin A 129mcg, Vitamin C 20mg, Calcium 51mg, and Iron 3.3mg.

I hope you’ll consider playing around with this recipe.  I really loved it, and had it for the next few meals before it was gone.  At only 302 calories, it seemed reasonable and tasty at the same time.  Enjoy!

Recipe: Petit Venison Chili

I confess…. I was a slacker over Christmas break and didn’t post any new recipes.  I made a few fun things that I’ll post ASAP, but spending time with my kids ended up taking precedence.   Since the winery has a Chili Cook-off coming up this weekend, I had chili on my mind when it was so rainy yesterday, so this recipe just came together for me.  As with all my recipes, I used “The Force” with regards to the amounts of spices and such, but this is a fairly standard way for me to make chili.  I do alter the meats, types of beans, and amounts of spices at times, but this is a workable recipe to use as a jumping off point if you have never made chili before.

PetitVenisonChili

I start with 2 onions, 2 spoons of garlic, and 1 large green pepper, diced well.  I saute them in a little bit of olive oil until they got slightly toasty and then added one pound of ground venison.  (Note:  I got the venison from a friend… I would have used a package of ground turkey if I hadn’t had the venison to use.)  Once the venison is thoroughly cooked, I add 1/2 cup of James River Cellars’ Petit Verdot red wine.  This wine is smoky and deep… a great pairing with the lean game meat in this dish.  Take your time here…. you want to allow time for the wine to be totally absorbed by the meat and vegetables before moving forward in the recipe.

Once the wine is totally incorporated, you can add the tomato/bean side of the chili.  I use one 28-oz can crushed tomatoes and four 15-oz cans of beans, undrained. For this recipe, I used one can each of pinto, light kidney, dark kidney, and white cannellini beans. I also like to add one 6-oz can tomato paste to thicken the chili.

Once your beans and tomato products are incorporated into your chili, it’s time to think about spices and seasonings.  I like to add a variation of spices… typically a blending of salt, garlic salt, pepper, cumin, chili powder, paprika, cinnamon, parsley, and a touch of honey or a little sugar.  I used varying amounts of these spices, tasting the chili after incorporating each flavor until it all meshed well and tasted the way my family likes.

I know many people who like to add chipotle seasonings, hot sauce, or spicy peppers, but since my family isn’t fond of too much heat, this is the way we like our chili to taste.  There are a multitude of “official” recipes for chili – some have specific ingredients while others simply give you generic ideas of what “should” be used.  Lots of people also have accompaniments that they like to have with their chili… corn muffins, cornbread, saltines, spaghetti noodles, cheese, onions… the list can be endless.    No matter what you use, or how you make it, enjoy the process of making chili for your own family.  What you choose to use in your chili is completely appropriate – as long as it’s what you and your family enjoy, that’s all that matters, right?

Happy Cooking!


Crock Pot Recipe: Red Wine Pulled Pork

I have been asked about crock pot recipes and thought I’d post my version of this recipe from the blog, “100 days of Real Food”, that states that it’s The Best Pulled Pork Recipe In A Crockpot.  I started with the author’s recipe but ended up tweaking it so much that it became a version of my own.  Don’t get me wrong… this recipe that I’ve linked is stellar.  If it looks like one you’d prefer to use, go for it.  That’s the beauty of cooking and creating recipes – if you find you’re missing an ingredient, or your family has particular tastes, then by all means alter the recipe to suit those you’re feeding.  Remember, there are NO food police… NO wine police… just enjoy the process and have fun creating something tasty!

Here are the Red Wine Pulled Pork ingredients I used yesterday:RedWinePulledPork

  • 1 1/2 tablespoons paprika
  • 1 tablespoon salt
  • 1 teaspoon black pepper
  • 1/4 teaspoon cayenne pepper
  • 1 square garlic powder
  • 1 tablespoon dried lemon thyme
  • ½ cup honey
  • ¼ cup red wine (I used a Malbec, but James River Cellars Rad Red would be great here) 
  • 1/2 cup Chambourcin Wine Jelly (made by a former employee at James River Cellars – any of her red wine jellies would work well in this recipe)
  • 1 onion, peeled and cut in chunks
  • 3 to 3 ½ pounds pork (I used a Boston Butt), cut in half, excess fat removed

Directions:

  1. Mix all spices together in a small bowl and then add the honey and wine.  Mix to make a paste and set aside.
  2. Put onion in the bottom of your crock pot and place the pork on top.
  3. Pour spice paste over the pork and allow pork to cook for 6-7 hours, stirring occasionally, until cooked thoroughly and shreds easily.
  4. Add wine jelly to the shredded meat and allow it to cook for 10-15 minutes to incorporate the flavors.  We found the cayenne pepper to be a bit too spicy in this recipe, so the jelly added a bit of sweetness that really made the flavors pop.
  5. Serve warm on rolls with coleslaw, if desired.  Also tasty on a salad with some “southwest” flavors added (corn, black beans, cheese, etc).

This was an incredibly easy recipe and one that really didn’t need any BBQ sauce or ketchup for flavor.  The meat was tender, the onion thoroughly incorporated into the meat, and it got rave reviews in my house.  Definitely a KEEPER recipe for me!  Hope you’ll consider trying it the next time you want to make a simple, easy dinner.

Recipe: Chicken Chardonel Cassoulet

I truly love having an afternoon when I have time to make a hearty, warming, delicious dinner.  I love to start with a few ingredients and turn them into something that just screams “Fall” to me and my family.  This was just such a meal. I make a lot of cassoulets, but this one turned out really well… so well that I wish I had doubled the recipe so I could have it for another few meals.

Tradition dictates that a “Cassoulet” is a French dish made with meat and beans.  It’s actually named after the slanted-side earthenware bowl (called a Cassolein which it is to be cooked.  I don’t own such a cooking vessel, so I use a large heavy stockpot that will stand up to some good old-fashioned cooking.  I don’t subscribe to the notion that you have to purchase a ton of different individual utensils to make a good meal.  It’s not necessarily about the final presentation… it’s about the care and love that goes into anything you make.  I realize that this can sound pretty hokey, but it’s honestly how I approach cooking in general.

This recipe was fairly simple and came together extremely well.  I used the following ingredients:  olive oil, one package of boneless, skinless chicken thighs, one thin slice of ham steak (thinly diced),  2 cans of cannellini beans (I used one can of pinto beans and one can of cannellini beans, because that’s what I had on hand), well-chopped Mirepoix (a mixture of carrots, celery, and onion…. don’t let the “big word” bother you), 2 bay leaves, salt/pepper, a can of chicken broth, a can of James River Cellars’ Chardonel, 2 Tablespoons of pumpkin puree, and 1/4 cup of non-fat plain Greek yogurt.

NOTE:  As you may know (if you read this blog at all), I cook using “The Force”.  I look at my fridge and pantry when cooking and adjust my ingredients based on what I have available or what might look good to me at any given moment.  This was one of those recipes.  If you’re starting with a recipe (especially one of *my* recipes), feel free to add or subtract ingredients to tailor the meal to your family’s taste preference or pantry contents.ChickenChardonelCassoulet

I started with a heavy, rounded stockpot.  I added some olive oil and sauteed the diced ham until it was fairly crispy and the fat had rendered out of the ham.  Using a slotted spoon, I removed the ham and added the mirepoix to saute and soften for a few minutes before popping in the chicken thighs and allowing them to brown a bit.  The meat is going to cook for an hour or two, so don’t worry about whether it’s browned long enough… you simply want the color on the meat before adding in the rest of the ingredients.  Once the chicken and veggies were sauteed (see top left hand photo), I replaced the ham into this mixture and started layering everything into the pot.

The middle photo on the left shows the cassoulet after I added the can of pinto beans (WITH liquid), can of cannellini beans (WITH liquid), can of white wine (James River Cellars’ Chardonel), can of broth, and seasonings.  I put the lid on the pot and allowed everything to cook together for an hour before starting to adjust seasonings.

The bottom photos show the cassoulet after I added a bit of pumpkin puree.  I realize that this is a strange ingredient to add to a cassoulet, but (as I keep saying) it was in my fridge and I knew that this small amount would thicken the sauce a bit without changing the flavor significantly.  I could have made a roux (butter and flour) and slowly added it to thicken the sauce, but I really felt that would have thickened the cassoulet too much.  It’s really up to you as to how you thicken (or not thicken) your meal… that’s the glory that *is* cooking… make it your own!  My final addition was a huge spoonful (about 1/4 cup) of non-fat plain Greek yogurt.  I could easily have used sour cream, but I try to always have Greek yogurt on hand for just such an occasion.   I absolutely could have left the yogurt out at this point, but adding that light touch really finished the cassoulet and made it special.

That’s a cassoulet, in a nutshell.  Not too hard, right?  This recipe is something that can provide you and your family with a filling, one-pot meal that only needs some crusty bread on the side to complete your dinner.  I hope you’ll try your hand at making this recipe… and making it your own… you may even find a new family favorite!


Recipe: Chardonnay Pesto Shrimp & Pasta

I started planning dinner before I left for work this morning.  I didn’t do anything as adventurous as get out the crock pot and start dinner… nope….  I just started thinking about what I wanted to make that evening.  Such is my life when I get to talk about wine all day.  Mind you, I’m definitely not complaining… just making an observation.  When I lead guests through a wine tasting at James River Cellars Winery, I gloss over recipe ideas and offer up ways to use the various wines we have to offer.  It’s the way I’ve always done wine tastings, but apparently it’s unique enough that people are stunned when I toss out recipe after recipe for our wines.  Thankfully, the winery owners have allowed my blog to be linked to the winery’s website, Facebook page, and Twitter account – guess I’m doing something right, huh?

I stopped off at the local grocery store to pick up a bag of shrimp on my wayChardonnayPestoShrimp&Pasta home and grabbed a tube of Pesto paste to use, along with some bow tie pasta.  I thawed, peeled, and sliced  the shrimp in half when I got home so that dinner prep would be as simple as possible.  Then I got out the rest of my ingredients:  a lemon, a pat of butter, olive oil, James River Cellars Winery Chardonnay, and a touch of half & half left over from another meal this week.  Once my husband got home, I was ready to start cooking.

I put some of the bow tie pasta into a pot with some salted water and got that started while I melted butter and olive oil in a large saute pan.  As soon as the butter/oil mixture was hot, I added the shrimp and allowed it to cook thoroughly – I had sliced the shrimp length-wise so the thin shrimp pieces curled up into little corkscrews.  Once the shrimp was cooked, it was time to start creating a sauce.

I made the sauce with the shrimp in the pan.  Sometimes I’ll remove the shrimp, but I was feeling a little lazy tonight and didn’t do this extra step.  I added some wine to the shrimp and let it sizzle for a bit until the chardonnay had almost been absorbed by the shrimp.  I then added the juice of the lemon, some pesto paste, a little more wine, a splash of half & half, and some of the pasta cooking liquid.  I allowed this to simmer until the sauce looked thick enough before I tossed everything with the cooked pasta.  It was quick and delicious!

The entire meal, cooking from start to finish, really only took about 15 minutes.  I even had enough time to defrost and toast a ciabatta roll so we could each have half to soak up the sauce.   While there are tons of different things I could have added or changed about this recipe, the clean taste of the wine, lemon, and shrimp paired with the pasta was just what I was looking for tonight.

I hope you’ll experiment with this recipe and come up with your own favorite version… it’s one of my favorite things to do.  Enjoy!

Recipe: Summer Crock Pot Roast

I’ve been rattling off the basics of this crock pot dinner to people for about two years now, but always forgot to take photos along the way and didn’t want to post this meal without proof of how yummy it looks.  Forget the taste… this dinner just looks tasty.  Add some crusty bread, a fluffy snowstorm, a warm fire, and this meal becomes the start of…. oh, wait… it’s JUNE!   I’ve been using this recipe as my favorite winter pot roast dinner for my crock pot, so I thought I would see how it would work if I “summer-ized” it by switching out the deep red wine I usually use and replacing it with white wine…

Summer Pot Roast

As it would happen, this dinner was really good with white wine!  Nothing like having an experiment go well, eh?

Ok… let me tell you about this simple dinner.  I started with a large bulk roast that I picked up on a huge sale at my local grocery store.  I honestly don’t remember what cut it was or just how much I had… I just remember that it was almost half of the original cost and “looked like a pot roast” to me.

I pulled out my crock pot and started the assembly of dinner before I left for work one morning.  I sliced up four golden potatoes into quarters, length-wise, and then added one thick sliced vidalia onion.  I separated the onion pieces and placed the veggies into the bottom of my crock pot before placing the frozen roast on top.  I had a quarter bottle of James River Cellars Chardonel and a quarter bottle of James River Cellars Gewurztraminer white wines in my fridge, so I poured the  ends of both bottles over the meat and potato/onion mixture.  I doused the meat liberally with garlic salt and some freshly ground pepper before I turned the crock pot on for 8-hours and left for work.

When I came home that evening, the house smelled wonderful.  I’d forgotten to add garlic to the roast, but it still smelled really tasty.   Now was my chance to finish the meal and pull everything together. I ladled out two cups of liquid from the pot and, using a whisk, blended in 3 Tablespoons of flour.  I poured this back into the crock pot and stirred in about a half bag of frozen peas.  After letting this cook for a few minutes, I realized that I needed something bright to make this dish really shine, so I quickly cooked some baby carrots in the microwave before stirring them into the thickening stew as well.  A quick taste of the broth gave me the chance to adjust the seasonings before dinner, then I let the crock pot work it’s magic for another 10-15 minutes.

To plate this meal, I carefully removed the roast from the stew and gently shredded the beef.  I ladled stew into a shallow bowl for each of us and added a portion of meat to top off our summer dinner.  If I’d had some crusty bread (or had taken the time to pick up bread sticks or make crescent rolls) this meal would have been over-the-top good… I wouldn’t have had to resort to using a spoon to sop up the ends of the stew!  This is another meal that will continue to taste wonderful as you warm up bowls over the next day or two, so feel free to make extra to share.  Your friends and co-workers will thank you!

Recipe: Chardonnay Cristo Benedict

When I was in college, I did an internship at a local “big name” hotel chain, spending a few days in each department and then writing up my findings, coming up with ideas to make things work better (reinventing the wheel, if you will), and generally being “free labor” for whichever manager needed some extra hands.  While I wasn’t wild about some of it when I was there, I realize now that I learned alot of great skills… like cooking!

I spent about a week in the kitchen, helping out with chopping, cooking, breaking eggs, and learning how the chef ran his kitchen.  After a particularly busy morning, he gave me the task of learning how to make his Monte Cristo sandwich, which is kinda like a marriage between french toast and ham & cheese sandwich.  We’re playing with a variation on a theme, after the Croque Monsieur posting yesterday,  but I suddenly had a craving for something like this for my morning meal today.  I didn’t really want to deal with the possible mess of dunking an entire sandwich into an egg batter (I really do not like “ick”), so I went with the alternative plating this sandwich as an open-faced one…  Easy, peasy, right?

Thankfully, it was!

I started by making an egg mixture for the “french toast” portion of this sandwich.  In a small mixing bowl, I put some fat free egg substitutea glug or two of James River Cellars Chardonnay, two thumbs-worth of fat free sour creamsalt, pepper, and paprika.  I added the sour cream because usually there’s an addition of cream to an egg mixture.  It wasn’t going to be the same (hell, I was using wine in something usually reserved for breakfast) but this was my way of coming up with a new and different spin on an old favorite sandwich, like this or this.  

Chardonnay Cristo Benedict

Once my egg mixture was done, I took a piece of sourdough bread (remember the bread I used the other day for the Croque Monsieur?  Same stuff… still chewy and yummy.), cut it in half, and soaked the bread before pan frying in on both sides.  I removed it to a baking sheet (covered in foil cuz I hate cleaning those things.. duh!) and popped the deli turkey slices in the pan to brown on each side.  While I was frying the bread, I shredded some sharp cheddar cheese (again, the same cheese from the other day) and doused it with a small amount of the Chardonnay.  When I finished browning the turkey, I laid the turkey on the bread and then thoroughly drained the cheese before topping the sandwich.

While I washed up the dishes, I popped the baking sheet into a 375 degree oven for a few minutes until the cheese melted.  Re-using the saute pan, I fried an egg in a small pat of butter and cooked it quickly, over easy.  I could have used one or two poached eggs instead, but I didn’t want to dirty another pan.  I put the fried egg on top of the cooked sandwich and broke the yolk to simulate the “benedict” taste of this sandwich.
IMHO, the best part of making dinner at home is being able to play with recipes to make them my own.  Have fun!If you’d rather not use the egg, that’s perfectly fine… that’s what so fun about cooking at home and making your own meals.  Add, subtract, play, and enjoy!  I toyed with adding some cooked spinach to this sandwich… I could have swapped out the deli turkey for some deli ham… I could have added some grilled onions or changed the type of cheese.