Chicken Divan Casserole

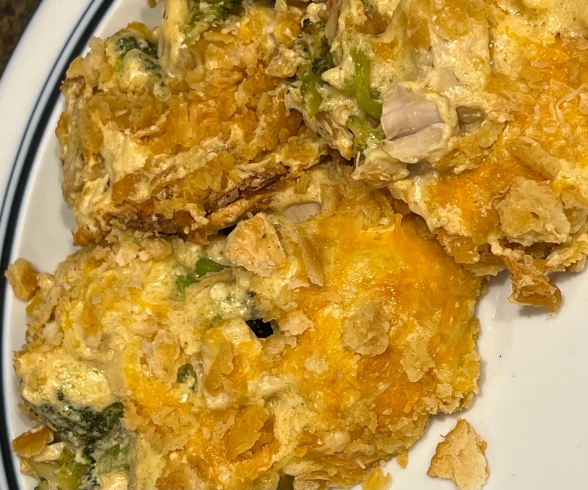
I have very fond memories of my mom making Chicken Divan casserole throughout my childhood. The recipe she used was based on one from Aunt Treva, my grandfather’s sister, and had lots of “cream of” soups included to make the sauce. It was always yummy, but I decided that I wanted to create a healthier version.

When searching for a similar recipe as the one from my childhood, I found a fabulous one created by Natasha Bull of http://www.saltandlavendar.com. Her original recipe can be found here: https://www.saltandlavender.com/chicken-divan/ but I needed to adjust the flavors to match what I was trying to recreate. If you’re looking for a cheesy, creamy chicken and broccoli casserole, look no further… this one is terrific.

For me, simply adding curry powder to the recipe above wasn’t quite what I wanted, so I played around with it until I created something that made sense for me. I also trimmed everything down to make an easy meal for two + 1 leftover serving. This recipe will make 3 servings in a 9×9 baking dish.

INGREDIENTS:

  • Broccoli florets – I used a small bag from the local store
  • Chicken Breast – I shredded two breasts from a rotisserie chicken but you can also use leftover chicken or even turkey
  • 2 T butter
  • 2 T flour
  • 3/4 c almond milk – you can use a mixture of almond milk and half & half if you prefer
  • 2 T whipped cream cheese
  • 1 tsp Dijon mustard
  • 1 tsp Worcestershire sauce
  • 1 tsp white wine – use what you have available/open but I also use this wine to thin the sauce before adding the cheese
  • 1 tsp curry powder
  • 1/4 tsp onion powder
  • 1/4 tsp garlic powder
  • 1 cup grated cheddar cheese – separate in half
  • 1/4 cup grated Parmesan
  • 10 Ritz crackers (approximate)

DIRECTIONS:

Preheat your oven to 375*F.

Prepare your broccoli for the casserole. After trimming down the broccoli into bite-size pieces, put all the florets in the bottom of the 9×9 baking dish. Lay a piece of paper towel over the broccoli and lightly dampen it with some white wine. Microwave the broccoli on HIGH for 2-3 minutes or until the broccoli is lightly cooked and still crisp. NOTE: if you’re using a metal dish, you can microwave the broccoli in the original bag and layer the cooked broccoli onto the bottom of the baking dish.

Layer your shredded chicken on top of the broccoli.

Make your sauce. Start by melting the butter in a sauce pan. Add the flour and whisk until combined and the mixture starts to bubble. Let the butter/flour mixture cook until it begins to get slightly toasty. Slowly add your milk and whisk to combine, then cook this mixture until it begins to thicken. Add the cream cheese (I like the whipped version b/c it’s light and combines fairly easily – if you use a block of cream cheese, I would decrease to 1T), whisking to combine. Add in your spices (mustard, Worcestershire, wine, curry powder, onion powder, garlic powder) and taste the sauce, adjusting as needed. Add salt and pepper if desired. NOTE: if sauce is too thick, add a splash of wine or almond milk. I have been known to add 1/4c-1/2 cup of wine to thin the sauce. Be aware that the sauce will thicken when you add the cheese. Remove the sauce from stove top and stir in 1/2 cup cheddar cheese.

Pour sauce over the chicken/broccoli mixture in your baking dish. Top with remaining cheddar cheese and Parmesan cheese then crush Ritz crackers over the entire casserole.

Bake casserole, uncovered, for 30-35 minutes. Cheese should be melted, crackers should be browned, and the sauce should be bubbling. Let casserole sit for 5 minutes before portioning out and serving.

Leftover Recipe: Holiday Turkey Casserole

I have to confess that I absolutely LOVE our Thanksgiving and Christmas dinners.  I love cooking them, I love serving them to my family, and I especially love the leftovers.

Creating a new meal from the leftovers is just so much fun!  Everything has already been cooked at some point, so all you’re really doing is re-assembling the foods in a new and different way… how hard can that be?  TurkeyCasserole

Last year, I used the stuffing to create “stuffing waffles”… if you haven’t tried this before, you HAVE to try it.  They were simply incredible!  You can check out my recipe here, which also talks about topping them with turkey gravy.  Serious “yum” factor here.  This year, I decided not to get the waffle iron down, so I came up with this new casserole.  Same sort of “yum” to the flavor… just a whole new twist.

I layered about 2 cups of our Mimi’s Peas Casserole (it’s the same “green bean casserole” that everyone else does… we just use frozen peas instead.  GENIUS!), sprinkled 1 cup of diced turkey on top, then spooned 3/4 cup of leftover gravy just to cover the turkey.  To finish this off, I took scoops of leftover stuffing and put stuffing balls over the entire casserole, then smooshed them down with my fingers to “connect” them as a topping.  Just for extra flavor, I crumbled about 3 slices of bacon over top, but these really weren’t necessary… this casserole was stellar all by itself.

NOTE:  Before you ask where the “wine” is in this recipe, remember that I used wine when I made the stuffing AND the gravy (and it’s in the peas as well), so I didn’t really feel the need to add more, but you’re welcome to add a little to the gravy if you think it’s too thick.  Just use your best judgement.  

Once everything was assembled, I baked the casserole for dinner at 375 degrees for 35-40 minutes or until the gravy was visibly bubbling.  This dish was honestly so good that we ate it for two nights in a row… all the flavors of a holiday dinner wrapped up in one meal.  YUM!

Leftover Recipe: Turkey Spring Rolls

I was searching for a new way to use up leftover turkey when I stumbled upon The Pioneer Woman, showing her spring roll recipe and I knew I had my inspiration.

I started by letting a small round of rice vermicelli sit in hot water until they were soft (this is, by far, the easiest thing to do!).  I then created a turkey mixture using thin sliced turkey, a spoon of apricot jam, some rose’ wine (white wine would be just as good, but I had leftover rose’ from Thanksgiving and I think it goes beautifully with turkey), a dash of sesame oil, a blob of ketchup, a little commercial orange sauce, salt & pepper, and a drizzle of balsamic glaze.  I set this aside and then sliced some cucumber into thin sticks for crunch and opened a bag of broccoli slaw.  I was now ready to assemble these delicious spring rolls.TurkeySpringRolls

First thing was to pull out a few rice spring roll wrappers.  These things are great…. just soak them in hot water until they are limp and you can wrap them around anything.  They are a little tricky when you first start playing with them, so be ready to have an extra or two on hand, just in case.

I laid out the soft wrapper and assembled each of the spring rolls by layering a little of the soft vermicelli, then the cucumber sticks, a bit of the turkey mixture, and topped it with the colorful broccoli slaw.  Once they were assembled, the creative part had to happen…. I had to roll these things into logs!  I started by pulling the bottom of the wrapper up and over the filling, then folded each side in, and rolled the whole thing into a log.  The first one was a bit funky-looking, but they got better as I went along.  NOTE: I had two spring rolls that each got holes poked in the sides from the broccoli slaw, so I just added a second wrapper around the original spring roll.  No biggie… 

Once all six rolls were done, I made a dipping sauce out of a mixture of apricot jam, balsamic vinegar, sesame oil, and a drizzle of honey.  Calling this a “dipping sauce” is sort of a mis-nomer… it was more like a “spooning sauce”, but you get the idea.  I could have made it runnier by warming the jam up a bit, but this was so yummy that I left it alone.  I liked the thick texture of the sauce when spooned onto (or into, after a bite) the spring roll, so it was all good.  I also sprinkled a tiny bit of sesame seeds over top to make it look pretty, but that was totally unnecessary.  These things were gorgeous in their own right.

Try this recipe sometime… you’ll be amazed, just as I was, at the fresh twist you get from using turkey in such a unique way.

Leftover Recipe: Stuffing Waffles with Turkey Gravy

I’m always looking for a new and unique way to use leftovers, especially from holiday meals.  We seem to have extras of everything in the fridge, so I find it very exciting when a new idea comes around.  This recipe idea was one that my husband found and it really looked fun.  A new way to use my waffle maker other than just making waffles?  I’m IN!

I started by making the turkey gravy that would go on top of our dinner.  Basically, I reheated the leftover gravy from Thanksgiving and, using James River Cellars Reserve Chardonnay, flour, and chicken stock, I thinned the gravy out to make more and then added chunks of leftover turkey.  Once this was done, I turned my attention to making the waffles.StuffingWaffles&TurkeyGravy

I preheated my waffle iron and then sprayed it with cooking spray before starting.  Using a large cookie/muffin scoop, I put one scoop of cooked stuffing into the center of each quarter of the waffle iron and let it all cook for 7-10 minutes.  Seriously, it was that simple.  I didn’t add anything to the stuffing… it was already moist enough that it toasted up nicely in a short amount of time.  When the waffle was crispy, I turned it onto a plate, topped it with turkey gravy and added a side of homemade cranberry sauce.  It was a really delicious way to enjoy our favorite parts of Thanksgiving in a new and tasty way.

I hope you’ll try this way of making your leftovers into something different instead of just reheating the same meal for a few days in a row.  As yummy as that is, having a new and unique meal that incorporates your leftovers can be really fun.  Honest!

Wishing you a wonderful holiday season with lots of leftovers…

Recipe: TWELVE-Hour Turkey

My turkey recipe is very, very simple.  I start with the largest turkey I can find and I stuff it with as much stuffing as I can possibly get into the bird (inside the body cavity as well as under the skin wherever possible).  I do all this the night before Thanksgiving and then my husband (Thank GOD for that man) gets up at 3:30AM to put the stuffed bird into a 200-degree oven and we allow it to cook all day.  NOTE:  I do, at some point, have to turn the oven off and turn it right back on again because apparently there’s a fail-safe on my oven that doesn’t allow for the oven to remain on continuously for 12 hours.  At the end of the 12 hours, remove the turkey from the oven and allow it to sit on a carving tray for 10 minutes (tented with foil) while you make the gravy and give the meat time to rest and for the juices to redistribute.  Once you carve the meat off the bone, place on a tray and, if you’re not eating immediately, pat with bits of margarine, seal with foil, and set on the stove top to keep warm.

Here’s photos of my turkey, from stuffed to cooked:

I know this recipe is going to freak a lot of people out, but I felt compelled to share my turkey recipe with you all here on my wine blog.  While this recipe doesn’t traditionally use wine, you can easily add some to your stuffing liquid.  I’d suggest using the same wine (my preference is an Oaked Chardonnay)  that you use for much of your meal, for consistency’s sake.  NO need to baste – basting decreases the oven temperature every time you open the door and dries out your bird.

Extra Note:  I stuff my turkey before going to bed, put the turkey in the fridge, then it’s put into the oven at 4AM to begin the cooking process.  I have been told that this is not safe, but have never had a problem with it in any way.  You are more than welcome to decide to stuff or not to stuff your turkey, depending on your comfort level.  I also do not baste or brine the bird.  We haven’t found this to be helpful and it really does save a step.  I typically cook a 20+ pound bird and the meat is always juicy and flavorful, although I’ve made as small as a 12# bird and as big as a 28# bird.

I was given this basic recipe from Dawna, a woman at our church in Michigan who owned/operated a restaurant in the area and generously made a Thanksgiving dinner for the entire congregation each year.  Amazingly, this was the way she was able to bake so many turkeys for a noon meal for such a large crowd.  She shared this recipe with me before we moved to Virginia in 2000.

I keep the turkey in the oven and increase the heat to 350-degrees for the last 45 minutes to begin cooking the remainder of the meal.  See sample time table below:

Sample Time table for Thanksgiving Dinner at 4PMFeel free to adjust timetable for your dinner time.

  • 3:30AM: put turkey in the oven at 200-degrees – I don’t pre-heat the oven
  • Before Noon: make peas, sweet potato pie, prep potatoes
  • 1PM: start rolls, start making mashed potatoes
  • 2:45PM: form the rolls (roll into cloverleaf shapes, three dough balls per muffin cup)
  • 3:05PM: Oven goes to 350 degrees, peas go into oven (40 minutes) **This is usually when I turn off the oven and turn it back on again.
  • 3:15PM: pan stuffing into oven (30 minutes)
  • 3:30PM: sweet potato pie goes in (15 minutes), warm up the turnip casserole in the microwave (7-9 minutes) take turkey out of oven and put bird on platter (let bird sit for a good 5 minutes before beginning to carve, then cover platter with foil) *start gravy (I start gravy first so I’m not carving the bird too early)
  • 3:45PM: all out of oven – raise temp to 400 degrees and put rolls in to bake (15 minutes)
  • 4:00PM: Time to EAT!

This may be a rather unconventional way of making your Thanksgiving meal, but it’s become our favorite.  I’ve roasted a turkey in a paper bag slathered with butter… I’ve cooked the bird on a rack with veggies around it… I’ve followed the “4-hour turkey” recipe… in all cases, this recipe has surpassed all our expectations and resulted in a picture-perfect turkey, suitable for any special occasion or holiday meal.  For a photo of this ginormous bird, check out my Stuffing recipe… it shows you the turkey in more stages than I could here!

I wish each and every one of you a most blessed holiday season and thank you for your readership and participation in this blog.  Happy Holidays!

Recipe: Chardonnay Cristo Benedict

When I was in college, I did an internship at a local “big name” hotel chain, spending a few days in each department and then writing up my findings, coming up with ideas to make things work better (reinventing the wheel, if you will), and generally being “free labor” for whichever manager needed some extra hands.  While I wasn’t wild about some of it when I was there, I realize now that I learned alot of great skills… like cooking!

I spent about a week in the kitchen, helping out with chopping, cooking, breaking eggs, and learning how the chef ran his kitchen.  After a particularly busy morning, he gave me the task of learning how to make his Monte Cristo sandwich, which is kinda like a marriage between french toast and ham & cheese sandwich.  We’re playing with a variation on a theme, after the Croque Monsieur posting yesterday,  but I suddenly had a craving for something like this for my morning meal today.  I didn’t really want to deal with the possible mess of dunking an entire sandwich into an egg batter (I really do not like “ick”), so I went with the alternative plating this sandwich as an open-faced one…  Easy, peasy, right?

Thankfully, it was!

I started by making an egg mixture for the “french toast” portion of this sandwich.  In a small mixing bowl, I put some fat free egg substitutea glug or two of James River Cellars Chardonnay, two thumbs-worth of fat free sour creamsalt, pepper, and paprika.  I added the sour cream because usually there’s an addition of cream to an egg mixture.  It wasn’t going to be the same (hell, I was using wine in something usually reserved for breakfast) but this was my way of coming up with a new and different spin on an old favorite sandwich, like this or this.  

Chardonnay Cristo Benedict

Once my egg mixture was done, I took a piece of sourdough bread (remember the bread I used the other day for the Croque Monsieur?  Same stuff… still chewy and yummy.), cut it in half, and soaked the bread before pan frying in on both sides.  I removed it to a baking sheet (covered in foil cuz I hate cleaning those things.. duh!) and popped the deli turkey slices in the pan to brown on each side.  While I was frying the bread, I shredded some sharp cheddar cheese (again, the same cheese from the other day) and doused it with a small amount of the Chardonnay.  When I finished browning the turkey, I laid the turkey on the bread and then thoroughly drained the cheese before topping the sandwich.

While I washed up the dishes, I popped the baking sheet into a 375 degree oven for a few minutes until the cheese melted.  Re-using the saute pan, I fried an egg in a small pat of butter and cooked it quickly, over easy.  I could have used one or two poached eggs instead, but I didn’t want to dirty another pan.  I put the fried egg on top of the cooked sandwich and broke the yolk to simulate the “benedict” taste of this sandwich.
IMHO, the best part of making dinner at home is being able to play with recipes to make them my own.  Have fun!If you’d rather not use the egg, that’s perfectly fine… that’s what so fun about cooking at home and making your own meals.  Add, subtract, play, and enjoy!  I toyed with adding some cooked spinach to this sandwich… I could have swapped out the deli turkey for some deli ham… I could have added some grilled onions or changed the type of cheese.