Recipe: Taco Pasta Bake

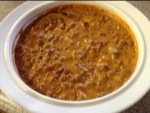
Are you looking for a quick and easy “go to” dinner for the holiday season that doesn’t involve turkey?  Are you stumped when it comes to making something for your family that everyone will eat without complaint?  If you’re like me and have a household of big eaters, I want to share one of my favorite dinners with you… a Taco Pasta Bake.

You may remember that I’ve mentioned my niece a few times – she writes a fitness and lifestyle blog called “Peanut Butter Fingers” or PBFingers?  She posted a recipe that my husband raved about… but he wanted me to make it “exactly like the recipe says”, which meant “no wine involved”… but what was the fun in that for me?  After mulling over the recipe for a few days, I came up with a version that could make everyone in my household happy… my guys (because they would get a dinner that tasted yummy) and me (because I could experiment and play with wine in my cooking).   I hope you find it as tasty as we do!

I started by browning a package of ground turkey.   If you can get away with it, this is where I would add diced onion and some diced green pepper if my family liked that Taco Pasta Bakesort of thing.  Once the turkey is nicely browned, I sprinkle the meat heavily with taco seasoning and a nice dry red wine (like James River Cellars’ Rad Red) and let everything cook until it’s nice and dark.  Next, I add some salsa and some more red wine so your food is a bit soupy.  At this point, I add in some dry pasta.  My hubby likes bowtie-shaped pasta, so I try and do things that he likes.  I’ve also made this recipe with jumbo elbow macaroni and it’s also tasty.

Now you need to cover the skillet and allow the liquid to be absorbed by the pasta… I know it’s hard not to peek and keep checking on the dinner, but try  and resist so the pasta has ample time to plump up and become al dente and just right.  If all the liquid gets absorbed and the pasta is still underdone, feel free to add more wine (or broth) and then allow time for the pasta to cook until it reaches the right taste for your family.

At this point, you have a few options.  If you’re ready to have dinner, feel free to serve this straight from the skillet.  If you’ve got some time, I would suggest putting your dinner into a casserole dish, spooning in (and on) some shredded cheese and then popping into a 350 degree oven for 30 minutes when you’re almost ready for dinner.   It totally depends on what you want to do… hence; this is a great example of using The Force when making your dinner.

I hope you try this recipe sometime and let me know how it turned out for you.  It’s similar to the mazetti recipe that my mother-in-law makes, with a tasty taco twist.  It’s simple… it’s easy… and it’s a recipe that you can adjust to please everyone in your family.  What more could you want?

Seriously…. what more would you want from a recipe?  Enjoy!

Recipe: Pumpkin Wine Brownies

Yup… you read that right… there’s pumpkin in these things.  PumpkinWineBrownies  If you can possibly get past the idea of adding pumpkin into something that is supposed to be a chocolatey, yummy treat, you’ll be pleasantly surprised at the results.  That is, of course, if you can get past the idea that you’re adding a vegetable into your treat.  Can you??

I was hungry for brownies last night.   I wanted to use some red wine in the baking process but I also wanted to experiment with making something yummy.   I’ve made brownie muffins using only pumpkin and chocolate cake mix (Hungry Girl, Lisa Lillian, calls them “Yum Yum Brownie Muffins”) but I wasn’t sure about adding red wine to the mix… so I experimented, I used The Force, and came up with this dessert.

I started with a box of brownie mix.  I poured in some red wine and then added a half can of pumpkin (that solid pack pumpkin stuff… not the “pumpkin pie mix” stuff) but it was still a bit too thick, so I added some more red wine to the mixture.  Once it looked smooth enough, I poured it into a 9 x 13 pan and baked it at 350 degrees for about 30 minutes.

See?  The Force in its truest form… helping me make dessert that tastes so good!

As always, when using The Force, I’ll tweak this recipe when I make it the next time.  I’m going to try making this recipe in a 9 x 9 pan so the brownies are a bit thicker (which means I’ll be cooking them a little longer).  I’ll probably find another box of brownie mix that I want to try, especially since this was the box mix that my darling hubby had picked up to make for his own work event.  I may even come up with some other crazy ingredient to add and see how it turns out.

Whatever I do, I’ll do my best to always share my experiments with you on this blog.  Isn’t that what writing a blog is all about?

Enjoy the experiments in life… they are what can make things fun, unique, enjoyable, and ultimately your own.

Take time to try different things and don’t be afraid of failing… sometimes its the failures that allow you to be the most creative!

Oh… and have a brownie!

Recipe: Pinot Noir and Black Bean Salsa Dressing

I was trying to make my lunch early this morning when I stumbled onto something pretty tasty. I’m generally not a fan of packing my lunch, but it really is the simpler option when I’m working at the winery. Bringing in something to heat in the microwave might seem easier, but since my meal might be interrupted at any moment, I really do like to have something that won’t spoil. A salad or sandwich is fairly quick to throw together before I leave but this time it became inspired.

I decided to put together a salad for today’s lunch. I cut up a head of romaine lettuce, sprinkled some freshly frozen corn kernels around and then spooned in a small amount of taco meat from last night’s dinner. I had pulled out the last of a jar of Spicy Black Bean Salsa that I had left in the fridge, but I didn’t feel inspired to create a multi-ingredient dressing. Instead, I pulled out a bottle of Acrobat Pinot Noir that I had left in the fridge… and that’s when inspiration hit me. What would happen if I added wine to the salsa?

It was nothing short of wonderful. 1/4 jar of the salsa, combined with about the same amount of the red wine and a packet of equal, became a fabulous concoction that was thick, without being too thick… Spicy, but not too spicy… In the language of The Three Bears, I had unwittingly created a dressing that was “just right”.

I would love to say that it was the most amazing thing I’d ever made, but that would certainly be overstating things a bit. It made a unique and “oh, wow” sort of flavor that blended with my salad ingredients beautifully. The lunch that I had grudgingly packed that morning turned into a meal that made me happy….and any meal that can do that for a person is one worth sharing.

Feel free to share my blog with you friends… Maybe my sense of whimsy in using wine for cooking will inspire others to make something new from the mundane. It certainly has livened up many of the meals in our household.

Wishing you all a renewed sense of the unique and the strange…. it can be quite tasty!

20121016-211428.jpg

Recipe: Mocha Wine Cupcakes with Nutella Frosting

This is my spin on a recipe that a friend posted recently.  After looking at it closer, I realized that it was a similar version of my favorite chocolate cake recipe (Althouse Chocolate Wedding Cake) that I’ve been using ever since our wedding in 1988.  I adore this recipe.  Since it’s a chocolate cake that uses oil and vinegar instead of milk, butter, and eggs, it’s an easy recipe to have on hand anytime.  I’ve made this in a 9×13, 9″ rounds, 8″ rounds, as well as cupcakes… it freezes beautifully and thaws just as well.  Simply put, this is the one chocolate cake recipe to keep on hand for any occasion.  NOTE: This recipe is a “half recipe”… if you want to make a 9×13 or two rounds, you’ll need to double this recipe.

MOCHA WINE CHOCOLATE CUPCAKE RECIPE:

Ingredients:

1 1/2 cups flour

1 cup sugar

2 t baking powder

1/2 t salt

3 T cocoa (Hershey’s cocoa works well)

6 t oil (I use vegetable oil, but have used olive oil)

1 T apple cider vinegar

1 t vanilla

1/2 cup coffee (I used espresso)

1/2 cup red wine (I used a Meritage, dry red)

Directions:

Mix ingredients together, spoon into cupcake tins, and bake at 375 degrees for 15 minutes.

NUTELLA FROSTING:

Ingredients:

6 T Nutella

4 cups powdered sugar

1/4 cup milk

1 1/2 t vanilla

Directions:

Mix together, using an electric mixer, until thoroughly smooth.

NOTES:

  • I have each of these ingredients on hand at any given time, so it’s easier than worrying if I have a cake mix in the cupboard.  I might not have all the ingredients for the frosting in my cupboard, but even pre-made frosting tastes pretty darn yummy when paired with this cake.
  • This is my very favorite chocolate cake recipe and I hope that it becomes one of yours as well.
  • The original recipe called for 1 cup of water instead of 1/2 cup coffee and 1/2 cup wine. I have made this recipe with water, with water/wine, with water/coffee, and with coffee/wine. I find that this recipe is pretty forgiving and tastes great in any form. 🙂

Recipe: Simple Chardonnay Dinner

I’ve been sharing this recipe with people for ages, but I thought I’d better get it down in type before I get too much grief.  Seems I have a few people who like to use this blog as a simple cookbook, so I want to keep everyone on the same “page” as it were.  I’ll try and get a photo of this dinner soon, but until then, you’ll need to use your imagination.

There are days when I just don’t want to have to think about how I’m going to throw dinner together when I get home.  I love to cook and be creative, but it’s nice to have a simple “go to” available if I’m not in the mood to experiment.  That’s where this recipe comes into play.

I always have frozen shrimp and frozen chicken (of some sort) on hand.  I also like to have those wonderful orange bags of Uncle Ben’s 90-second brown rice in my cupboard… and I will, as long as my local grocer keeps them in stock.  (Note to self: give grocery store manager the address of this blog so he knows how important that item is to keep in his available inventory.)  That being said, I can get a fairly simple dinner done as long as these main ingredients are available to me.

I start with either frozen shrimp or frozen chicken.  I thaw whatever I’m planning to use, and for simplicity’s sake, let’s pretend that I’m using shrimp for dinner.  Once I remove the shells from the thawed shrimp, I spray my saute pan with cooking spray and cook the shrimp to a hard sear on both sides, until they’re pink and just cooked.  I then remove the shrimp to a plate and cover lightly with foil to keep warm.  (Note:  if I’m using chicken, I use skinless, boneless chicken and cut it into thin enough pieces to cook about as quickly as the shrimp does in this recipe.)

Next, add 1T margarine and 1T flour to make a roux.  Allow the roux to bubble and cook the flour a bit – this mixture should turn slightly brown and toasty.  Add Chardonnay, along with a bit of chicken stock to make a sauce. I tend to add the wine first, then add some stock and taste the sauce before continuing. (NOTE: I like to use an oak-aged chardonnay but any tasty stainless Chardonnay is also stellar in this recipe.   Use something you enjoy drinking – if the wine is too salty or not flavorful enough, you won’t enjoy the sauce you create.  Add enough wine to make a sauce that is to your liking.)  Take time to allow the flour to thicken the sauce as it cooks and don’t be so impatient that you add too much liquid… adding flour at this point is when you’ll get little flour lumps as it’s difficult to incorporate  thoroughly.

Once you have the sauce completed, replace the shrimp in the sauce and add a little touch of parsley or a fresh herb of your choosing.  While your shrimp are soaking up the flavors of your sauce, pop a bag of 90-second rice into the microwave and use to plate your dinner.

You can add a crisp green salad, bread, and a vegetable to this dinner if you so desire, but I find that the simple dinners are best served simply.  Let the food shine and enjoy the accolades that accompany such a delicious dinner.  If someone feels compelled to thank you by doing the dishes, so much the better, right?

Enjoy!

Recipe: Mexican taco cheese dip

I had to bring an appetizer to work… and I work at a winery…. so I needed to come up with something yummy. I also needed to come up with a dish that could be made quickly and warmed up later. Jeez…. So many parameters within which to work. Could I do it??

Over the years, I have found that people who love wine seem to also be people who appreciate tasty food, so sharing something with them needed to be great. My darling hubby had pulled a package of ground turkey out of the freezer earlier, so that’s where I started.

I browned the package of ground turkey until it was toasty brown. I could have added onion and garlic, but I was a bit pressed for time this morning. Once the meat was thoroughly cooked, I liberally spread taco seasoning on top and then added the quarter bottle of Cabernet Sauvignon that was resting in my fridge. A few more minutes in the pan was all it took to turn plain turkey into a spicy concoction worthy of a finicky foodie, such as myself.

My next step was to add some salsa. I poured from the jug (yes, generic and mild, I admit it) and mixed until well incorporated. The last addition was a package of Velveeta cheese. This stuff melts extremely well and handles reheating beautifully, so it was the perfect “go to” for this treat. I popped my dish into the microwave and heated it up, minute by minute, until all the cheese was melted.

Tasting it was a delight… Unfortunately, it was only 11am and I wasn’t going to serve this until after 6pm. Thankfully, the ingredients I used here are very forgiving. My dish warmed up well in the winery’s microwave, I served it with some scoop able tortilla chips, and had nothing left to bring home.

There’s something so satisfying about bringing home an empty dish. Try this recipe for your next get together and see if you don’t have the same great result!

20120924-222808.jpg

Recipe: Chicken Cassoulet

Here’s an easy recipe for Cassoulet that I’ve adapted from Weight Watchers… and included wine.  This was our dinner last night and it got rave reviews from my favorite taste testers (my family).  Since I use The Force when I cook (do I sound like a broken record, warning everyone about this?), the amounts are approximate and will vary depending on the foods you prefer and what you have on hand. 

Start by preheating your oven to 350 degrees.  You’ll start this recipe on the stove top and then allow it to cook for about 30 minutes or so in the oven, so go ahead and get this ready.  If you’re doing the first part early in the day and planning to cook it in the oven just before eating, the only thing I would change would be to add an extra 15 minutes to the baking time before you serve it.  Mine baked a little too long, so it’s pretty dry, but that’s the way my guys like it.

In a Dutch oven (or large skillet with a lid), brown 8 boneless, skinless chicken thighs.  The original recipe calls for bone-in thighs, but my family prefers to not deal with bones whenever possible.  I do this in two stages and remove them to a plate as they brown.

Add diced Canadian bacon and saute until browned and crispy.   Add sliced baby carrots (I used about 2 cups), sliced celery stalks (I had some celery sticks that needed to be used, so I went a little overboard on this one, but I don’t believe it hurt the dish at all), and a diced onion (the recipe actually calls for leeks, but I forgot to get this at the store and I always have onion on hand), and cook until the veggies are soft and a little toasty, stirring frequently to distribute the small amount of fat left from the bacon.  Add 2 cans of cannellini (white kidney) beans (drained slightly), a half bottle of James River Cellars Pinot Gris  (I had this on hand… next time I’ll use James River Cellars Reserve Chardonnay), a packet of chicken broth seasoning, water (I used a coffee cup’s worth), 3 bay leaves, and some lemon thyme (from my friend’s garden).  I then allowed all the flavors to combine and brought the dish to a slow simmer.  Return the chicken thighs (and collected juices) to the pan and nestle the meat among the vegetables.

Baking your dish: Here’s where you can take a break, if needed.  I actually put the lid on the Dutch oven and let it rest on the stove top for about an hour at this point.  M wasn’t due home for a bit and I knew dinner wasn’t going to need to be ready for a few hours.  If you’re making this immediately, pop the Dutch oven (with lid on) into your hot oven and allow to cook for an hour.  Since you’re not using bone-in chicken, you can decrease the baking time a little.  Do realize that if you’re making this using bone-in chicken, you should bake it for 1 hour and 30 minutes.  If you’ve taken a break and are bringing it back from “cool”, I would bake for 1 hour and 15 minutes, but this part isn’t exact.  Check your dinner and decide for yourself when the meal is cooked… the meat will be falling apart and the sauce will be thickened to your liking.

Remove the pan from the oven and discard the bay leaves.  If you so desire, take a coffee cup’s worth of sauce (without meat) and process it in a blender until smooth, then return to the dish and stir.  I totally skipped this part because my guys were “starving”, but this is a nice touch.  You can also use a stick blender and just pulse it a few times near the bottom of the pan, staying away from any of the chicken.

Remember to always use a wine that you would drink… there are tons out there that don’t cost a small fortune and are worthy of cooking.  I always have James River Cellars wines on hand, so I tend to lean toward using those.    This is one of my favorite cold-weather dishes and I hope it will become one of yours as well.

Cheers!

Recipe: Chicken Prosciutto Roll

Pairing a cheese and a wine can sometimes be tricky, but it can be a really beautiful thing if you pair Bourcin’s garlic and herb cheese with James River Cellars’ Gewurztraminer white wine. This particular Gewurztraminer is done Alsatian-Style… off-dry and floral but with a slight citrus taste. It’s great with Szechuan foods and tastes fabulous in/with this recipe.

Again, this is a Use-The-Force recipe. For each serving, use a very thin chicken breast (or a thin piece of veal), lay a piece of prosciutto on the chicken and top with Bourcin cheese (be as liberal as you’d like… this is why I say you’re using The Force). Roll the breast, secure with a toothpick, and sear the roll in olive oil on all sides until nicely browned.

At this point, put the lid on the pan and allow the meat to cook thoroughly. While your dinner is cooking, pop a package of brown rice into the microwave (use whichever brand you like best) and cook according to package directions. When meal is almost completely cooked, remove the lid and add Gewurztraminer to the pan to lift up bits of the cooked cheese and turn it into a sauce. If the sauce seems a little thin, feel free to add a bit of flour or a spoonful of cheese and cook until it thickens to your liking. You can also add a small amount of butter to add some gloss to the sauce.

You’ll want to serve this over the brown rice, with a simple green salad and a glass of Gewurztraminer. I added green beans, wrapped in the remaining prosciutto, and roasted until just cooked. Simple, yet elegant… especially if you love the Gewurztraminer from James River Cellars!

20120904-173220.jpg

Recipe: Chocolate Wine Cobbler

ChocolateWineCobblerI originally found this recipe on the side of my Facebook account. It looked yummy and was called “Chocolate Cobbler”. It showed up in my FB feed when I was looking for a new dessert and this just looked simple and tasty. For me, the plus came when the recipe called for “boiling water”… wait… water? What? Why use boiling water when I could substitute wine… and a new recipe was born. After trying this recipe a few times, I’ve finally been able to get a picture of this treat so you can see just how yummy it can be. Oh, and you’ll notice that there are exact measurements in this one because I didn’t use The Force…

INGREDIENTS:

2 sticks butter or margarine (I used margarine, because that’s what I had on hand)

BATTER:

1 1/4 cup sugar

1 1/2 c self-rising flour (or use 1 1/2 cup regular flour + 2 tsp baking powder + 3/4 tsp salt)

1 tsp vanilla

3/4 cup milk

CHOCOLATE LAYER:

1 cup sugar

6 Tbs cocoa powder

WINE LAYER:

2 cups boiling red wine – I used 2 cups of sweet red wine *Note: this tastes perfectly fine with boiling water instead if you so choose.

DIRECTIONS:

  1. Preheat oven to 350 degrees. In a high-sided 9×13 baking dish, melt the two sticks of butter in the oven
  2. Meanwhile, in a separate bowl mix together the ingredients for the batter layer. Once the butter is melted, pour the batter over the melted butter but DO NOT STIR.
  3. In a clean bowl, mix together the ingredients for the chocolate layer. Sprinkle on top of the batter but DO NOT STIR.
  4. Pour 2 cups of boiling wine gently on top of entire dessert (again… DO NOT STIR) and bake for 30-45 minutes. I bake mine until I can see a nice golden brown crust.
  5. Serve warm – this is great with ice cream.

I served this dessert at our company Christmas party and it was a huge hit. If you want to substitute boiling water for the wine, that’s completely fine. I would use anything that you like, but I’d suggest using a red wine that cooks well. I find that red Bordeaux varietals (Cabernet Franc, Cabernet Sauvignon, Merlot, Malbec, and Petit Verdot) cook nicely and maintain their integrity throughout the process.

Enjoy! I’ll be adding a little bit of vanilla ice cream to each serving tonight, but I can’t think of anything more comforting than wine paired with chocolate…

Recipe: Wine for Dessert

There are some really wonderful dessert wines out there.  Have you taken a moment to taste them or do you pass by this unique offering in favor of something you think will be less like “sugar-overload”?   While I’m not a huge fan of the uber-sweet, I do enjoy using them for cooking or sipping after a meal.  They aren’t something I would typically choose to drink, but I certainly try everything offered when I’m on the tasting side of the bar.

One of my favorite dessert wines is Noche from Cooper Vineyard in Louisa, VA.  Here’s their description, as quoted from Cooper’s website:

Noche Chocolate- Silver 2012 VA Governor’s Cup, Silver Atlantic Seaboard Wine Association. A Virginia Norton dessert wine infused with chocolate, Noche is a decadent treat. Hints of black cherry and raspberry complement rich aromas of cocoa with a chocolate ganache finish.

I used this wine for a dessert I made a few months ago and it’s just wonderful.  I started by making a Noche Reduction.  Using the entire bottle of Noche, I cooked the wine until it had reduced by half, until a spatula left a slight line when drawn across the bottom of the saucepan., stirring frequently.  I then added about a thumb (“The Force” at work) of butter and a spoonful of sugar or so.  I also added a tiny dash of vanilla, more to satisfy my thoughts that I was actually “cooking” instead of just throwing stuff in a pot.  I allowed the sauce to simmer a bit until the sugar and butter had melted and been thoroughly incorporated.  Once this was done, I removed the pan from the stove top and waited (impatiently) for the sauce to cool thoroughly.

Once cooled, my new sauce was ready for use.  I decided to make a Hot Milk Sponge cake, cooked in a Baker’s Secret pan that was made to look like a cross between a trifle and a pie… it’s apparently called a Duncan Hines’  Tiara Dessert pan.    The sides are fluted, there’s a high edge and then a lower cake level so you could put “something” on top of the cake and not have it dribble over the edge.  If I remember correctly, they marketed this pan for use with a thick pudding mixture you would pour in the center and then top with whipped cream.


For this specific dessert, I made the Hot Milk Sponge cake (only a half recipe was needed), cooled the cake, then filled the “inside” with frozen whole cherries before drizzling the sauce over top.  Dusting it with powdered sugar was all I needed to make the dessert look magical.  While it was beautiful, it wasn’t the easiest to cut… the next time I made this dessert, I topped the entire cake with whipped topping before drizzling the sauce, thereby allowing the berries to remain in place and giving some height to the dessert.  Either way you decide to make it, this sauce was a knockout.

If you’re looking for an easier thing to do with this sauce, just slice pound cake (you can pick it up in the freezer section of your local grocery store), top with fresh fruit, and drizzle with sauce.  Simple and delicious!

An even easier option would be to drizzle the chocolate wine (sans cooking at all) over ice cream or pound cake or angelfood cake or…  you get the idea, right?

Using The Force when you create desserts can be a lot of fun.  Try to imagine the taste of what you’re creating and then see if you can break that taste down into ingredients.  Even using a store-bought chocolate sauce and adding some of Cooper’s Noche to thin it out can take your dessert to a whole new level.

Eating wine for dessert instead of drinking it… quite a different concept, yes?  Enjoy!